Saturday 10 December 2011
Lamb
We have our first little dorper lamb to mummy Jean. She is so very cute and likely to be so very yummy.
Jean is being such a great mum, looking after her so well. Was rather difficult to get this photo.
Now dorpers are suppose to be all white or white body and black head. This poor little lamb is a bit back to front. There are high chances of her lambs also being the wrong colour, keeping her and selling off her lambs may be difficult as she is not a colour people want. Just selling her may work, someone may want a little cutie lawn mower. Otherwise she will create a yummy dinner. After all we did get the sheep to grow our own meat. Knowing what our meat has eaten, the life it has had and knowing it has not been to the abbatoir will make for a much more enjoyable meal.
Monday 21 November 2011
Frog bread
On our diet we can only use natural coloured food dyes. Things rose oddly and so my frog bread was far from idea. Hmmm I would like to try it again one day though.
ETA: the recipe I used no longer exists on the web so the link has been removed and a picture added instead. It was just a regular bread dough recipe so whatever you normally use just add food dye.
Saturday 12 November 2011
Chicks
We have our first little baby chickens. Such a cute little things. We didn't have great success with our first attempts at an incubator. Only 6 chicks hatched a handful others were very close, I am sure I even heard some of them piping but the temperature changes were just too great for the poor little things. But we still have 6 little cuties to play with.
The breed is Plymouth rock. They are a large breed. Good layers and good for meat too.
Friday 28 October 2011
Ducklings
We decided we would do a bit of an experiment with this broody duck. Since we have chooks who do not go broody and we have ducks who are broody all the time. We popped some chook eggs under the mummy duck then a couple of duck eggs later on. All went well till right at the when every baby chick died in shell. They were fully formed and grown but something went wrong. After a bit of research we think that since the mummy duck got wet then sat on the eggs a bacteria got in and eventually killed the little chicks.
We did though get two very cute ducklings from her. She was not a vey good mum though. Wouldn't call the babies in at night or get them out of the rain. Will try an avoid brooding with her again.
Saturday 15 October 2011
We have sheep
Our journey to self sufficiency continues we have sheep. I am so crazy excited. This may sound cruel and heartless but I cannot wait to eat our first lamb. We have 4 ewes, 1 ram and 1 lamb.
We decided on getting dorpers so we will not have to shear them. Well that is the plan as two of the four ewes are only 1st cross and are likely to need some shearing. They are all pregnant which is very exciting. They run with the ram and come into heat regularly. It is anyones guess as to when we will get our first lamb.
They are already playing reasonably friendly and will come relatively close to us to get some special feed treats.
So far the names we have are Dee and Jean for the ewes, Becca lamb and Bone the ram.
Wednesday 12 October 2011
The winter prune
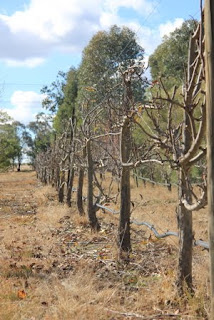
Over winter we had around 200 fruit trees to try and prune. Needless to say we FAILED. We had 2 weeks over the winter school holidays to try and get it done. And it rained the first week. But we did succeed in getting the apples and pears completed. It was by far a huge learning curve. Neither of us have pruned fruit trees before so we were out there with the book trying to check we were cutting the right bits off.
After about 5 trees we just started hacking randomly. It was going to be far too much work being so precise. the picture above is just one row of our espaliered apples. Below is the end result of our work. I did most of this with Immali wrapped to me all snuggled and warm and sleeping. I so wish I had a photo pruning with her but I don't.
we left the other half till Spring holidays. But again it rained and we could not find the motivation to get it done.
Next year we need a new plan and a system to get the whole orchard pruned ready for fruiting.
Wednesday 28 September 2011
Teepee
The kids were bugging me while I was trying to prune the trees. Kept grabbing sticks and fighting and just plain being young boys. So to redirect that energy I lashed some of the pruned branches together, threw an old sheet around it and voila teepee fun and I could finish my pruning.
Tuesday 30 August 2011
Reusable snack wraps
Just wanted to share my funky new creations. Igloo will be starting preschool and to save on wastage I have made him some awesome little snack wraps and pockets. One set of just cotton, one lined with PUL.
He is going to have the best dressed food at preschool.
Sunday 28 August 2011
Burrowing frog
Not really what you expect to find as you dig the veggie garden beds. A burrowing frog decided to make our vegetable garden home. Damo accidently dug him from his slumber. I think he is rather good looking.
Sunday 17 July 2011
Ducks
But best of all we have duck meat. It has been a learning curve for us both. Damo has had the task of learning and to slaughter and pluck a duck. Sadly the plucking is just not working out for him so they were skinned. Hopefully we can find someone who is willing to teach us how to pluck the feathers off a duck.
For me I am needing to learn how to cook duck. My first attempt was very touch. My second was so very yuck, I tried cooking it in the slow cooker in some plum chutney. I just used far too much chutney. My third attempt was a roast and it wasn't too bad.
Friday 27 May 2011
Baby feet
Monday 4 April 2011
Perennial Leeks
When we moved here I dug up the leeks and brought them with us. Normally they keep growing as usual but this summer they seemed to die down to bulbs which made moving easier. I planted them out in one of the vegetable gardens. The picture below shows some of the leeks I have planted.
Perennial leeks - very hardy |
As all leeks apparently do, they grow rather slowly. But these ones multiply fast. I have let some plants flower but they have never produce viable seeds for me. By the time a large leek is ready to be dug up and eaten it will have numerous smaller leeks ready to take its place. If you divide the babies off they all grow large and start to multiply, if you do not divide them they keep growing but are much smaller.
The picture below shows a larger leek in the background, with many smaller leeks in the foreground waiting to be divided. As you can see the lack of viable seed is not a problem whatsoever.
Like all the vegetables that I have got online I had hoped that these would do well and would eventually pay for themselves in one way or another. Some things have paid for themselves by reducing the amount of groceries we have to buy, others such as yacon pay for themselves by being sold. The leeks certainly have been hardy and generous plants and have grown and multiplied well. After seeing the prices for leek in the supermarket I know that they have paid for themselves several times over just from what we have eaten.
Since writing this I have grown some regular leeks and have written a post comparing these with perennial leeks here
I do sell perennial leek plants as well as some other perennial vegetables, herbs and some vegetable seeds, please see my For Sale page for details.
Friday 25 February 2011
Big boy bike
Sunday 20 February 2011
Apples
The variety you get with homegrown organic apples are amazing. Above is our biggest and littlest apple together. Then just the littlest one to give perspective of size.
It was the cutest littlest most sour apple ever.
We have unfortunately lost a lot of our apples to coddling moth and even fruit fly. It is completely heart breaking throwing out kg's of fruit every day.
We need to try and figure out how to manage these issue organically. Hopefully we can and fast. Once we have chooks and ducks free ranging the numbers of these pests should be significantly reduced.
Wednesday 26 January 2011
More preserving with one working hotplate.
Last night Damo and I decided we should sort out the second bucket of plums. The morning saw us fill the 5 tray dehydrator with plums, most of which are ready just the last few still in the machine. Then once it cooled down last night we tried to tackle the rest. With a pot big enough to only fit 5 jars we still had a good few dozen left (plus today's bucket worth). You will notice that there is only one pot on the stove, this is because there is only one working hotplate on the stove. Makes thing difficult and we could only cook one thing at a time and it all just took forever.
But last night we made Plum Chutney it was getting rather late so I did not reduce it enough creating more of a sauce, but it is still yummy and I think will work well in a chicken stir fry. Do wish we had some smaller jars for it though so I could have preserved in one meal quantities. Recipe below.
We also made some plum and apple sauce. Now this one tastes like store apple sauce but with a background flavour and tang of the plums. It is really super nice. Once again tiredness kicked in and we created a chunky sauce as neither of us could be bother to blend it or push through a sieve. We can always do that when we use it if we want. Recipe below. We ended up with about 550g apple and same of plum and used 800g sugar and about 350ml of water. I also threw in a 1/4 teaspoon of citric acid (I am just a little terrified of poisoning the family right now). I did cook for less time so it didn't reduce too much as I wanted more of a sauce than a jam, I had trouble finding a simple plum and apple sauce recipe.
Plum Chutney
Recipe Ingredients
900g / 2lb plums
1 large onion
200g / 7oz raisins or sultanas (optional)
450g / 1lb brown sugar
570ml / 1pint malt or cider vinegar
1 thumb / 3cm ginger
1 Tblsp cinnamon
1 Tsp nutmeg
8 cloves
2 tsp salt
Mise-en-Place:
Sterilize the jars and lids with hot water and a kitchen sanitizer spray
(Or the old school method is to wash the jars then heat to 100°C - 120°C for 10 minutes in the oven)
Cut the plums into quarters (or if very large into eighths)
Slice the onion
Weigh the sugar and measure the vinegar
Roughly chop the ginger, measure the remaining spices
Cooking Method:
Place all the ingredients into a saucepan
Rapidly boil until thick (about 30-45 minutes)
Stir from time to time to ensure that the chutney doesn't stick or start to burn.
To test if the chutney is thick enough rapidly draw a ladle across the bottom of the pan, if you can clearly (yet briefly) see the pan's base before the chutney flushes back into place the chutney is done.
If not continue to thicken the chutney by boiling.
Check the seasoning, remove and discard the cloves and sliced ginger.
Pour hot, but not boiling, water into the preserving jars (this is to heat the glass so that it doesn't crack when you add the hot chutney)
Remove the water then pour the plum chutney into jars.
Seal and label.
Adjust:
Its quite difficult to get a real taste of a chutney's flavours while it is still hot. Once the chutney has cooled the flavours will develop and the longer you age the chutney, again the greater the flavours will develop. However if a chutney tastes quite bland when hot, this is an indication that the final product will also be quite flavourless.
Too bland: Add more spices / or salt
Too thin: Continue to heat the chutney until it thickens
Too thick: Add a little water
Chef Tip:
If you don't have a funnel roll up a non-stick baking mat into a cone, then use this to easily pour the chutney from pot to preserving jar.
http://cooking4chumps.com/Chutney%20Plum%20Recipe.html
Homemade Plum and Apple Jam
3 1/2 cups (750 g) apples (peeled and cored)
450 ml water
1.5 kg sugar
method
2. Cook the fruit slowly until the skins of the plums are softened.
3. Add the sugar, stir over low heat until dissolved, bring to the boil and boil rapidly until setting point is reached.
4. Remove the stones as they rise to the surface (a stone basket clipped to the side of the pan is useful for holding the stones, and allows any liquid to drip back into the pan).
5. Alternatively, the plums may be stoned before cooking.
6. Remove from the heat, skim, pot, cover, and label.
Cooking time 45 minutes (approx)
http://www.cookitsimply.com/recipe-0010-032o55.html