Friday, 26 April 2013

Alpaca Cria


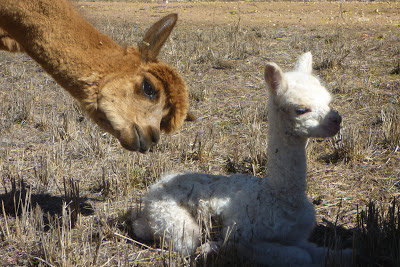
Our first alpaca cria, born 08:00 April 25 2013

This little girl is still a little wet as she is less than 2 hours old in this picture

Big sister having a look


Mum having a good look, must be an interesting little one!

Sure is dry out here

drinking some milk

Monday, 22 April 2013

Glass Bead Corn


When I was younger we used to grow some beautiful multi coloured corn, as a child I loved the stuff, it was inspirational and looked amazing.  As a child I would carefully save seeds each year and only plant the most amazing ones, every year the resulting cobs were far superior to their parents.  
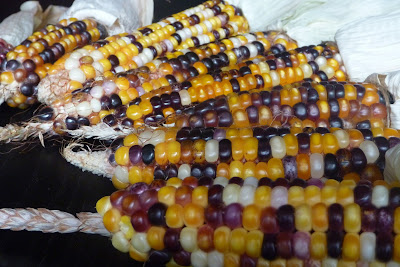

glass bead corn
While not the best photo of the Glass Bead corn you can see some of the different coloured and spotted seeds

After doing some research it appears that each colour has a different nutrient profile and pretty much every colour other than white is better for you than the usual yellow colour.  In Australia we pretty much only see yellow corn, in Africa they only see yellow corn when they are starving and foreign aide comes in, other than that they predominantly grow white corn as they see yellow corn as a famine food, native people in the Americas who originally domesticated corn grow a multitude of colours.

After moving here and having a little extra space I wanted to track some coloured corn down again to grow for cornflour as well as animal feed.  Nowhere had it listed for sale.  I emailed all of the seed companies that used to stock it and they all replied saying that they no longer stock it.  I then emailed a few seed saver groups to ask if any of their members had some that they were willing to sell me, the replies ranged from "we do not save seed, we only buy bulk heirloom seed to distribute to members" to "we do not sell seeds, please google heirloom seeds and leave us alone".  Further research showed that many of the corn varieties that I used to grow are now extinct in Australia.  This is rather worrying as corn seed not be imported into Australia easily.

After much searching and asking around I found a lady in Western Australia who had several varieties of multi coloured corn.  She had one variety that she called "glass bead corn" that she had selected from the prettiest seeds from the best cobs of an Indian corn that she had.  She claimed that some of her cobs looked similar to the glass gem corn that you may have seen on the internet.  I ordered two packets of these corn seeds, one to grow and one as insurance in case I lost the crop and had to replant, and eagerly waited for them to arrive.

Not my picture unfortunately, but many of my cobs had coloured silk like this


When the seeds turned up I was a little disappointed, there were 60 seeds in the packet and only 10 of them were anything other than yellow.  Some were nicely coloured, some had a single coloured spot on them, but most were just yellow.  I know that the yellow seeds carry hidden genes for colour, but I had hoped for a few more coloured seeds in the mix.  I carefully planted the seeds out in a way that would maximise the coloured pollen landing on the yellow cobs and hopefully would result in a lot of coloured cobs.  
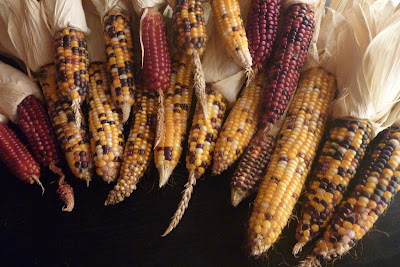
Glass Bead Corn - huge array of genes at play here

Then the birds came, they scratched through the garden and kicked mulch everywhere.  I was not certain if any of the seeds were left in the soil but I continued to water them, to my surprise most of the glass bead corn seeds had not been eaten and they germinated for me.

Glass Bead Corn
I am no photographer, this is the most beautiful cob in real life but looks ordinary in the photo

The corn plants themselves were remarkable, they have a lot of genetic variation which means that this strain is not overly inbred and should adapt to various climates well.  They survived an extreme summer here by growing to a height of between 2 and 3 metres tall.  We had no rain, extreme heat, and high wind, some plants were blown over or even snapped by the wind, but overall they all grew very well.  We had also grown a packet of sweet corn, only one single plant survived to maturity as the conditions were too harsh this year, that highlighted the strength of this amazing strain of glass bead corn.

As the plants grew some of the leaves were variegated, some of the stalks were bright red, some of the pollen bearing tassels were purple or red, some of the silk was red or purple or yellow, even some of the sheaths covering the ears were coloured, on top of that most plants were producing two large ears of corn, I had a good feeling that I could turn this corn into something great.  Next year I will have to try and remember to get some pictures of the plants as they are growing, some of them would not look out of place in an ornamental garden.

glass bead corn
Corn was traditionally grown with a multitude of colours - this is more of our Glass Bead Corn
You can see some of the spotted seeds of the glass bead corn

After harvest I had some beautiful cobs as well as some mediocre ones.  When people see these cobs they are amazed by the colours and patterns of the seeds, there are yellow, white, purple, pink, red, orange, black, brown, striped, spotted and even marble swirled coloured seeds on each cob.  It is not quite as good as the ones I grew when I was younger, but I plan to eat all the substandard cobs/seeds and only plant the best, this way it will only take a few years to turn this into something truly amazing.

These are a dark red/coffee colour with a few black seeds in real life - Igloo's favourite
I will probably sell a small amount of the Glass Bead corn seeds in Australia each year.  These are non-hybrid, organically grown, open pollinated and non GM seeds.  There will be some yellow seed in each packet as well as a mix of colours, these yellow seeds will all carry recessive genes for a multitude of colours and patterns and besides that cobs look nice with a small amount of yellow mixed through.  I will put details on my "for sale" page so that you can contact me.

glass bead corn
Glass bead corn - not too shabby considering the conditions it survived


Friday, 30 November 2012

How to Grow Perennial Vegetables

Growing notes for Perennial Vegetables - Plant Once Harvest Forever!


This is my growing notes page, for my "For Sale" page please click here, for a list of vegetable days to maturity please click here.

I used to grow some amazing vegetables when I was a teenager, when I left home I lost most of them.  Slowly I am tracking them down again and now have a rather eclectic range of vegetables which I sometimes sell for other people to grow and enjoy.  Some of these vegetables are on the brink of extinction in Australia, others are far more common, regardless I have found them all to be valuable, productive and worth saving and distributing.

I offer to provide growing notes to people for the plants they buy from me, but after cut and pasting emails I think that making a list of growing notes here and linking to them is probably a better way of doing this.  I plan to put in some more growing notes when I have time, if there is anything that I have sold you that is not covered please let me know and I will email growing notes through to you.


How to Grow Water Chestnuts (Eleocharis dulcis)

Water chestnuts need frost free warm weather to grow properly.  While technically they are a tropical plant (just like the tomato) they can and do successfully grow in cool climates such as Canberra.  If you buy corms in the cooler months store them in damp soil somewhere dark and safe until Spring.  Please check on them from time to time to ensure they are not rotting, they should be firm to the touch.

When planting water chestnuts the biggest mistake people make is rotting them.  If you put the corms under water and they do not have any leaves above water they will drown and rot.  They need leaves to be out of the water as they use them like a snorkel.  I start them in a punnet of moist but not wet soil, just like any seedling.  I normally do this towards the end of the frosty months and keep it under cover somewhere as they do not like frost.  

When they have sprouted I put the punnet so the bottom half is under water and the top half is in the air.  This way they have a lot of water but the corm is still above the water level.  When they are about 10cm tall I pull them out of the punnet, separate them and plant them in their proper home which can be anything from a 10L bucket to a swimming pool.  I fill that with water so that only just the tips of the leaves are poking out of the water.  From there the plants get a lot taller and I keep that water level as constant as I can until they die down in Autumn.  After the water chestnuts have died down I let them dry off for a few weeks prior to harvest.


You will get a huge yield of corms from each one you plant, the further you space them apart the larger the corms they will produce.  I am told 1 to 2 square meters per corm is adequate, but I don't have that kind of space.  If you crowd them they will produce masses of tiny corms that are too fiddly to bother eating.  These tiny corms can be planted the next year and will produce huge yields of large corms if given the room to grow.  The better the soil the better they will grow.  I have put more comprehensive notes on how I grow them in buckets on my water chestnut page here.


How To Grow Perennial Leeks  (Allium ampeloprasum)

When posting these I trim the leaves, wrap in damp newspaper and put into a zip lock bag, I have found that by doing this the plants undergo less stress and grow faster.  They do sulk a little after being replanted, but if you give them a lot of water they pick up pretty fast. 

You will need to plant them deep to help them produce long white shanks and water them a lot to get them established.  Once established they will survive with minimal watering but will produce best with regular watering.  We normally plant about 10cm apart, if you plant them closer they will still grow but will not get as large, if you plant them further apart they will grow larger.  Frost is not a problem for these and if it gets too hot and dry they may die down to odd little bulbs and reshoot when it is cooler.

Harvest them when they are the right size for you, some people eat them when they are tiny others when they are large.  When you harvest they should have multiple babies growing that you can replace them with.  In the early years to help build up numbers you can cut off the roots with a few mm of shank attached, if you put this in a jar with a little water it will reshoot and can be replanted.  Sometimes they will send up a dozen shoots, other times only 3 or 4.

They do not often produce viable seed so I normally try to cut off the flower stalks so they can put energy into growing.  If they flower the pollen may cross with other leeks so be careful if seed saving other varieties (apparently the offspring will not be as good as either parent).  I have had viable seed produced once after floods and odd weather.  Those flower heads also produced tiny leeks on the flower stalk as well as seed.  I have planted both but have not had them long enough to see if anything useful results from them.  If either are exceptional I will keep them separate from the regular perennial leeks and offer them.


How To Grow Babington's Leek (Allium ampeloprasum var babingtonii)

I have gone into a bit of detail on how to grow Babington's leek in a different post.  They will grow much like any other leek.  The closer together they are planted the more competition they have and the smaller and slower they will grow.  As I have wanted them to grow as fast as possible I give them up to 20cm between each plant.  Planting them as close as 5cm between each plant will still give you a crop, but they may take a few extra years to flower and they may never develop thick shanks.


How To Grow Giant Russian Garlic (Botanically this is a type of leek and not a true garlic Allium ampeloprasum)

This plant is botanically a leek, but used in the same way as garlic, it will grow and produce well in areas where garlic normally will not survive.  Heavy frost is not a problem, nor is dry heat, or humid heat, this plant survives a lot of neglect but produces best when taken care of, weeded and well watered.  Frost is not an issue for these and it makes the taste stronger, and they tend to die down around Christmas so are not too water hungry.

Generally planted around the shortest day (June 21) and harvested around the longest day (December 21) but does fine if planted a few months either side of these dates.  I have planted cloves that are over 18 months old and they have performed just as well as the fresh cloves. 

I normally plant them about 3cm deep with the pointy end up (if planted upside down they may die), and about 15cm apart.  If you plant too shallow they will work it out, if they are too deep they may not have enough energy to grow to the light.  In the future if you cannot remember which way up to plant, plant them on their side and they will sort themselves out.

Russian garlic has a slightly different life cycle than regular garlic.  If you plant a single large clove, in a growing season it will generally grow into a large bulb made of 5 or 6 cloves with a heap of hard bulbils growing underneath the bulb as well as a large purple flower head made of hundreds of flowers.  The bulbils may or may not grow if planted; if they do grow they mostly grow into a large single clove about the size of a ping pong ball called a "round".  Small cloves also generally produce a single round instead of a large bulb.  If you plant the round it will usually grow into a normal clove of 5 or 6 large cloves.  I try to plant a mix of small cloves, large cloves and rounds each year.  With that said: some years we get mostly rounds, some years we do not get any.

Harvest plants after they die down around Christmas time.  The flowers are said to be sterile, but they are not.  I normally cut the flower head off after the plant dies down and leave it on the soil somewhere.  Out of the thousands of seeds each flower head produces I normally have 2 or 3 plants sprout up.  As far as seed saving goes they are not meant to cross with any other alliums so should not give you any problems.


How To Grow Yacon (Smallanthus sonchifolius formerly Polymnia sonchifolia)

Yacon is by far my favourite vegetable, I have never met anyone who dislikes the taste of yacon, all kids love yacon!  It is easily grown in full sun or part shade, they grow from waist height to well over 2m tall depending on the year.  The more fertile the soil the better harvest you will get.  They can survive on low water but do best when given a lot of water.

We normally plant them 5cm deep and about 30cm apart, if you space them further you will get a larger crop.  They tend to shade things out that are growing under them, but you can easily grow a fast crop of something like beetroot under them while they are little and something like a climbing bean growing up them when they are taller if you would like.  They exude inulin and other sugars from their roots which feeds earthworms and helps nearby plants grow better.  We had very few earthworms when we moved here, but I could always find them under the yacon.

Here growing is dictated by frost, frost kills down the tops of the plants and I harvest the tubers a week or two later.  If you leave the tubers a week or so after digging they sweeten a lot, if you eat them too early they taste like a spicy carrot.  To harvest I carefully dig them up, they will have small purple crowns and large brown tubers that look similar to sweet potatoes.  The brown tubers are the part that is normally eaten, the purple crown is the part you replant to grow more yacon.  Most years you can divide each plant pretty easily.  I keep the purple crowns in a bucket of soil in the garage until spring, but they can survive in the ground if you mulch them and they are not frozen.

We normally peel the tubers and eat them raw, but they can be cooked in a variety of ways and go well in a fruit salad, a stir fry, or any dish that a water chestnut is used.  The tubers store well for a few months but can be frozen and kept for ever.  Frozen tubers are then peeled, chopped and eaten frozen to taste similar to a frozen banana custard!  If you let them thaw they turn black, slimy and look bad so we eat them still frozen.  All parts are edible, but we only eat the tubers, we skin the tubers as the skin has a resinous taste to it.  I suggest trying a little of the skin to see if you like it.  The leaves can be made into a tea that is meant to be good for diabetics and has a lot of other medicinal properties.


How To Grow Everlasting Onions (Allium cepa perutile)

These do not really grow a large bulb, they are more of a spring onion type of plant.  That being said if they are divided each year they can form a small bulb that is very similar to the French Shallots that are found in supermarkets.  Plant 10 to 15cm apart and plant reasonably deep, if they are not deep enough they will work it out for you.  Water a lot to settle them in, then water as you would any spring onion.  Over summer they may die down to a small bulb or they may keep growing, it depends on the climate.  The more fertile the soil the faster they grow, but once established they will survive dry and poor soil.  Frost is not an issue with these plants but it may slow their growth a little.

They do not often produce viable seed so I cut off the flower stalk when it appears so they can put more energy into growing and dividing.  If you dig them up and separate them each time they divide it does not take long before you have a large patch of them.  If you do decide to eat the small bulb you can replant the roots with a few mm of bulb attached and it should sprout and continue growing for you.  As with any of the perennial vegetables I sell, unless you want to kill them you will always have them growing and producing food for you.


How To Grow Jerusalem Artichoke (Helianthus tuberosus)

We plant the tubers about 20cm to 30cm apart and 5 to 10cm deep.  Each tuber can produce well over 1kg of tubers in a regular season so they are very productive and valuable to have in the garden.  They grow 2 or 3m tall in a season and grow small sunflower like flowers that do not seem to produce viable seed.  A rich soil and plenty of moisture returns the greatest crop.  If you do not dig them up and eat them or divide them they tend to produce a crop of smaller tubers which are difficult to clean.

It is said that they will stay where you planted them forever as you always miss some tiny tubers when you dig them.  Even though we always miss some tubers I have found that I can easily get rid of them by pulling out any plants early in spring.  Guinea pigs and sheep love the stems and leaves and the high inulin content is meant to be good for ruminants.

I plant in winter or spring (or transplant in early summer) and let them grow until the tops are killed by frost.  Sometimes it takes a few frosts to knock them down fully.  They are sweeter after being hit by frost, but you can dig them up earlier if you want (or if you live in a frost free area).  You do not have to peel these to eat them, just scrub the soil off and either cook any way that you would cook a potato or eat the raw.

They do not store very well out of soil, they store in the crisper of the fridge OK but we find that digging them as needed is easiest and saves space in the fridge.


How To Grow QLD Arrowroot (Canna edulis)

Plant 30cm apart with the tip of the growing point at soil level, easy to divide to obtain more plants.  These things love water but do OK out here where it is very dry as long as I mulch or water them.  They grow 2 to 3m tall with large lush tropical looking leaves.  For such a tropical looking plant they survive on very little water.

Very easy to grow, extremely productive, mine do not flower here but I am told that they flower and produce viable seed in other places.  I grow them on the Western side of the vegetable garden to screen the hot summer afternoon sun, I have heard of people growing them in a semi circle under fruit trees to cut as mulch.

Frost kills the tops and leaves but the tubers survive and grow again in spring.  This will form a clump, to create new plants divide it with a spade as long as each part has a growing tip it should do fine.  I tend to separate them in winter and spring before they start to grow but they can be divided at any time of the year if you give them enough water.

Best to eat small tubers as the larger ones get a bit fibrous, leaves can be used in place of banana leaves in cooking or fed to animals.  Tubers can be made into arrowroot flour and is said to have the largest starch particles of any plant, you can even see the starch particles with the naked eye.  Very few people have eaten these in Australia or even recognise them as a valuable food plant, but they are cooked regularly in South America. 


How To Grow Comfrey
  
(probably Symphytum officinale although I am not 100% certain) 

 
I sell root cuttings as I find they travel the best and grow easily.  Plant root cuttings horizontally about 2cm deep and give plenty of water.  Protect from heat and frost until established.  They grow all year here but will die down if you get harsh frosts.  You can take root cutting off your plants at any time of year and they should grow.  I am told to plant 50cm apart but we put them much closer and they do well. 

Leaves can be eaten by poultry and stock and are high in protein, vitamins and minerals but I would not feed a lot of comfrey as it may cause damage (there is scientific debate about this so I do not feed too much just to be safe).  Leaves are great for mulch or to activate a compost heap.  A comfrey tea can be made as a plant food which works a treat but stinks terribly!  The root and leaves can be made into a variety of medicinal products.

I have been told it can be difficult to remove as it grows so easily from root cuttings.  If I want to remove it I cut off as much above ground as I can, then cover with something so any new growth does not get sunlight.  After a few weeks I find that the plant is dead and has left a fertile compost behind.  This variety does not produce viable seed so does not provide a weed threat.  The leaves do have tiny irritating hairs that you may need to be careful of when handling the plant.


How To Grow Pineapple sage (Salvia elegans)

I sell well rooted cuttings as I find they survive post best and settle in to the new home faster.  They will most likely be under 10cm tall when you get them.  I could sell the older plants but I find the rooted cuttings will out grow them very quickly.

It grows reasonably fast and snails may be problematic while it is very small.  It should reach about 1.5m tall and about 1m in width, mine never get quite that large as I pick the leaves too often.  The scent is amazing, it really smells like pineapple.  Even if you do not use it for anything this plant is worth growing just to smell as you brush past it.  It is a great companion plant as it repels some of the more damaging insects while attracting beneficial insects.

This plant grows similar to common sage but is a bit less hardy.  They need more water than regular sage but not much more, it is certainly not what I would consider to be very thirsty.  They like full sun with good drainage as wet feet may kill them.  Frost may be an issue, if you protect it or mulch heavily it should be alright.  I have had tiny plants burnt to the ground from frost only to find they re-sprouted when it warmed up.  If worried grow it in a pot that you can move under cover for the winter.  I always grow one in a pot just to be safe as I would hate to ever lose this plant.

Pineapple sage produces red flowers in autumn and winter, the flowers are scented just like the leaves and are edible.  I do not know if it will produce viable seeds as my kids pick the flowers before the seed gets a chance to ripen.  Like many herbs, the more you pick this the stronger and bushier it will grow.


How to grow Perennial Tomatoes

Many varieties of tomato are perennial, in fact the majority are perennial tomatoes but we tend to grow them as annuals.  There are some advantages to growing perennial tomatoes such as earlier cropping whcih make up for any extra work that is involved.  I have written a blog post explaining how to grow perennial tomatoes here.


How To Grow Tree onion, aka topsetting onions, aka Egyptian walking onion (Allium × proliferum, formerly Allium cepa var proliferum)

These are interesting little plants, they grow a small bulb at the base like a regular onion and then small marble sized onions (bulbils) at the top of their flower stalk.  The underground bulb is normally eaten while the bulbils are generally used for planting.  The green parts can be eaten like a spring onion and the bulbils are also edible and often used for pickling.  I sell the bulbils as they tend to grow better than the larger underground bulbs.  By growing from bulbils you also lower the possibility of disease significantly.

Plant the bulbils about 3cm deep and around 20cm apart, they may have some leaves already growing.  Plant out the bulbils with their pointy end up and flat side down as soon as you get them.  If you are unsure which way is up put them on their side and they will work it out themselves.

Tree onions are meant to be the hardiest and easiest to grow of all onions, they survive frozen ground and drought with no worries. 

Harvest the tree onions when the stalks dry down, and plant the new crop of bulbils straight away.  Spread the larger bulbs in a cool, well-ventilated area to dry and they should last up to 12 months.  In some climates they stubbornly refuse to form true bulbs and instead only produce thicker bases to the plant, in this case dig them and use them straight from the garden.  The thickened stem tastes exactly the same but just doesn't store well out of the soil.


How To Grow Garlic Chives (
Allium tuberosum)

Plant bulbs/rhizomes about 2cm deep and 15cm apart, they will form a perennial clump.  To get more plants the clumps are easily divided (make sure you trim the leaves) and the plants flower and produce seed each year.  Try not to let them flower if you do not want seed as this will decrease the vigor of the plant and you may end up with far too many plants in a small space.  You also do not want them dropping seed in your lawn as removing seed grown plants from a lawn is difficult.

Dividing every few years will make the clumps more vigorous.  By leaving the roots in the ground when harvesting and only taking the tops the plants will continue to grow and produce for you.  Seed only remains viable a year or so and is best planted pretty much straight away by scattering it in its final position and left to do its thing.

These are extremely hardy once established and survive hard frost, drought, being mowed as well as repetitive over grazing by ducks/sheep etc.  They may or may not go dormant over winter depending on your climate.


They are said to repel aphids and other insect pests as well as protecting young trees from rabbits.  To be honest I am undecided if they actually do this, but having a clump under each fruit tree is simple enough and takes no real effort on my part.

The flowers are white, smell nice and full of nectar.  Bees and other beneficial insects enjoy the flowers or they may be eaten.  


How To Grow Lemon Balm (
Melissa officinalis)

This plant looks similar to mint and grows 30cm to 90cm tall.  Plant about 20cm apart, it will form a clump pretty fast.  It can be propagated by seed but is easiest by dividing plants or taking cuttings.  They will get a bit leggy from time to time, do not be afraid to cut it back hard to force it to produce a healthier plant.

It prefers partial shade and rich moist soil but survives full sun, poor soil and dry conditions.  It is meant to be a great companion plant to fruit trees, onions and tomatoes but I worry that it would take over too much so keep it contained.

It may die back in winter depending on your climate but the plant will survive heavy frost and resprout in spring.  They grow yellow or white flowers that are meant to attract bees and other beneficial insects.  All parts of this plant are edible and are said to have some medicinal property.


How To Grow Common Spear Mint (Mentha spicata)

All types of mint have similar growing conditions, they all prefer moist rich soil and full sun or partial shade depending how hot it is.  They all have a tendency to overtake an area and become a nuisance so are best grown in a pot or container.  Be warned that the roots will try to grow out of the bottom of the pot and spread the plant.  

Plant mint about 20cm apart and let it form a clump.  Depending on climate they may die back over winter but will easily survive hard frosts.  If they start to get leggy cut them to the ground and they will sprout up again.  If stems are placed in water they may start to grow and are easily planted to create new plants for you.

They can be propagated by seed but it is far easier by dividing your plant.  All types of mint will cross pollinate so I try to prevent seedlings growing so that I do not get any unwanted and unpredictable hybrids.  The flowers will attract bees and other insects to your garden.


When you get your plants 

If you have ordered bulbs or dormant plants please remove them from the zip lock bag as it may cause them to rot.  It is best to either plant them into moist soil or store them in a dark cool place until ready to plant.  If you receive seeds please store them in a cool dry place.  Heat, humidity, air, insects, sunlight etc will shorten the life of your seeds so please try to limit exposure to these.

When you receive plants, keep in mind that they have been in the dark for a few days being thrown around by postal workers and will need a bit of time to recover before they can resume growing.  Carefully unpack the plants from the box being sure not to break stems or branches. Unwrap the newspaper and remove the zip lock bag used.  Plant them in a cool shady place and give them a good drink.  Over the next few days provide them with more light and they will be ready to be planted out in your garden.  If you do plant them directly in your garden try to provide a little shade for the first few days.  While they may well grow fine without this I do find that it helps them grow stronger faster.  Even the hardiest, most drought tolerant plants will need a bit of water to become established.


Genesis 1:29  Then God said, "I give you every seed-bearing plant on the face of the whole earth and every tree that has fruit with seed in it.  They will be yours for food."

Tuesday, 13 November 2012

Daisy Update

Our beautiful Daisy now lets me rub her neck, really rub it and she doesn't stop eating.

We are close to being able to rub her side. But if I rub her neck then run my hand down her side in one smooth motion to her udder I can touch it briefly before she steps away. No kicking so that is a good thing.

Hoping that she will eventually let me milk her. So far the progress is looking promising :)

Monday, 12 November 2012

Our first twins


We had our first twins born, such an exciting day. The perfect twins, one boy for dinner and one girl to replace mum.

They were great at birth, sitting up, walking around not long after. Following mum.

Day 2, not looking as great, wondering if we should catch them and take them off mum. But they are still running after her so would have been hard to catch. We make the decision to wait till the next day and see what is happening.

Day 3, I got to check on the and find the poor mum standing by her dead lambs. Poor little things, poor mummy sheep. It was just heart breaking and I felt terrible for not taking them. But if they didnt need it I dont want to go snatching of the mum.

I am thinking maybe there is something amiss with the genetics of our flock. So we are buying some new ewes and hoping things start working out better for us. Will update with pictures when we get them on the weekend.


Sunday, 11 November 2012

Sick little lambie


Finally we have a lamb, after losing every single one last round.

But this lamb was not well from birth, after a few hours it was still not standing. Poor mum was worried but she was an excellent mum and stood by her baby coaxing it to stand, please stand, please stand is what I am sure her sheep talk was saying. Begging willing her little baby to life. Can lambs be born preemie?

I couldn't stand by and watch this little gorgeous girl go. So we stepped in picked up bub to help and mum followed, she followed the entire length of the paddock, through the gate, through our verandah into our house yard. Twice a day she stood by her bub while I supplemented its milk.

After a week she was doing really well. It was starting to get harder to catch her and hold her while I fed her. So we popped them back with the other sheep. Another week on and this little lamb can run the entire length of the paddock with mum.

This little lamb is most definately not going to end up on the dinner table

.

Saturday, 10 November 2012

Daisy


Meet Daisy our very beautiful Jersey. Who apparently does not like us. She handled beautifully for her previous owners but wont let us touch her. This is a bit of an issue since we would like to milk her.

She is currently pregnant to her first calf, which is due in a few weeks. We are working intesively with her in the hope she will let us milk her. I am doubting she will.

Not to sure where to from here. Do we aim for another adult in milk or get ourselves a poddy calf to raise, so she will be very use to our property and being handled by us.

Hopefully we get to milk Daisy, as I cannot wait to be supplying our own raw milk.


Thursday, 28 June 2012

Ram wrangling

I learnt a very valuable lesson in how to free a ram from a fence today.
  1. Wear gloves or use a towel their horns really hurt your hands. 
  2. Get on the other side of the fence to the ram, even though he is a placid boy, he's not happy stuck in a fence and will body slam you, and he weighs a LOT. 

Thankfully he ran away as soon as he was free. I got him some food to make it up to him. Now to try and get whatever is imbedded into my hand out.


Saturday, 16 June 2012

Meat chickens


I killed our first Plymouth Rock rooster 16 June 2012. 

He hatched out 15 November 2011 and was so much smaller than the others that I expected him to die in the first few weeks.  He did not get feathers until very late in his life, weeks after the girls got feathers.  His brother is larger but it is raining hard so I plan to do him another day (or sell him as he is pure bred and a stunning looking bird). 

It is difficult killing something I hatched out, fed, watered, and looked after.  He was a beautiful looking animal with a calm temperament, had I entered him he could easily have won medals in poultry shows.  He lived a calm and happy life, and died an honourable quick death, not at all like the terrible and painful life and death of a commercial meat chicken.

At the age of 7 months he weighed 3.71kg live, when he was ready to go in the freezer he weighed 2.50kg.  That is a dressing percentage of just over 67%, not too bad for the first rooster I have processed in such a long long time.

Unfortunately I did not keep records on the food he ate to reach this size.  If I were to guestimate based on the feed that he has been consuming over the past few weeks I would say it cost about $19 to get this far (which works out to about $7.30 per kg of chicken).  The actual cost must be lower than that as he certainly did not eat this much when he was a week old.  Next time I plan to keep stats and keep the young chickens feed completely separate from all other poultry feed so I can work out accurately how much it costs to feed a chicken from hatching to eating size.


Plymouth rock egg stats over a year


I was meticulously recording egg statistics (among other things) for our hens every day.

On average our plymouth rocks laid 221 eggs per hen per year.  That works out to an average of just over 4 eggs per hen per week.

This average over the year includes each hen moulting twice (they do not lay through a moult), some hens going off the lay as they were injured, each hen going broody and not laying an average of 0.3 times each (they were not allowed to hatch so stopped being broody after 2 weeks or so). 

Average number of eggs per hen per month:
April            23
May             21
June             19
July              20
August         16
September   18
October       15
November   17
December   18
January       17
February     18
March         19

These hens were free ranged through the orchard and not provided any extra light or heat.  They foraged for between a third and two thirds of their diet depending on the season.  Feed costs should be very low on acreage as they can forage for most of their feed.

We had one hen who lays a different looking egg, she laid far more than the others, her eggs were not counted so that we have a more accurate average number of eggs for my old strain of plymouth rocks.  I also did not include eggs that were laid while we were away as they were collected by our neighbours and I did not want to impose that they also count eggs as well as feed and water them.