Friday 9 June 2023

Giant Parsley Breeding

A few years ago I started breeding giant parsley (Petroselinum crispum).  Parsley used to be a common garnish when I was a child.  When I was a little older a sprig of parsley used to be put on steaks or other meals at restaurants, with the intention that it was discarded rather than eaten.  Since then it has fallen even more out of favour.  Some people still grow parsley, and a few eat it, but it is a largely underutilised crop.  

I wanted to develop a new variety of parsley to be big and productive, so it could be primarily used as a leaf vegetable.  Eventually I had a variety (albeit not a completely stable variety) of comically large parsley that dwarfs any of the 'giant' varieties.  The taste of this huge parsley is much like other flat leaf varieties, perhaps a little stronger. 

Then, for a number of reasons, I stopped my breeding project.  I felt my parsley was getting too big.  I stopped selecting for larger plants, and other than picking leaves I mostly ignored my parsley and let it do its own thing.   

Giant parsley
Parsley almost as long as my arm

Parsley is great.  It is simple to grow and in my garden it self seeds reliably.  For this reason I still have a lot of parsley around, all of which is descended from my giant parsley breeding project.  As there were a few generations with no selective pressure, there may have been some genetic drift.  Some plants are far larger than others.

Recently I spoke to someone who wanted a giant parsley and complained about how tiny and unimpressive 'Giant of Italy' parsley is.  He convinced me that there is merit in making parsley huge.  

After that conversation I went to my garden and looked to see what size parsley I have to work with if I ever wanted to increase its size again.  

As you can see, I still have some plants with reasonable size.  According to Wikipedia, Parsley leaves grow 10cm to 25cm long in its first year.  My parsley produce leaves that are far larger than that.  The leaf above is almost as long as my arm!  I measured a few leaves from my largest plants, and they were over 60cm long.  Some were about 67cm long.  

Parsley leaf around 66cm (26 inch) long
Parsley leaf about 67cm (26 inch) long

This parsley is still pretty big.  I have a number of plants around this size, and between them they probably have all the genetic potential to get a bit larger if I put in some effort.  I also have some smaller plants, I won't be allowing these to flower so their genes won't be in the mix. 

I once wondered if parsley petioles (leaf stalks) could be large enough to be used instead of celery stalks.  I had put some effort into breeding for fatter petioles and they were getting quite thick.  All of the leaf stalks in the celery at the moment are still a bit thin.  Most are about 1cm to 1.5cm thick.  This is still a lot thicker than the stuff you find in the supermarket, but not thick enough to replace celery.  At this stage I am undecided if I care too much about how thick the stalks are.


The parsley plant itself gets rather large and bushy.  I put a tape measure from the soil to give a bit of perspective.  For most of its growing season they are about two feet tall.  This is too large to grow on a windowsill, but it is a good size to grow in the garden or a large pot.  As you can see, it has a lot of leaves that can be picked.

Over the years I have had a lot of people come to my house to buy plants and seeds.  Some of these people have been gardening since before I was born.  My giant parsley astounds everyone who sees it.  Some people have to pick some and taste it before they can believe that it is even parsley.  


When this parsley flowers it can get very tall.  They tower over me when they are in bloom.  I am not exactly sure how tall they get as I never particularly cared how tall they reach and never measured them.  Flowering height is not something I would put any breeding effort into, but I should measure it one day just out of curiosity.  

Some leaves have a lot of stem and not enough leaf.  Others have a lot of leaf and not too much stem.  I never paid a great deal of attention to this as I believe it may be highly influenced by the growing environment.  

You can eat the stems, or feed them to animals.  As well as being healthy for people to eat, parsley is great for animals.  Parsley leaves and stems are loved by our guinea pigs.  Our chickens also eat the parsley stems, but they much prefer the leaves.  If nothing else, the stems are good in the compost, so there is no waste. 

Over two feet tall
Parsley vegetable not herb
Look at the size of this monster

I find it odd how simple parsley is to grow, how productive and nutritious it is, yet how rarely we use parsley as a leaf vegetable.  Parsley leaves have a lot of vitamins and minerals, according to research it is very high in Calcium, Iron, Vitamin C, Vitamin K, Vitamin A.  

Just 5.5 grams of fresh parsley, which is about 1.5 tablespoons, provides the recommended daily intake of Vitamin K.  

Parsley contains 133mg Vitamin C per 100 grams, which is higher than oranges which have about 50mg per 100 grams.  

Parsley has about 138mg calcium per 100 grams, while cows milk has about 120mg calcium per 100 grams.  

Parsley contains around 6.2 milligrams of iron per 100 grams. To put this in perspective, spinach only has about 2.7mg of iron per 100 grams.  

I find it strange to think that parsley is mostly used as a garnish in this country when it has the potential to be something so much more.  It is so easy to grow and apparently very nutritious.  Each leaf of my parsley is absolutely massive, and with a little more breeding work they would get a bit larger.  

My giant parsley

Parsley this big should be more than a garnish

I used to know someone who bred rabbits for meat.  He used to feed the young rabbits parsley to increase their growth rates.  He said that parsley's high levels of calcium helped their bones grow fast so they could get up to full size quickly.  He would also feed parsley to lactating mothers to increase their milk supply and because he thought the high amounts of iron would help them recover from birthing.  I have no idea if this is true or not, but it makes sense to me.  

I wish I was growing this huge parsley back then and could have given him some seeds.  One of these giant plants has the potential to produce more leaves than a large plot of regular flat leaf parsley.  


Parsley is an underrated herb

I sell seeds of my parsley through my for sale page.  It is not a stable variety, and may produce a few regular size plants.  It will also produce a lot of extra large plants, and a few mammoth plants.  They all taste the same, just prevent the smaller plants from flowering and you will ensure that each year your plants will be large.  If you want to grow a giant parsley that is edible and will impress people, then this is for you.  

Saturday 3 June 2023

Senposai days to harvest

I recorded the number of days from planting a seed until being able to harvest senposai.  I should probably write another post on senposai as its history is fascinating as well as complicated.  For now that will have to wait.  

Senposai is a cross between a European cabbage (Brassica oleracea) and an Asian cabbage called Komatsuna (Brassica rapa).  This means, according to the Triangle of U theory, senposai is considered to be Brassica napus.  See what I mean about Senposai having a complex history?  

I recorded the days to harvest from planting a seed below.  The number of days to harvest listed below are base on how it performed in my garden this year.  I don't give anything perfect conditions, it is just how they perform for me.  It may be a few days more or a few less under different conditions, and it probably grows faster with warmer weather.  Being in Australia, the dates are written day month year.  

Senposai (Brassica napus) days to harvest:  

Seed planted  25/02/2023   Day 0 
Germinated    28/02/2023   Day 3 
Baby leaf       01/04/2023   Day 35 
Harvest          08/04/2023   Day 42 

Senposai

Very few places in Australia sell senposai seeds, and almost nowhere sells leaves for eating.  This is unfortunate because senposai is fast growing, nutritious, easy to grow, and rather productive over a decent amount of time.  

Like virtually all brassicas, bees and other beneficial insects like its flowers.  Senposai is also easy to save seed from, and the senposai I grow is a stable variety that mostly breeds to to type.  

Tokyo Bekana on left, Senposai on right

Senposai can be eaten raw or cooked.  I dare say it could be fermented like most other cabbages, but I am yet to try that.  People also eat senposai flowers and flower stalks, I have not tried them yet.  

Poultry love to eat senposai leaves, as do our guinea pigs.  I probably wouldn't feed too much of this to a guinea pig as they can be a little sensitive to eating large amounts of brassicas.  Chickens on the other hand can eat as much senposai as I can give them.  

Unfortunately I can't find any reliable information on the level of crude protein or iron or anything like that.  Given its parentage, it is safe to assume that like most brassicas it would be highly nutritious.  

Senposai - ignore the holes

I grow everything organically.  You will notice the many holes in the leaves in my photos.  The holes were made by caterpillars that did some damage before I noticed them and fed them to my chickens.  The leaves still taste the same, the holes don't make a great deal of difference.  

Given that senposai only takes a month an a half to reach harvestable size, and it survives rather harsh conditions, and how it crops for a long time, I think I will grow more senposai.  I will probably need to save seed myself because so few places offer it in Australia. 

For a list of days to harvest for many vegetables and herbs, please click here.    


Saturday 13 May 2023

Lucky iron fish year and a half update

I wrote an earlier post after five months of using the lucky iron fish.  At that stage I had used it almost every night for about five months, and it was working great.  The Lucky Iron Fish is meant to last for over five years if used every day, apparently once its smile disappears it is time to get a new one.  Given that these are intended for long terms use, a post saying how it looks after five months is not all that useful.  

I have had my Lucky Iron Fish for just under two years now.  I have used the lucky iron fish almost every night, so I thought it a good idea to do another post saying how the lucky iron fish performs over this longer time frame.  

Each night I use the lucky iron fish to make up some iron enriched water.  We drink this water, and it adds iron to our diet.  Like any other supplement, it can only be useful if your diet is lacking.

Using this is simple.  Each evening when I am clearing up after dinner I put the lucky iron fish in a pot, add 2 liters of boiling water, ass a few drops of lemon juice, then boil for twenty minutes.  You could also put it on one liter for ten minutes, or you could put it in with soups or whatever, but we drink the water the following day so two liters works well.  

My Lucky Iron Fish after more than a year and a half of use

The same Lucky Iron Fish after only five months

Once twenty minutes is up I remove the lucky iron fish, dry it with a tea towel, and put it on the shelf until the next evening.  As the fish is still really hot, any water not dried off by the tea towel evaporates.  I then take the water off the stove and leave it to cool.  Once cooled I pour the water in a bottle.  It is that simple.

The lucky iron fish needs some acidity for the iron to go into the water, so I put some lemon juice in it.  As I put in a squeeze of lemon juice, the water can taste a little like lemon at times if I squeeze in too much.  Most of the time the water tastes like water, but it has iron it in.  

Twenty minutes of boiling this thing while I am cleaning the kitchen after dinner is no inconvenience.  Other people put this in with their cooking, again it takes no real effort.  I have a lemon tree, so adding a few drops of lemon juice (it needs acidity to work) is simple for me.  Other people put this in with their cooking, if they are cooking with tomatoes there is no need to add more acidity.  

The Lucky Iron Fish people also make a cookbook for people who want to use the thing in their cooking.  As I use my Lucky Iron Fish for water I have not looked at the cookbook, but I am told it is good.

Lucky Iron Fish Cookbook

While it makes no difference, I always put my lucky iron fish with the number side down and the leaf side up, that way I will know if wear and tear is due to it being scratched against the pot.  The only reason I do this is because I wanted to see how much wear the ingot gets from use, as the leaf side is always up I know any wear is not from being scratched against the pot.  Most people just pop the ingot in and don't care which way is up.  It really makes no difference other than to satisfy my curiosity.

After using this Lucky Iron Fish for over a year and a half of nightly use (other than a few nights per year if we are away or something) my lucky iron fish has absolutely no rust, and is still looking good.  The side that scrapes against the pot in the photo below does not look very worn yet.  As you can see in the photos, mine had a little seam around the nose that is no longer there, other than that it almost looks new.

I have heard of people buying a special oil that they use to clean their lucky iron fish, I have never used anything and mine looks fine.  All I ever do is dry the thing after use.  I dry it straight away while it is sill hot.  I don't wash it or clean it or anything, and mine looks great after more than a year and a half of continuous use.  

Lucky Iron Fish - still looking good

If your diet is low in iron you could buy iron supplements, or try to eat more red meat, or you could use a lucky iron fish.  This is much like any supplement, it only works if you diet is lacking.  

The difference with the Lucky Iron Fish is that this is much cheaper than supplements, lasts a long time (more than five years), takes up little room on the shelf, and is much easier on the stomach than most iron pills.  Given the materials it is made from, it poses no moral problems for vegetarians, or vegans, and no religious issues for Orthodox or Muslims or Jewish people or any other faith.  

Much like myself, my son generally has low iron.  He eats a varied diet, but struggles to get enough iron for some reason.  Getting a six year old to take an iron pill every day for weeks on end is difficult.  Getting him to drink water is easy.  Each night I fill his water bottle with iron fish water, and each day he drinks it when he is thirsty, it doesn't get much easier than that.

Another great thing is that percentage of Lucky Iron Fish profits go to humanitarian work in developing nations.  

Lucky iron fish

There are a few other brands that make similar products, unfortunately I don't know if any of the other types are safe.  Lucky Iron fish has been tested, and retested, by many different laboratories, and all confirm that the Lucky Iron Fish is safe and effective.  

Other brands have not had such rigorous testing, I don't know where their iron comes from, so I would not risk using one.  Not too long ago a shipment of iron was seized at the border.  One of the nuclear facilities in China had been decommissioned or was replacing old parts or something, the metal had been sold, and it was hideously radioactive.  A lot of radioactive iron from there had made it into our country before this shipment was stopped.  While I know that the iron used for Lucky Iron Fish is safe, I can't know about the iron used by other companies.

Lucky Iron Fish comes in two shaped ingots, a fish or a leaf.  I like the look of the smiling fish, so that is the one I got.  The leaf works exactly the same, but is shaped like a leaf instead of a smiling fish.  

Lucky Iron Leaf 

They used to have an affiliate program where you would get money off the price, but they have discontinued that for now.  There is a new affiliate program, if I join it I will post the link here.

Saturday 6 May 2023

Immali corn 2023

Immali Corn is a pink/purple and white sweetcorn.  This is the first purple sweet corn developed in Australia.  For some reason we don't have many coloured sweet corns in Australia.  I bred Immali corn myself, so am biased, but I really like it.  

Immali corn is a short variety, which tillers (ie grows several stalks per plant which increases the number of cobs).  It is very sweet, and higher in antioxidants than yellow corn.  

It needs to be cooked not long after it is picked, otherwise it starts converting sugars to starch.  This means it tastes far better.  It is a great variety for backyards, and entirely unsuitable to mechanical harvest and interstate transport.  

This year I didn't grow many Immali corn plants, and didn't get to eat any.  Instead I saved all the cobs for seed.  This year, due to the weather and the soil, the cobs were smaller than usual and less were produced per plant than usual.  That is ok, they are still large enough and numerous enough.  I will fix up the soil over winter and next year's crops of all my vegetables will hopefully be back to normal.

Some interesting things happened this year in the cobs that I thought I would share.

Immali corn cobs drying

Some cobs were mostly white, with just a few coloured seeds.  When picked at the milk stage (ready to eat as sweet corn) they are white with a few blue or purple kernels.  

This is what I was aiming for when I first started to breed Immali corn.  I then decided that a higher percentage of purple was better (there are vastly more antioxidants in purple corn), so pushed the variety to have more purple.  I don't see many of these mostly white cobs.  They sure are pretty.

Immali corn - small cobs this year
Immali corn - lots of white

Some plants produced entirely purple cobs.  The colour genetics behind this is relatively simple, but I alternate white seeds and purple seeds when planting, so tend to only see cobs with a mix of white and purple.  

Finding some entirely purple cobs like this was fun and unexpected. 

Immali corn - some cobs entirely purple

Most plants produced the regular looking "Immali corn" cobs.  They have mostly purple seeds and some white seeds.  

When picked at the milk stage, the colours are lighter, and they look pink/purple and white.  It really is very pretty for a sweet corn.  When you let the cobs age and dry the colours change to darker purple like in these photos.

Immali corn ready for shucking
Immali corn - dry seeds

I started breeding Immali Corn about a dozen years ago, and it is now a stable and beautiful variety.  I have only ever grown it organically so it has adapted to become relatively resistant to pests and productive under less than ideal conditions.  One thing I love about Immali corn is that you can save seed each year and grow it again and again without ever having to buy seed a second time.

Sweet corn seed only lasts a year or two before germination drops off.  I now have plenty of fresh seeds.  If you would like to buy seeds of organically grown Immali Corn, I sell them through my for sale page.  


Tuesday 11 April 2023

Compost worms

Years ago (somewhere around 2009 or 2010) we got a worm farm.  From memory it was either a 'worm cafe' or 'worm factory'.  

We also bought some compost worms locally, put them in, and it worked great.  Eventually we moved house, we moved to acreage somewhere semi arid and far too hot.  I lost all the worms and didn't get any more to replace them.   

I have had this worm farm sitting empty ever since then.  It has moved house with us a few times.  

My worm farm

I have some raised garden beds that I use for my vegetable garden.  The first few years they worked really well.  There is much less digging, less weeds, and they are much better on my back than non-raised garden beds.  Recently we have had a lot of trouble with rabbits, they don't get up into the raised beds, they only eat things growing at ground level.  I like my raised vegetable garden beds.  

The soil level in the raised garden beds started getting a little low, so I bought a 5 cubic meter load of soil to top them up.  This soil is dreadful.  It compacts hard like a rock when dry, when watered it is a gluggy mess, and my vegetables show signs of nutrient deficiency.  This soil needs to be fixed.

I have a compost tumbler, I plan to mix the compost through the soil when it is ready.  We have chickens, I will dig some of their manure through the soil.  This will help.

We also have a lot of leaves up the side of the garage that my daughter kept raking into a large pile.  I considered digging this through the soil, then remembered the worm farm.  The worm farm may be a faster way of breaking down the leaf litter making the nutrients available to my plants.  The worm farm also has a little tap, any liquid that drips out of there tends to be good for the soil.  

I looked around and discovered very few people sell compost worms locally, most of which were selling for really high prices.  Some hardware stores sell them, as do online shops, but their prices are too high and (based on many bad reviews that I read) I may not actually get what I paid for.  I eventually bit the bullet and bought 1,000 compost worms from someone local.  

I put 1,000 worms into my worm farm filled with leaf littler on 05/03/2023.  I took the photo below days after, you have to look pretty close to see any worms.  They should increase in number from here pretty fast.  I looked yesterday and there are noticeably more worms in there - meaning they are growing.


Not many worms early on
I also put a small number of the compost worms in a large plastic pot.  This was also filled with leaf litter as well as muck that I removed from the gutters.  I'm hoping that the worms will also breed up in here quickly.  

If this pot works I can use it a little like a movable worm farm where I feed the pot, the worms move between it and the soil, fertilising as they go.  If it gets too hot or too cold they should be able to survive by sheltering in the soil.  

Not the ideal set up, but it should work

At the moment the worms are living in leaf litter.  There is a small amount of vegetable scraps in there, and some tea bags and things, but it is mostly leaf litter that is already broken down various amounts.  Some leaves are new, others are already so broken down that they look like soil.  I added a small handful of guinea pig manure and some chicken food that had been spilled, this should help the worms grow faster.  I would also like to add the bedding from our guinea pig house when there are enough worms to eat it.  

The leaf litter has become noticeably lower in the pot, so I assume the worms are eating it.  I have added a second tray of leaf litter to the worm farm as the first one has been mostly turned into castings.  This is all very positive.  I don't think I will empty the first tray yet.  Winter is just around the corner and having two trays on the worm farm should help to buffer the temperature swings a little due to increased thermal mass.  

The worms should grow and breed between now and winter, from there I don't expect them to do much until spring.  That's ok.  The worm farm and the pot are both protected from the frosts so I expect the worms to survive winter.  

Over winter they won't eat a lot or breed much, but each worm will grow and the baby ones should mature over this time.  Come spring, the worms should all be large enough to breed and ready for their population to explode with the warmer weather.  

Saturday 11 March 2023

Micro farming with tiny vegetables

I grow a lot of different vegetables, herbs, berries, and other fun things.  I grow a lot of perennial vegetables, and also some annuals and biennials.  

I have done a little breeding and produced some really enormous plants

Massive vegetables are great if you have the space and have a large family to feed, but are not worth growing if you only have a balcony or a windowsill to grow your plants.  If you have a small family, live on your own or only live with your partner, then smaller vegetables may be more suitable for you to grow.  

I have also done some breeding of smaller vegetable plants such as Igloo tomato, Nanuq tomato, Immali corn, Oaken tomato, Tracey Tomato.  Immali corn reaches about 5 feet tall, the tomatoes reach about one to two foot tall.  While these are nowhere near the monstrous sizes that other varieties can reach, they are also not tiny.

I can also see the point of growing tiny vegetables (as well as breeding enormous vegetables, and smaller vegetables) so I have also started dabbling in breeding micro vegetables.  Micro vegetables are nutritious and adorable, plus they take next to no room to grow.  Micro vegetables won't feed your family, but they can be the difference between growing some food, or growing nothing.

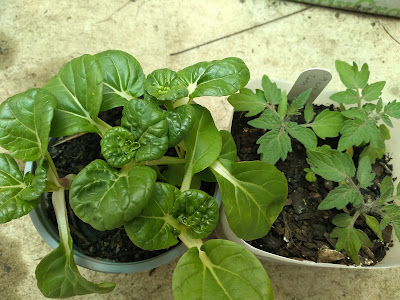
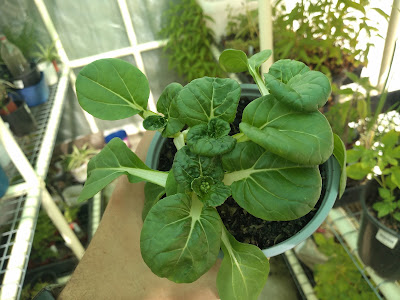
Hedou bok choy and Micro Tom tomato

Tiny micro dwarf vegetables are fun to grow.  They take up next to no room, they produce nutritious wholesome organic food, they are ridiculously cute, they go from seed to harvest in a very small amount of time, and you can grow several crops each year.  Being tiny means that you harvest what you will eat fresh that day, no need to store anything and no waste.

Micro vegetables can be grown by urban farmers with nothing more than a sunny window sill, some water, and a pot of dirt.  If you can't find a pot, then cut off the base of a milk bottle, or use a yoghurt container, be creative!  If it can hold soil, and has drainage holes, then it will probably work for micro vegetables.

Below are some photos of Micro Tom tomato, and Hedou Bok Choy.  These are the tiniest varieties of each of these vegetables.  

Micro Vegetables - nutritious, fast growing, and cute

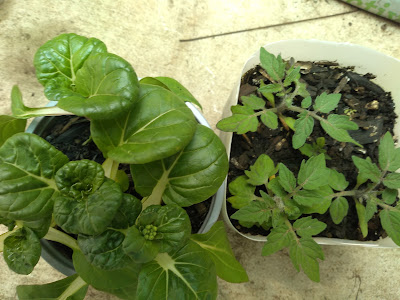
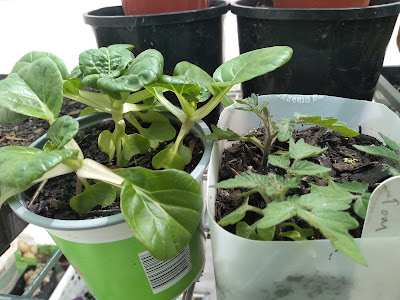
Hedou Bok Choy is adorable.  It is tiny and cute and makes Baby Bok Choy look enormous.  The ones in the photos are growing in a 10cm pot.  

This is the size that these are normally harvested, but I am keeping these particular plants for seed saving.  As you can see, they take up next to no room, could easily be grown under taller vegetables or other plants, and you harvest exactly as many as you plan to eat in that meal - making them super fresh.

There were five plants in that tiny pot, but one was culled as it did not meet my strict seed saving requirements.  Five plants easily fit in such a tiny pot, I have a feeling I could have put in even more and they would have grown just as well.  

Hedou Bok Choy - several plants in 10cm pot

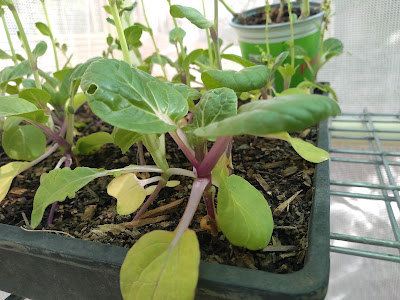
I have a seedling tray that was partly empty.  Instead of having unused soil with nothing growing in it, I decided to plant out some Hedou bok choy.  

In an area that was 25cm by 20cm I planted 30 Hedou bok choy plants.  Six rows of five plants spaced relatively evenly apart.  

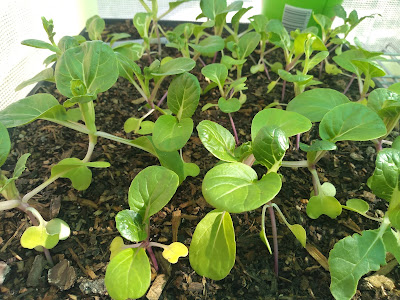
Hedou Micro Bok Choy almost ready to harvest

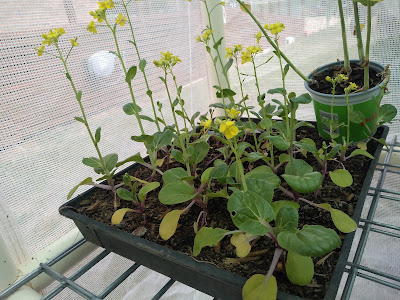
Hedou Bok Choy Flowering

These could have been planted slightly closer if I wanted and they would have still thrived.  That's the beauty of micro vegetables, they can be grown in impossibly small spaces and still produce fresh food.

They do need some depth of soil for root space.  The Hedou Bok Choy that is in the small pot would have a depth of under 10cm for roots, this seems to be ample.  You may notice that the plants in this pot have larger leaves.

The thirty plants were in a seed raising tray with about 3 or 4cm depth for roots, that did not seem enough and the plants bolted to flower pretty quickly.  This early bolting may have been caused by the heat and fluctuating weather, but I suspect if they had a deeper pot they would have held off a little longer.  

Early bolting is not the end of the world, I ate some of these plants, and kept the best ones to produce seed.  You can eat the flower stems of bok choy, there are even some varieties that have been bred for that exact purpose.

Micro Tom tomatoes ripening


Micro Tom plants flowering and fruiting

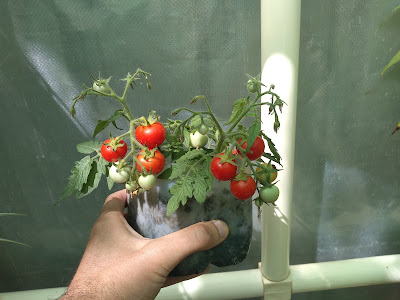
Micro Tom is the smallest tomato variety ever produced.  They don't produce the smallest fruit, they produce the smallest plants.  

The plants below have grown under shade in my greenhouse and are much taller than normal.  When grown in direct sun sometimes they barely reach 2 inches tall. 

Micro Tom getting tall under low light

My micro tom plants have grown to heights of between 4cm and 9cm tall.  I have grown them in pots, as well as in the garden, and have never had a plant reach 10 cm tall yet.  They are tiny.

Micro Tom Tomato Australia
Micro Tom tomato fruiting

The plants in the photos below are about 2cm tall (just under an inch) and already producing flower buds!  

Usually I get about ten small red round tomatoes per Micro Tom plant.  Sometimes more, sometimes less, but the average for a well grown plant is ten fruits.

Micro Tom flowering at one inch tall

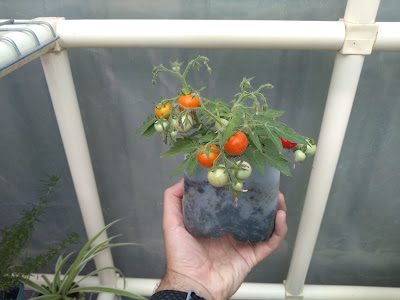
The plants are growing in the bottom of a milk bottle which measures10cm x 10cm.  There are only 4 plants in there as I planted 5 seeds and only 4 germinated.  Once again I think more could have easily put more plants in without it bothering them at all.  

There are not many varieties of micro dwarf tomatoes in Australia.  I currently grow Micro Tom, Florida Petite, Micro Venus, and am attempting to breed some woolly leaf micro tomatoes of various different colours.  
Venus micro tomato

Micro Venus Tomato Australia
Micro Venus tomato 

Micro Tom is always under 10cm tall, the other micro tomato plants usually reach 10-15cm tall.  This is tiny when you consider that most dwarf tomato plants usually reach about 4 feet tall.

The genetics behind micro tomatoes is fascinating if you are breeding new varieties, but to everyone else can be a bit of a dry topic so I won't discuss it here.  

There are a few varieties of tiny herbs around too, but most of those get surprisingly big.  If you have limited space, but still want to grow a little something to eat why not try tiny vegetables.  There are plenty of different ones out there, not just the two I mentioned.  

There is a good chance I will have seeds of these for sale at different times.  I grow everything, including these micro vegetables, organically.  When I do have extra seeds I will try to list them on my for sale page.

Micro Tom plants fruiting

Bok choy gets some colour under high light

Window sill farming at its best!

Micro bok choy

Saturday 4 March 2023

Drosera capensis Hercules seedlings

I wrote a post about my sundew Drosera capensis Hercules.  Back then I had sown a few seeds and the seedlings were still tiny.  

Some time has passed, the seedlings have grown, I have almost lost my original plant once or twice, and I thought it time to write a blog post about the seedlings.  

Just like in my previous post, I seem unable to take nice looking photos of my Hercules plants.  They do catch incredible numbers of small insects, so it is rare to see a leaf that is nice and dewy without being covered by many tiny dead things.

Drosera capensis 'Hercules' true clone
Seed grown plants (Hercules x self)

Originally, Hercules was registered as an interspecific hybrid between Drosera capensis 'alba' and Drosera aliciae.  Since then things have changed and the current belief is that Hercules is a wide leaf variant of Drosera capensis.

For me this clone seems reluctant to grow from cuttings.  Some are successful, but not the high percent that I normally get from capensis.  

My Hercules plan seems to grow really well, then for some unknown reason it dies back badly.  Then it grows bigger than before, and mysteriously dies back again.  I have come very close to losing this close a few times.  Hopefully I never lose it, it is such a great plant.


Drosera capensis seed grown (Hercules x Hercules)

D capensis Hercules - cutting grown

My parent Hercules plant is the true clone.  This was sent to me as a plant that grew from a cutting taken from the original Hercules plant.  

Judging from what my parent plant has done, and based on what the seedlings are doing, I would be pretty confident that this is not an interspecific hybrid, and is a form of capensis.

The seedlings (Hercules x Hercules) so far are true to type.  I had expected only a small percentage to look similar to the parent, but so far there have not been any off types.  

The seedling grown plants appear the same as the parent in every respect.  They grow the nice wide leaves, and grow a bit slower for me than typical.  They are so similar that if I did not keep them separate I would not be able to tell which was which!

Hercules x self - seedlings

Capensis Hercules grows wide leaves, has the typical colouration, produces many flowers per stalk with the typical colouration, and produces rather large flowers that are more open than 'typical' or 'alba'.  Last year when it flowered I saved some seed, and planted some, but unfortunately lost most of the seed.  This year it is flowering again, hopefully I am able to save and plant some more self crossed seed.

The self crossed seedlings have not flowered yet so I don't know what the flowers will be like, but in every other respect I am unable to tell them apart from the parent.  

If Hercules was the first cross between two different species I would expect to see some diversity in the seedlings.  To be entirely honest, even if this is a spontaneous mutation of pure capensis I would still expect to see some diversity in its seedlings.  I can't explain why the seedlings are so homogenous.  Perhaps there is more to the history of Hercules that I don't know about.  

Hercules - true clone

From here I plan to plant out a bunch more seed, and grow out a few more seedlings.  They appear to grow a bit slower than typical or alba, or at least they have grown slower for me so far.  

If I ever have any spare seed or seedlings for sale I will label them as Hercules x self, or Hercules x Hercules, and offer them through my for sale page.  Being in Australia I can probably can't send them overseas.  I would probably consider a trade for other carnivorous plants.  


Drosera capensis Hercules - cutting grown in live sphagnum moss