Thursday, 1 February 2018

Breeding Superior Slow Bolt Coriander

Coriander (Coriandrum sativum) is a herb that you either love or hate.  This does not store well or transport well or dry well, and hydroponically grown coriander that you can get in supermarkets often taste weak, so for those of us who love coriander we must grow it ourselves.

Most people who grow coriander to harvest leaves (the Americans call the leaves 'cilantro') complain that they bolt too easily.  It often feels like any stress from transplant shock, or hot weather, or a change in the weather, or under watering, or over watering, or even looking at them wrong makes them stop growing leaves and start flowering.  Buying so-called ‘slow bolt’ varieties often makes no noticeable difference as these varieties have been grown by the seed company and no selective pressure has been placed on them for reluctance to flower. 
 
Most people adopt one of two responses to this issue, they either stop growing coriander as it is too difficult/low yielding, or they save seed from the best plants each year and add selective pressure for slow bolting plants.  These are both valid and sensible responses.  
Recently I read a paper written by an overseas seed research facility that said “Selection is the most common breeding procedure used in coriander and crossing is non-existent”.

I encourage people to add deliberate selective pressure when saving seeds, I certainly do this myself.  Common sense tells you that if you plant seed of the slower bolting plants (and cull the early flowering ones) then the next generation will be slower bolting.  The main issue with adding selective pressure coriander is that you are working with a small inbred population of plants that have very little diversity in their genetic makeup, so progress is made but it is slow progress.  To really create slow bolting coriander crossing different varieties is essential.  So that is what I have done.

Coriander mass cross, I had another bed of these behind and another one next to this to ensure every variety would cross with every variety
I was given seed of several different varieties of coriander collected from several different countries, plus I already had some that I had grown previously and added selective pressure to.  I grew all  nine varieties being careful to prevent them from crossing, and while each variety was nice and clearly different from one another none of them really thrives in my climate.  The leaf shape and size varied considerably among them, the size and number of seeds was very different between varieties, but they all taste and smell much the same.  I don’t have the time or space to grow nine substandard varieties and keep them all pure, and I really don’t have space to add the selective pressure required to improve each of the varieties separately, so I had a difficult decision to make.
Coriander mass cross, even this tiny some are already flowering due to the heat
Rather than keeping the lines pure and separate, putting in effort to maintain purity, and having nothing that performs overly well here, I decided to plant all of them and produce a mass cross.  They are very distinct varieties, originating from several different countries, meaning there is a lot of genetic diversity among them.  Inbreeding depression will be eliminated from my population through this mass cross event.  From the mass cross or grex, which is comprised of many different potential f1 crosses, I will grow out and allow them to cross as they see fit, all while culling.  

I did three staggered plantings of several seeds from all the varieties to ensure that each variety will flower and cross with each other variety.  It seems strange to be allowing coriander to flower, and not to be culling, but this is only the start.  Every year from now there will be culling, as well as back crossing to the previous year seeds.
  
If I cull hard each year I should be able to create a new variety or landrace of coriander that performs far better in this climate.  While I feel bad that once these have crossed I have no way to get these varieties back, which means that many of these varieties may well go extinct, the end result should be superior to anything I currently have access to.  I only have small numbers of seed of the original varieties left, but if you are a seed saver group and want a few seeds from the original strains and want to keep them pure please let me know before it is too late.
  
I have been harvesting the leaves even from substandard plants, so I am no worse off than just growing all of the different varieties and keeping them pure, and I should never end up with something as bad as I started with.  This first year I have allowed all of the varieties to flower and cross, I have even done a second planting of all the varieties to increase chances of crossing all the different varieties with each other.
 
Coriander
After this first year, when the lower quality plants begin to bolt they will be culled and not allowed to flower, so each generation the genepool becomes superior to the previous one.
  
When breeding it is important to know what to cull for, to make some culling rules, and to strictly follow those rules.  I plan to cull for firstly amount/size of leaves as that is what I want to harvest from the plants, there is no use having plants that take forever to flower if they don't produce many leaves.  Then I will select for reluctance to bolt as the yield is reduced if they stress and flower too easily.  Then I will select for number of seed produced, then large size of seeds.  

I want to end up with plants that produce lots of leaves and are simple to grow and save seed from each year.  Producing many seeds means I can produce many plants, and large seeds are easier to work with and tend to remain viable for longer, but leaves are the crop here so that is where the main selective pressure is to be added.

Most of these original varieties are 'slow bolt' and 'long standing' and 'giant' leaf varieties, some from hot climates, others from cold climates, this gives a strong yet wide genetic base with which to work.  
  
When I have finished tinkering with this improved coriander variety I may sell seeds through my for sale page.  Currently I am selling the mass cross seeds and allow others the opportunity to create their own new variety that suits their climate.  These will display a wide range of genetic diversity, all will taste and smell like normal coriander.  If you buy these please cull hard, ONLY save seed from the slowest to flower, that way you will create a variety of coriander that will be productive and slow to flower in your garden.

Thursday, 25 January 2018

Days to harvest Rhubarb from seed

I was sent a few different varieties of rhubarb seed that was originally collected from different countries.

Very few people grow rhubarb from seed.  It is said to be too difficult, and it is said to take too long.  yet no one ever tells you how long it actually takes.

Most varieties of rhubarb, even if it self pollinates, will not grow true to type and you will not get anything similar to the parent plant.  Each rhubarb variety that I was sent was said to breed true, which I find almost impossible to believe given the polyploid nature of rhubarb.

Each set of seeds looked different to one another, some larger and some smaller.  Each set of seedlings did show a remarkable lack of diversity from one another from that group, yet each group was very different from the others.  Even at cotyledon stage it was simple to tell each group from all the others.

Other than one variety collected from Korea, which I am not convinced is rhubarb or even a species of Rheum, all of these rhubarb varieties went dormant over winter and re-sprouted in spring.

The largest was a variety originally collected in China.  It was the largest right from the start.  The others are not yet ready to harvest.  Some are closer to harvest than others.  They have all grown a lot since the photo was taken.  They have also been battered by the heat and shredded by hail, gone dormant over winter and resprouted in Spring.


Days to maturity Rhubarb (Rheum rhabarbarum)

Seeds planted       04/11/2016       Day 0
Germinated           ??/??/2016        Day ? Oh why didn't I record this!
Harvest start         14/01/2018       Roughly 14 months from seed planted to first harvest
Flowering             ??/10/2018       Roughly 23 months after seed planted (I removed the flower stalk)

Some of the rhubarb varieties.  Left to right seed collected from: China, Poland, Finland, Germany

Considering that when you buy rhubarb crowns it is not advisable to harvest in the first year, growing from seed didn't really take much longer.  Time will tell which ones are worth keeping.

I also listed the days to harvest from seed for a heap of different vegetables, if you are interested please click here

Tuesday, 16 January 2018

How to grow skirret from seed

Skirret plants will not cross pollinate with anything other than skirret, so saving seed is easy.  Skirret flowers in characteristic umbels that appear to be loved by all kinds of pollinators from beneficial wasps to flies to beetles to ants to native bees and even honey bees, so pollination is never problematic.  Seed grown skirret displays a surprising amount of diversity which is great for breeding improved plants with thicker roots.  I normally plant skirret seed in spring, this year I have sown some in summer and it also appears to be growing well.
Skirret: normal plants on left, offset grown plants on right
Planting skirret seed in spring will yield a small crop of edible sized roots, a few tiny offsets to plant out, as well as more seed before the end of autumn, even in shorter climates.  First year roots tend to be thin and delicious, if you can leave some they will be far thicker the following year.  Planting a tiny skirret offset gives a far larger plant with thicker roots than seed grown plants.  This winter I should take a comparison photo of seed grown skirret, offset grown skirret and older skirret plants. 
One year old skirret plants - each skirret plant produces several offsets
Skirret seeds are very tiny and germination is normally very simple.  I am told that skirret seed remains viable for anywhere from 3 to 10+ years.  While I normally get great germination I am told that germination rates can fall below 75% even with fresh seed.  To cover against this I only sell the freshest seed I have and I put extra seed in the packets so you will easily be able to grow 20 or more plants.  I have read that temperatures of 10 C to 22 C are best for germination but have never paid much attention to this.  
I plant skirret seed either in pots of soil or in an empty garden bed with no weeds.  I normally scatter the seed over the soil surface and water well.  I don’t cover the seed as it is so tiny and the seedling may not be able to grow to the surface.  I am also not sure if skirret needs light to improve germination.  From here I never let it dry out and in a week or two I normally see seedlings start to pop up.  If it rains the seedlings seem to germinate and grow faster, but that may be my imagination.  

Skirret offsets, they aren't big
The main pests I have seen with skirret are slugs and snails, the tiny seedlings may need a little protection until they get larger which is why I often grow skirret seedlings in a pot.  Much like any seedling things like earwigs and slaters may kill them when very small.  I am yet to see any pest bother a large skirret plant.  I assume rabbits, ducks, sheep etc would eat skirret plants to death due to the high sugar content.    

Once the skirret seedlings have a few true leaves and are large enough to handle you can transplant them where they are to grow.  Even if seeds were sown in the garden they will still likely need transplanting as watering tends to move seeds and clump them together rather than leave them to grow nicely spaced.  You don’t have to transplant them if you don’t want to as they will survive and still produce a crop.  

One dormant skirret offset, it doesn't have roots yet
Unlike many other root crops skirret does not appear to dislike being transplanted.  Skirret likes to be protected from the sun for a few days after transplanting, otherwise the leaves sometimes wilt.  I cram skirret in to any space I have and get good crops but the more space you can give them the better, most people plant about 30 cm apart or 9 per square meter.  

Skirret thrives in cool climates and loves water but it is a survivor that is remarkably adaptable.  I grew it in a hot arid climate where it could not survive in the garden by keeping it in a pot of soil in a bucket that I would fill with water each morning and afternoon.  Each year the skirret plants get larger, both taller and wider.  Each year the skirret plants produce more offsets, more seed, and fatter roots.    
organic skirret roots Australia
Skirret roots from two year old plants

When the skirret dies down it is time to harvest roots.  I have only grown skirret in frosty areas so don’t know if it dies down in areas of warm winters.  Skirret roots do not store well once dug so I dig them up as needed.  Any small ones that I leave behind or any that I miss will just be larger and fatter next year.
 
Few places sell skirret seed in Australia and even fewer sell skirret plants.  I sell skirret seed all year and skirret offsets over winter through my for sale page.

Saturday, 13 January 2018

Days to maturity Thornless Youngberry

One of the berries I grew this year was a thornless youngberry.

Youngberries are one of the many hybrid berries that have raspberry and blackberry in their parentage.  These are not GM, the first ones were bred about 100 years ago.

These things taste amazing, much like a boysenberry, but are smaller and more productive.  They have no thorns on the canes (botanically they are known as prickles) and are strong vigorous growers. 

Days to maturity Thornless Youngberry (Rubus sp)

Seeds planted       N/A grown from divisions
Germinated           N/A
Flowered              25/10/2017       Day 0
Fruit Ripe              07/12/2017       Day 43

I have added this to a larger list of vegetable days to harvest from seed.
Thornless youngberry

Thornless youngberry

Thursday, 11 January 2018

Golden Raspberry plants in Australia

A while ago Diggers club advertised what they claimed to be an exclusive yellow fruited raspberry plant.  They looked and sounded amazing!

“Diggers gold” raspberry plants were listed on their web site, it was listed in their printed catalogues, at first they were only for Diggers members but eventually it was sold through their shops, and it was sold through other stores that carry their line of plants.  The stock photos of yellow raspberries they used looked amazing, and their embellished and fanciful description of the plant sounded great.  Diggers arrogantly renamed this variety to ‘Diggers gold’ even though they had not bred it and had never actually grown them, not even once.  I am not sure if they bought the naming rights or if they just decided to rename it to make it more marketable like they do with so many other plants and seeds that they sell.  This level of contempt and arrogance is typical of many of my experiences with Diggers Club.

Here is the irony, I love this part: the raspberry variety that Diggers actually had, the one that they renamed to be “Diggers Gold”, was actually a red fruited raspberry.

If you looked on Diggers club facebook page you either see comments from people who say they can’t wait for them to fruit, or comments complaining that they had red fruit.  Not a single comment on there said that they grew yellow fruit.  Not one.  It certainly appears that Diggers did not sell a single yellow fruited raspberry. 

Diggers facebook page ad for Diggers Gold Raspberries
Diggers club sold these ‘diggers gold’ raspberry plants to many, many home gardeners.  A year or so later when they had red fruit a reasonable number of these people complained because they did not get what they paid for.  Diggers sent replacement plants to most people who complained, and they grew the plants on for another year and a half, only to have red fruit again.  For some people, this happened more times and they never got what they paid for.  Some people were tricked to think that fruit colour was influenced by growing conditions (which it is not) or somehow they were to blame.  Others were offered credit on their next purchase.  I almost bought a Diggers membership just so I could get a golden raspberry, I am so glad that I didn't fall for their lies again.

I have heard people try to justify all of this and say that they still got raspberries - unfortunately that isn’t good enough.  If I wanted to buy an inferior and unnamed random variety of raspberry I would do that and not pay the high prices and inflated and unjustified postage cost that Diggers has.  People made space for these things when they could have grown something far better.  It is the time spent growing the wrong thing that is the biggest loss – you can’t get back time.

You would have thought that with such a large company and paying inflated prices for something they claim to be exclusive that you would have some assurance in actually getting what you paid for, apparently not with Diggers club.  With the Diggers club you don’t always get what you pay for.  Rest assured, Diggers doesn’t currently list ‘Diggers gold raspberries’.  Perhaps one day they will rename another variety of raspberry to be ‘Diggers gold’ and maybe it will be yellow fruited?  Perhaps one day Diggers club will have a yellow raspberry and rename it to be something else or add 'Clive' to the cultivar name?  I wouldn’t risk buying from them though.

Yellow raspberries in Australia
My golden raspberries look great

Yellow fruited raspberries do exist in Australia

Some people had such a bad experience with Diggers club and spent so much time growing diggers gold (red fruited) raspberries that they think yellow raspberries don’t actually exist.  I am happy to say that yellow fruiting raspberries do exist in Australia, I grow them.  I paid a small fortune to get a few plants from someone trustworthy (ie not Diggers club or ebay) and it was worth it.

My golden raspberries

My golden raspberries

My golden raspberry plants are an un-named variety, they looked very strong and healthy.  I planted the golden raspberries in two different positions to ensure that they would not die off.  Apparently they were well suited to both of these positions as they have all done well and spread nicely.
My golden raspberries starting to ripen
Like many other varieties of raspberry they have thorns (botanically these are 'prickles'), and it is a floricane variety, meaning that it will not flower or fruit on current year growth.  It needs previous year growth to flower and fruit.  This is why it often takes a while to get the first fruit but once they do fruit once they should fruit each year from then onwards.  My golden raspberries fruited around Christmas time and spread out the harvest for a few weeks.  I wrote another post on golden raspberry days to maturity.

This variety also has the habit of spreading roots under the soil and growing extra canes from the root tips.  This means that an investment in a few plants can quickly expand and fill in an entire patch.  I love how raspberries do this.

My golden raspberries taste much like red raspberries, except they are much sweeter.  They smell sweet and fruity, I really love the way they smell.  The fruit is super soft and delicate, this is perfect for home gardeners who will carry the raspberries to where they are to be eaten, but not great if you plan to transport it to supermarkets across the country, which is why you don't see many yellow raspberries in the shops.

The colour of golden raspberries is pretty remarkable, I am no photographer so my pictures don't do them justice.  They range from a bright golden yellow to a richer yellow on the same plant.  Birds seem to ignore the yellow fruit, then again birds seem to ignore red raspberries too.  Insects, slugs and children on the other hand do not ignore them and find them irresistible.  My kids comment on how they love the fruity smell of golden raspberries.

The plants seem reasonably productive and just as hardy as other varieties.  They don't appear to grow any taller or shorter than my other varieties.  In fact, when they are not fruiting I would not be able to tell them apart from many of the other varieties I grow.
Golden raspberry: something took a bite out of this one
The colour gets a tiny bit darker if left to ripen longer

Where to buy yellow fruited golden raspberry plants in Australia

Golden raspberry plants are difficult to find, please NEVER buy seeds from ebay as you will be sent seeds but not yellow fruited raspberry seed.  By the time you work it out, assuming that you get any to germinate, it will be too late to do anything.

Please don't buy from Diggers club if they ever claim to have golden raspberries again.  The utter contempt that they showed in their first botched attempt (and the many other times they have disappointed customers with similar disrespectful stunts) should be enough to warn you off buying from them. 

Over winter when my plants are dormant I will hopefully have a few extra that I can sell through my for sale page.  If all goes well I should be able to sell a few each winter.  Unfortunately I can't offer pre-purchasing as I would hate to have a crop failure or something and not be able to come through.

Golden raspberries starting to ripen

Monday, 8 January 2018

Oyster mushrooms on cardboard

I wrote another blog on how I grew oyster mushrooms on newspaper.

Another way I grew them was on torn up pieces of cardboard in an ice cream container.  This method was fast, but the mushrooms were small and it was difficult to keep the right amount of moisture in the cardboard.  It would have been better to use a larger container and have some holes in the sides of it.  I didn't think to take any pictures of this.

Days to Maturity Oyster mushrooms on cardboard

27/06/2017 damp cardboard inoculated with oyster mushroom stems  Day 0
01/07/2017 noticeable mycelium growth                                              Day 4
16/07/2017 cardboard fully colonised, more added                             Day 19
24/08/2017 fruiting (about 2 months)                                                   Day 58
28/09/2017 fruiting again                                                                     Day 93

Saturday, 6 January 2018

Days to maturity oyster mushrooms on newspaper logs

I wondered how difficult it would be to grow edible mushrooms.  Mushroom kits are expensive, and many people who sell mushroom spawn charge a lot of money and often bang on about how they are amazingly talented experts and you will surely fail unless you pay for their advice.

So I decided to work out how to grow some edible mushrooms just using common sense.  I have grown many different plants, I have raised many different animals, I have studied mycology at university, how hard could it really be?  Button mushrooms grow on compost, I don't have great access to this and steralising it sounds like a hassle so I looked for something that grows on wood.

Paper and cardboard are made from wood and I have free access to these.  Oyster mushrooms (as well as a few others) grow on wood.  As it turns out, it is not overly difficult to grow edible oyster mushrooms at home.

I tried a few different methods to grow oyster mushrooms, all of which were free once I got the oyster mushroom mycelium to start with.  Some methods were easier than others, some produced larger mushrooms than others, some produced faster than others.  You can see in the pictures below that I had a few different things in the plastic bag.  I also tried a few different types of card board.  Turning a free waste product such as newspaper into something edible is always pretty cool.

One of the easiest methods I thought of was to make some fake logs out of newspaper.  Newspaper is often free and is easy to work with.  I made it damp, tied it together with string, inoculated this in one place with oyster mushroom, and then kept it in the wood shed in a plastic bag with the end open to allow in air and light.

Oyster mushrooms need oxygen to survive and contrary to what people may tell you they benefit from sunlight.  Every now and again I would dunk this in a bucket of water as the mushrooms need moisture to survive.

From inoculation to harvest was only about 4 months, this time could have been far shorter if I inoculated more than one spot.


02/07/2017   newspaper log inoculated with oyster mushroom    Day 0
13/11/2017   large mushroom fruiting                                          Day 133

Oyster mushrooms growing on newspaper


Wednesday, 3 January 2018

Maidenhair Fern

I wanted to get an office fern to make my day at work a little nicer, maidenhair ferns are always nice so I got one of them.

I have been told that this one is Adiantum raddianum but don't know for sure.  Many of the maidenhair ferns sold in Australia are A raddianum but there are a few other similar species as well as complex hybrids around.  After looking at NSW flora online I am pretty sure it is not one of the 8 native species of maidenhair fern.

My maidenhair fern was a tiny little fern when I got it, the fronds were only up to 6 cm long.  Over the past 12 or so months it has grown large, the fronds are now up to 38 cm long, and it has started to produce spores.  I plan to grow some more of these maidenhair ferns from spores when I find the time as growing ferns from spores is fun. 

The pictures from 2016 I had the pot sitting in a small 2 Liter white ice cream container.  Not long after the pictures were taken I re-potted it into a far larger 'self-watering' pot that was about the same size as that ice cream container.  The tiny fern looked silly in such a large pot but it quickly grew and filled its new pot.

Maidenhair fern 2016

My little office fern

Maidenhair fern 2017
The same office fern, only older and in a larger pot


Friday, 29 December 2017

Comparison of Thyme varieties

I have grown a bunch of different varieties of edible thyme over the years.  I haven’t disliked any but some are better than others.  Since writing this post I have done a better comparison of Jekkas thyme, have a look if you are interested.

I have always wanted someone to do a comparison of the different varieties of thyme, but the best I can find are some general words or exaggerated hype about just one variety, but no comparisons.  So I decided to write a quick comparison of some varieties I have grown and take some pictures to compare them. 

Before you read this please note the leaf size will vary on each plant depending on growing conditions, the photos will only give you a general comparison of plants grown under similar conditions.  All of the below varieties have survived for me through many harsh frosts, snow, and hail.

Each year I tend to cut the plants down pretty hard in spring, this encourages new growth and the trimmings can be planted and will usually grow new plants if watered a little.  Like many other leaf herbs, frequent harvests encourage it to produce and if left unharvested they can get a bit woody and unproductive.
All were same sized cuttings planted on the same day: Variegated lemon thyme, Orange peel thyme, Tabor thyme, Jekka's thyme
  
Comparison of Thyme varieties:
Regular thyme (aka Garden Thyme Thymus vulgaris) is a good edible herb, not surprisingly it smells and tastes of thyme.  The leaves are tiny and green.  It is meant to be drought hardy and frost hardy.  For some strange reason I have trouble growing it.  Random things happen that can’t be the fault of the variety such as my kids pull it up or the pot gets knocked over and one of the kids kicks it under a shrub where I can't find it.  It just hasn’t had a chance to thrive for me.  It is not included in the comparison photo as it looks tiny in its pot.  It is simple to strip the tiny leaves from the twigs. 

Silvery posy thyme (Thymus sp) is a lovely edible thyme.  The leaves are the same size as regular thyme but are variegated and interesting.  We grew it for years, it smells and tastes and is used just like regular thyme but is far prettier.  Mine was vigorous and strong, unfortunately being variegated means it does not cope with hot dry weather as well as all green varieties can.  After growing it in an arid climate with one too many weeks in a row where day time temperatures exceeded 40 Celsius it died, and I didn’t replace it.  Now that we have moved near Canberra I should get another one as it grows well here and I miss it.  
Thyme leaves back and front, from left to right: Garden thyme, Lemon thyme, Variegated lemon thyme, orange peel thyme, Jekka's thyme, Tabor thyme
Thyme comparison from left to right: lemon thyme (this plant is older than the rest), variegated lemon thyme, orange peel thyme, Tabor thyme, Jekka's thyme
Lemon thyme (Thymus citriodorus) is another great edible herb.  I have been growing my plant for over 9 years, it takes strong frost and heat/drought and has survived for me through some rather extreme conditions.  It has tiny leaves of a similar size to regular garden thyme that are green and smell like thyme and lemon.  Stripping the tiny leaves from the twigs is simple.  This plant is usually very productive and very hardy in heat and cold.

Left to right: Tabor Thyme, Variegated Lemon Thyme, Jekka's Thyme
Left to right: Garden thyme, Lemon thyme, Variegated lemon thyme, orange peel thyme
Variegated lemon thyme (Thymus citriodorus) tastes and smells the same as lemon thyme but the leaves are variegated.  Variegation varies from leaf to leaf and from branch to branch, some branches are whiter than others.  It probably does not take extreme heat as well as the green form, but it is a little prettier.  Stripping the tiny leaves form the stems is simple.  I will probably grow more of this as it is useful and pretty.

Left to right: Orange peel thyme, Jekka's thyme, Tabor thyme
Orange peel thyme (Thymus nitidus) is a low growing edible thyme that smells like a mix of thyme and spices.  Sometimes it smells a lot like orange peel, other times less orangey and more spicey.  The leaves are thinner than regular thyme, but still tiny and green.  Stripping the leaves from the stems is not as easy as regular thyme but not overly difficult.  This is not only edible but people also use it to create a fragrant thyme lawn.  It is a bit of a slow growing thyme until established.
Tabor thyme on left, Jekka's thyme in right
Jekka's thyme (Thymus sp) is a strong growing edible thyme with relatively long leaves that are green.  This has a strong thyme smell and taste.  Jekka's thyme is a vigorous grower that doesn’t take long to grow into a large plant.  I assume that it would not take extreme heat as well as smaller leaf forms.  When the stems are young and green it is difficult to strip leaves from the stems, as they get woodier this is no longer a problem.

Tabor thyme (Thymus sp) is another strong growing, vigorous edible herb.  It has the largest leaves I have seen on a thyme plant and is the fastest growing thyme I have grown.  It has a strong thyme smell and taste.  When young it is difficult to strip large leaves from soft stems, as the plant gets older the stems get stronger and this becomes simpler.  Tabor thyme is not well suited to hot arid climates and suffers a bit due to its larger soft leaves.


Where to buy culinary thyme plants
Most garden shops tend to sell thyme, sometimes they have different varieties.  I really should take some cuttings and sell some of the thyme varieties that I have through my for sale page as some of the thyme varieties I grow were difficult to come by but are really rather good. 

Tuesday, 26 December 2017

Days to Maturity Golden Raspberry

One of the raspberries I grew this year was golden raspberry.

Golden raspberries are a yellow fruited variety of red raspberry (Rubus idaeus).  There are currently very few varieties of yellow fruited raspberries in Australia (there may only be this one at the moment) and this one is a summer fruiting (floricane) variety. 

Days to maturity Golden Raspberry (Rubus idaeus)

Seeds planted       N/A grown from divisions
Germinated           N/A
Flowered              10/11/2017        Day 0
Fruit Ripe              15/12/2017       Day 35

For a long list of berry and vegetable days to harvest please click here.

golden raspberry Australia
Golden raspberry
golden raspberries Australia
Golden raspberry

Saturday, 9 December 2017

Perennial leek vs Regular leek

Back in 2013 I wrote a blog post comparing perennial leeks with regular leeks.  I have since done a better comparison and thought I would write another blog post comparing leeks.

I was given seven small regular leeks by a very lovely neighbour when we moved to this house.  I didn't ask what the variety was.  I planted them in a raised garden bed and decided to plant seven perennial leeks in the next row as a comparison.  Both rows contained seven similar sized leeks. 

Both sets of leeks were planted 30/10/2016.  I then left them for a year and did nothing other than water them every so often.  I was careful not to dig up and eat any leeks from either of these rows during this time.

I dug up both sets of leeks on 27/10/2017 and took pictures of both sets.  I figured 12 months of growth (and relative neglect) should give me a decent comparison.
Perennial Leeks for sale Australia
Leek comparison: Regular leeks on left, Perennial leeks on the right

Regular leeks 
The regular leeks didn't do very well for me.  I started with 7 plants each about the size of a pencil, after 12 months I ended up with two edible sized leeks, one small leek, and one small leek bulb growing off the base of one of the large leeks that could be replanted (you can't see the bulb in the photo).
Regular leeks

Perennial Leeks
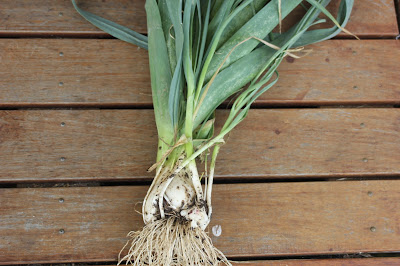
The perennial leeks did a lot better for me.  Again I started with seven leeks each about the size of a pencil.  Each of the seven leeks grew to a large size.  At this size I usually wouldn't eat these leeks as they are too large.  Larger leeks tend to be tough so we often eat a lot of smaller leeks which are more tender.  As well as being large each of the seven grew 30 to 50 baby leeks of various sizes.

You will notice that each of these leeks has a rounded base.  When we cut these leeks up to eat for dinner we noticed that each of them had many, many leek bulbs in the base.  These leeks would have died down over summer and when the weather cools each of the bulbs would have sprouted into a new plant.
multiplier leeks
Perennial Leeks
Take a closer look at how perennial leeks work.  Each plant grows until it is reasonably large.  They are usually smaller than store bought leeks but that could be the way I grow them.  Then they start to send up baby leeks from their base.  If the weather gets too hot or dry they die down to odd little bulbs.  When the weather cools these bulbs all sprout and you end up with more than you planted.  Another name for perennial leeks is multiplier leeks, it is easy to see why this name is used as they multiply like crazy.

multiplier leek propagation
Perennial leek - note the baby leeks growing from the base

Perennial Leek vs Regular Leek Comparison Results
The first and most obvious thing I noticed from this comparison is that I obviously don't know how to grow leeks!  I wouldn't have planted seven leeks and ended up with three leeks if I knew what I was doing. Considering how many years I have been growing leeks this came as a surprise to me.

The second thing I noticed is (considering that I don't know how to grow leeks) the perennial leeks gave a great yield.  Look at the photo, there are plenty of edible sized leeks in there, and there are plenty of tiny leeks to replace them.

I have been growing perennial leeks for many years and always get large consistent crops.  I never give them much attention and there are always some leeks large enough to eat, and there are always plenty of small leeks to replace any I eat.

I want vegetables that feed my family and don't need much attention from me, so perennial leeks are great.  I want vegetables that reproduce themselves with no effort from me, and perennial leeks are great for this.  I want vegetables that will always be there for me even if I forget about them and don't look after them, and perennial leeks are great for this.  For all of these reasons I am not sure if I will grow regular leeks again.  Perennial leeks are just so easy and productive.  With perennial leeks you plant once and harvest forever, what is not not love!

Perennial leeks for sale in Australia
I sell organically grown perennial leek plants and other perennial vegetables, herbs, heirloom vegetable seeds and a few other things on my for sale page.  I also sell Babington leeks, which are another type of perennial leek, but it grows numerous bulbils on their flower stalk.  Babington leeks take longer to produce a crop than these perennial leeks but once they start producing food they are also very productive.

Friday, 1 December 2017

String of Pearls Plant From Cuttings

Senecio rowleyanus is commonly known as string of pearls plant and looks similar to the Neptune’s necklace seaweed that you sometimes see washed up at the beach.  String of pearls plant is an easy to grow and surprisingly hardy succulent that was popular in the 1970’s in hanging baskets due to its cascading and remarkably beautiful form.  

Each little leaf on this delightful plant is almost spherical, making it look like a little green pea.  As these little pea like leaves grow on long string like stems the common name of "String of Pearls" plant seems rather fitting.  Each little leaf is green and has a small translucent window that lets light in for photosynthesis but restricts water loss.  String of pearls plants also grow a nice little flower that smells lovely, but it is their cascading form and pretty little leaves that it is mostly grown for.  Being a succulent means that they do not require large amounts of water.  Too much water can make them rot and is apparently the biggest cause of them failing to grow for people. 

I have always wanted to grow a string of pearls plant as I think they look amazing, but for some reason they are difficult to find in Australia.  I started to look online and found them in dedicated succulent nurseries but they were rather expensive, even more so when postage is added.  Being dedicated cacti and succulent nurseries I was not interested in anything else they sell so could not spread the postage cost over several items.  
string of pearls succulent cuttings
My String of Pearls plant - one year of growth
A few times I have seen plants in plant shops, but the high price always made me shy away from buying one.  Having never grown one I did not want to spend a fortune and then have the thing die.  The high price made me wonder if they were difficult to grow.  I also wasn’t sure if they would grow well over the warmer months and not survive the harsh winter here.  I considered buying seeds, but the only place I could find string of pearls seed was ebay and there are far too many thieves on ebay who sell seeds that do not exist so I was not willing to take the risk. 

Then, as luck would have it, one day I got two very small cuttings.  One was about 5 cm long, the other only 3 cm long, they were both rather battered by the time I got them, and I was not sure if they were even large enough to be viable.  I looked on the internet and found conflicting advice on how to grow string of pearls plants from cuttings, some places made it sound incredibly difficult, others made it sound overly simple.  

Some places recommended to simply lay the cutting on soil and it would root everywhere that the leaves joined the stem.  Other places recommend removing the lower few leaves and plant the stem.  Other places recommended removing the pearls and planting them partly exposed.  I had two small cuttings so decided to try a little of each.  


String of Pearls plants starting to grow
I got a small pot of soil, lay the larger cutting on the soil and ensured that each of the leaf nodes were in contact with the soil, I removed the lower leaf from the smaller cutting and planted it in the same pot.  Everywhere recommends removing the lower few leaves, but the cutting was so tiny I could only remove one single pearl.  I planted this pearl so that the top was in the light and the bottom was in the soil.  I had a feeling that the smaller cutting would not survive as it was just so tiny, but I had to try.  Some succulents grow well from planting a single leaf, so I had nothing to lose by planting the pearl.  I figured having both cuttings in the same pot would give me a good comparison and make it easier to keep an eye on them. 

Many people grow string of pearls in the house in a hanging basket or somewhere it can drape over the side and look attractive, I grew mine outside in a small pot of soil.  I did not cover the cuttings to increase humidity, I watered reasonably often, and I kept them in dappled light so they would not get too hot or dry out too fast.  This all seemed pretty reasonable to me.  If they all started to die I had a few ideas, but I wanted to go with the low effort approach first as minimal effort is how I like to garden. 

It became pretty obvious early on that planting a leaf (or peal) was not going to result in a plant.  I have tried this several times now and never seen any sign of success.  I think it is possible, but not likely to happen.  Each time I take a cutting and remove lower leaves I plant them, as I am losing nothing by trying, but I don’t expect to ever have one pearl grow a new plant for me unless I really put in some effort. 
String of Pearls
The larger cutting that was just on the surface of the soil was not doing a great deal.  After a while the cutting on top of the soil started to shrivel and wither.  It was not growing any roots and was slowly going to die.  Being a succulent they store moisture and take a long time to die like this.  I am glad I had two cuttings so I could try this method. 

Under the right situation the string of pearls plant can root when simply placed on the soil surface like this, but not when the cuttings are so small.  I know that as the plant grows it sends roots down at leaf nodes from time to time and I can cut that section off to have another plant, but when cuttings are tiny and not overly well looked after this method does not seem like the best way to root cuttings.  As this was going to end poorly I removed the lower two leaves and planted the cutting, it recovered and has since survived and grown rather well. 

The tiny cutting that I originally planted and assumed would die because it was so small was actually growing strong and grew much larger than its counterpart in a relatively short amount of time.  I had only removed the lower leaf and planted the lower section of stem, this appears to be the easiest way to propagate string of pearls plant.  The cutting quickly grew longer and then branched several times and I was able to take a few more tiny cuttings.  I planted each of these cuttings in the same pot to help it look nicer. 

I now had a pot with several healthy string of pearls plants trailing over the sides of it.  These healthy growing plants do put down roots at leaf nodes every now and again, so I can understand why people say that cuttings can be grown in this way, but removing lower leaves and planting the stem seems to be more efficient and just as easy.  I have no idea if bottom heat or misting or rooting hormones make any difference to growth rate as I haven’t needed to try them, I have never had a cutting die.  I remove the lower leaves, stick them in soil, and away they grow.  They are not the fastest growing plant I have ever seen, but they are also not overly slow. 
String of pearls plants, getting bigger

My string of pearls plants were all happily growing over the warmer months getting longer and occasionally branching.  Being a succulent meant that I did not have to water them very often, just a little every now and again was enough to keep them thriving and looking great.  This is exactly what I had hoped would happen, they grew so easily, they required very little from me, and they looked amazing.  I keep looking at my string of pearls plant and think how small they are as I would love plants that are several feet long, then I look back to how tiny they were to begin with and notice that they have actually grown well for me.  

Then winter came, I didn’t know how to grow them so I looked on the internet for their care and everywhere said to bring them in out of the cold and protect them from frost.  Space is an issue in my house, so I placed the plants outside where they would not get much frost and hoped for the best.  I figured they were large enough that if they were damaged I could move them inside then and they should eventually recover.  

This year has been cold, we had snow, hail and many frosts and plants that normally survive winter with minimal damage have died off completely.  The string of pearls plants stopped growing over winter but have shown no frost damage.  Admittedly they are in a position that gets less frosts, but the point is that they survived winter completely un-phased.  I probably wouldn’t grow them in the open in frosty areas (although I may experiment with this next year), but with a little protection they do just fine.  Now that winter is over they have started to grow again.  

There is one thing that I dislike about String of Pearls plants, and that is they are not edible or useful.  I mostly grow things that are edible or useful in some way, and this string of pearls plant is completely useless other than looking fantastic, having nice smelling flowers, and generally making me smile.  All parts of the string of pearls plant are said to be mildly toxic, which means it is not good for pets or kids to eat too much of them.  I have plenty of kids and pets and none of them have ever even considered eating this plant, and from what I have read on the internet the side effects are a generally upset stomach, so I can’t imagine it being too much of an issue unless you have a really greedy and stupid cat or something that eats huge amounts of the plant.  

String of pearls plant used to be very popular in Australia, but for some reason they are difficult to find at the moment.  It is too bad as they look great and are so simple to grow.  As well as the green variety that I have there is also a variegated version of the string of pearls plant.  I have only seen this being sold in one place and one day I should try to get one. 
String of pearls cutting starting to grow

Where to buy Sting of Pearls plants in Australia
I sell unrooted string of pearls plant cuttings through my for sale page.  I take the cutting after you order just prior to posting so they are fresh and healthy and could easily survive several weeks before being planted.  Most have tiny roots starting to form.  When you get the cuttings please remove the lower few pearls, plant the cutting in some soil, give them dappled light, and water them.  It really is that simple.  Plant them as soon as you can after they arrive to help them grow as fast as possible for you, while they will survive a long time without being planted I prefer that you plant them as soon as possible.  I do not guarantee that the cuttings will survive and grow for you as I have no control over the growing conditions at your place, but I am yet to have any planted cuttings fail so think you are pretty safe to go with this option. 

I also sell small string of pearls plants through my for sale page.  The plants cost more as they have taken me more time to produce.  They are not in a pot, they are wrapped in damp newspaper and have minimal soil on the roots.  I take cuttings and then grow them on until I am absolutely certain that they have good roots and are actively getting larger.  Plants usually grow faster than cuttings as they already have roots, cuttings take a little while longer to do anything as they have to grow roots before they can start to get larger. 

String of pearls plants flower and can produce viable seed.  At this stage I don’t sell string of pearls seeds as I don’t know how long they are viable, or the best/easiest way to grow them from seed, and I would hate to sell dead seeds.  I am currently experimenting with the best way to grow string of pearls plant from seeds, and to find out how long they remain viable when stored properly, once I have this all worked out I plan to also sell string of pearls seeds as it is a good way for people to get a lot of plants for less money.