Saturday, 11 March 2023

Micro farming with tiny vegetables

I grow a lot of different vegetables, herbs, berries, and other fun things.  I grow a lot of perennial vegetables, and also some annuals and biennials.  

I have done a little breeding and produced some really enormous plants

Massive vegetables are great if you have the space and have a large family to feed, but are not worth growing if you only have a balcony or a windowsill to grow your plants.  If you have a small family, live on your own or only live with your partner, then smaller vegetables may be more suitable for you to grow.  

I have also done some breeding of smaller vegetable plants such as Igloo tomato, Nanuq tomato, Immali corn, Oaken tomato, Tracey Tomato.  Immali corn reaches about 5 feet tall, the tomatoes reach about one to two foot tall.  While these are nowhere near the monstrous sizes that other varieties can reach, they are also not tiny.

I can also see the point of growing tiny vegetables (as well as breeding enormous vegetables, and smaller vegetables) so I have also started dabbling in breeding micro vegetables.  Micro vegetables are nutritious and adorable, plus they take next to no room to grow.  Micro vegetables won't feed your family, but they can be the difference between growing some food, or growing nothing.

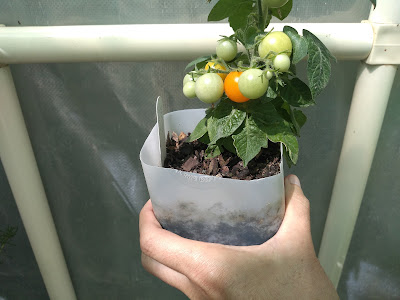
Hedou bok choy and Micro Tom tomato

Tiny micro dwarf vegetables are fun to grow.  They take up next to no room, they produce nutritious wholesome organic food, they are ridiculously cute, they go from seed to harvest in a very small amount of time, and you can grow several crops each year.  Being tiny means that you harvest what you will eat fresh that day, no need to store anything and no waste.

Micro vegetables can be grown by urban farmers with nothing more than a sunny window sill, some water, and a pot of dirt.  If you can't find a pot, then cut off the base of a milk bottle, or use a yoghurt container, be creative!  If it can hold soil, and has drainage holes, then it will probably work for micro vegetables.

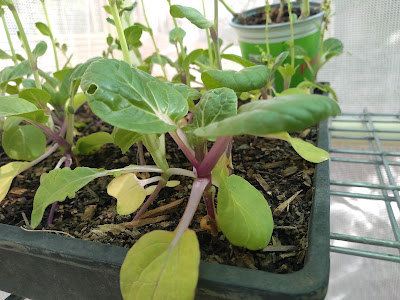
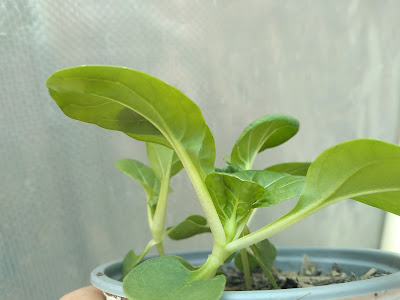
Below are some photos of Micro Tom tomato, and Hedou Bok Choy.  These are the tiniest varieties of each of these vegetables.  
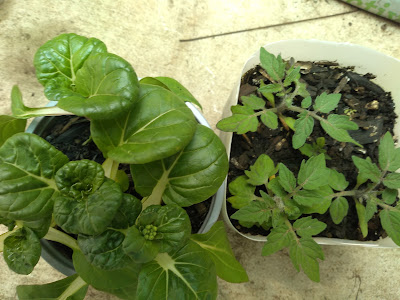
Micro Vegetables - nutritious, fast growing, and cute

Hedou Bok Choy is adorable.  It is tiny and cute and makes Baby Bok Choy look enormous.  The ones in the photos are growing in a 10cm pot.  

This is the size that these are normally harvested, but I am keeping these particular plants for seed saving.  As you can see, they take up next to no room, could easily be grown under taller vegetables or other plants, and you harvest exactly as many as you plan to eat in that meal - making them super fresh.

There were five plants in that tiny pot, but one was culled as it did not meet my strict seed saving requirements.  Five plants easily fit in such a tiny pot, I have a feeling I could have put in even more and they would have grown just as well.  

Hedou Bok Choy - several plants in 10cm pot

I have a seedling tray that was partly empty.  Instead of having unused soil with nothing growing in it, I decided to plant out some Hedou bok choy.  

In an area that was 25cm by 20cm I planted 30 Hedou bok choy plants.  Six rows of five plants spaced relatively evenly apart.  
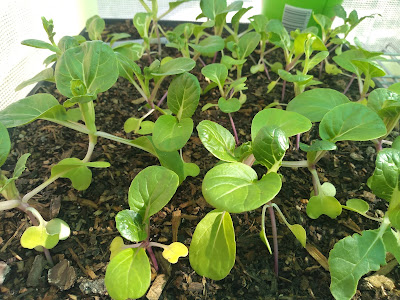
Hedou Micro Bok Choy almost ready to harvest

Hedou Bok Choy Flowering

These could have been planted slightly closer if I wanted and they would have still thrived.  That's the beauty of micro vegetables, they can be grown in impossibly small spaces and still produce fresh food.

They do need some depth of soil for root space.  The Hedou Bok Choy that is in the small pot would have a depth of under 10cm for roots, this seems to be ample.  You may notice that the plants in this pot have larger leaves.

The thirty plants were in a seed raising tray with about 3 or 4cm depth for roots, that did not seem enough and the plants bolted to flower pretty quickly.  This early bolting may have been caused by the heat and fluctuating weather, but I suspect if they had a deeper pot they would have held off a little longer.  

Early bolting is not the end of the world, I ate some of these plants, and kept the best ones to produce seed.  You can eat the flower stems of bok choy, there are even some varieties that have been bred for that exact purpose.
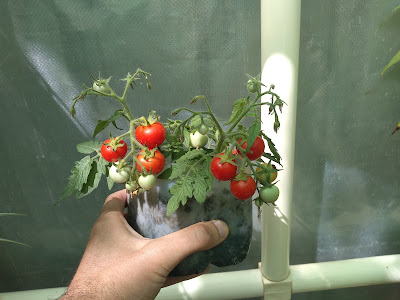
Micro Tom tomatoes ripening


Micro Tom plants flowering and fruiting

Micro Tom is the smallest tomato variety ever produced.  They don't produce the smallest fruit, they produce the smallest plants.  

The plants below have grown under shade in my greenhouse and are much taller than normal.  When grown in direct sun sometimes they barely reach 2 inches tall. 

Micro Tom getting tall under low light

My micro tom plants have grown to heights of between 4cm and 9cm tall.  I have grown them in pots, as well as in the garden, and have never had a plant reach 10 cm tall yet.  They are tiny.
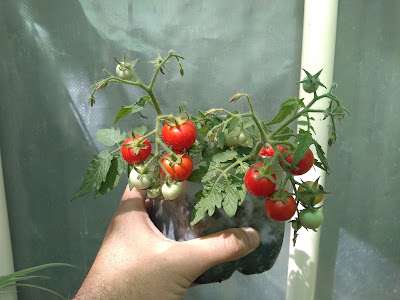
Micro Tom Tomato Australia
Micro Tom tomato fruiting

The plants in the photos below are about 2cm tall (just under an inch) and already producing flower buds!  

Usually I get about ten small red round tomatoes per Micro Tom plant.  Sometimes more, sometimes less, but the average for a well grown plant is ten fruits.

Micro Tom flowering at one inch tall

The plants are growing in the bottom of a milk bottle which measures10cm x 10cm.  There are only 4 plants in there as I planted 5 seeds and only 4 germinated.  Once again I think more could have easily put more plants in without it bothering them at all.  

There are not many varieties of micro dwarf tomatoes in Australia.  I currently grow Micro Tom, Florida Petite, Micro Venus, and am attempting to breed some woolly leaf micro tomatoes of various different colours.  
Venus micro tomato

Micro Venus Tomato Australia
Micro Venus tomato 

Micro Tom is always under 10cm tall, the other micro tomato plants usually reach 10-15cm tall.  This is tiny when you consider that most dwarf tomato plants usually reach about 4 feet tall.

The genetics behind micro tomatoes is fascinating if you are breeding new varieties, but to everyone else can be a bit of a dry topic so I won't discuss it here.  

There are a few varieties of tiny herbs around too, but most of those get surprisingly big.  If you have limited space, but still want to grow a little something to eat why not try tiny vegetables.  There are plenty of different ones out there, not just the two I mentioned.  

There is a good chance I will have seeds of these for sale at different times.  I grow everything, including these micro vegetables, organically.  When I do have extra seeds I will try to list them on my for sale page.

Micro Tom plants fruiting

Bok choy gets some colour under high light

Window sill farming at its best!

Micro bok choy

Saturday, 4 March 2023

Drosera capensis Hercules seedlings

I wrote a post about my sundew Drosera capensis Hercules.  Back then I had sown a few seeds and the seedlings were still tiny.  

Some time has passed, the seedlings have grown, I have almost lost my original plant once or twice, and I thought it time to write a blog post about the seedlings.  

Just like in my previous post, I seem unable to take nice looking photos of my Hercules plants.  They do catch incredible numbers of small insects, so it is rare to see a leaf that is nice and dewy without being covered by many tiny dead things.

Drosera capensis 'Hercules' true clone
Seed grown plants (Hercules x self)

Originally, Hercules was registered as an interspecific hybrid between Drosera capensis 'alba' and Drosera aliciae.  Since then things have changed and the current belief is that Hercules is a wide leaf variant of Drosera capensis.

For me this clone seems reluctant to grow from cuttings.  Some are successful, but not the high percent that I normally get from capensis.  

My Hercules plan seems to grow really well, then for some unknown reason it dies back badly.  Then it grows bigger than before, and mysteriously dies back again.  I have come very close to losing this close a few times.  Hopefully I never lose it, it is such a great plant.


Drosera capensis seed grown (Hercules x Hercules)

D capensis Hercules - cutting grown

My parent Hercules plant is the true clone.  This was sent to me as a plant that grew from a cutting taken from the original Hercules plant.  

Judging from what my parent plant has done, and based on what the seedlings are doing, I would be pretty confident that this is not an interspecific hybrid, and is a form of capensis.

The seedlings (Hercules x Hercules) so far are true to type.  I had expected only a small percentage to look similar to the parent, but so far there have not been any off types.  

The seedling grown plants appear the same as the parent in every respect.  They grow the nice wide leaves, and grow a bit slower for me than typical.  They are so similar that if I did not keep them separate I would not be able to tell which was which!

Hercules x self - seedlings

Capensis Hercules grows wide leaves, has the typical colouration, produces many flowers per stalk with the typical colouration, and produces rather large flowers that are more open than 'typical' or 'alba'.  Last year when it flowered I saved some seed, and planted some, but unfortunately lost most of the seed.  This year it is flowering again, hopefully I am able to save and plant some more self crossed seed.

The self crossed seedlings have not flowered yet so I don't know what the flowers will be like, but in every other respect I am unable to tell them apart from the parent.  

If Hercules was the first cross between two different species I would expect to see some diversity in the seedlings.  To be entirely honest, even if this is a spontaneous mutation of pure capensis I would still expect to see some diversity in its seedlings.  I can't explain why the seedlings are so homogenous.  Perhaps there is more to the history of Hercules that I don't know about.  

Hercules - true clone

From here I plan to plant out a bunch more seed, and grow out a few more seedlings.  They appear to grow a bit slower than typical or alba, or at least they have grown slower for me so far.  

If I ever have any spare seed or seedlings for sale I will label them as Hercules x self, or Hercules x Hercules, and offer them through my for sale page.  Being in Australia I can probably can't send them overseas.  I would probably consider a trade for other carnivorous plants.  


Drosera capensis Hercules - cutting grown in live sphagnum moss

Saturday, 25 February 2023

Variegated maidenhair fern update

A few years ago I bought a variegated maidenhair fern (Adiantum raddianum 'Variegata') and wrote a blog post about it.  

My variegated maidenhair fern did poorly.  I had it in a self-watering pot that was not designed well.  I normally grow maidenhair ferns in self watering pots and they usually work well, but this one functioned more like a pot without a drainage hole.  My fern went down hill badly until I repotted it and changed some of the soil.

My fern grew ok from here, getting larger and stronger.  The fern reached a rather large size and had long graceful variegated green and white fronds.

Then I had to move it to a different spot.  Maidenhair ferns do not handle direct sunlight, it burns them.  Variegated maidenhair ferns are even less able to tolerate direct sunlight.  Maidenhair ferns don't cope with no light, variegated ones even less so.  

Variegated maidenhair ferns can be a bit precious, but they are worth the effort.  

Variegated maidenhair fern fronds

Maidenhair ferns need bright shade, they thrive with a little direct sunlight early in the morning.  Contrary to what you have been told, maidenhair ferns do not cope with low light.  If the light is too low they slowly die.  

This fern is so beautiful that I really want it growing inside the house where I can see it.  Unfortunately, my variegated maidenhair fern did not get enough light in the spot I chose for it.  It declined again.  I tried moving it a little closer to the light, where it struggled to survive.  After some time of declining it only had one single frond!

I have a sheltered spot outside where I grow some maidenhair ferns and other delicate plants.  It is perfect for them.  They get a little direct sun at sunrise, then bright shade for the rest of the day.  

I don't want my variegated maidenhair fern to die, so I moved it outside.  I won't see it as much out there, but I sit out there on warm days and drink coffee so will still get to see it.  

Some of my ferns

Maidenhair ferns can bounce back quickly if they have enough stored energy, but my little fern had depleted its energy over a long time inside the house where it did not get enough bright light, so I was not sure if it could survive.

The fern immediately started producing new tiny fronds.  This filled me with hope that my fern would survive.  These new fronds were almost immediately eaten by slugs or snails.  

My fern still only had the one frond, only now it had used some of its stored energy to produce more fronds that had been eaten.  To make matters worse, the remaining frond was being damaged by the wind.  

This was not good.

Variegated maidenhair ferns Australia
Variegated maidenhair fern

I don't use much snail poison, I don't tend to use it ever, but figured this was probably the one time that I should use it.  I bought one that is iron based, and put a little on the soil near my variegated maiden hair fern.  

Apparently this iron based snail bait kills slugs and snails then breaks down and does not leave toxic residues.  The ferns are up on the deck so the chances of a bluetongue lizard eating it (or a snail getting down to them after injesting it) is low.  I am still not keen on using poison, so I only used a tiny bit.

I don't like using poisons, but there is a time and a place for them.  I don't want to lose my fern.  It took years to track one down and it was not cheap.  If this one died I may never find another.

The plant is uneven for now while it builds strength


Slowly, this plant produced more fronds.  At first they were tiny.  Some were damaged by wind or heat, but none were touched by slugs and snails.  

Over time my variegated maidenhair fern produced more fronds.  At first they were very small fronds, then the next ones were slightly larger, and the next ones larger again.  This is all a good sign.

Variegated Maidenhair fern

The variegated maidenhair fern is now reasonable sized and starting to look healthy.  

The fronds are about half as long as they used to be, but they are getting larger as the plant gets stronger.  The plant also has a decent number of fronds now, and looks healthy enough to bounce back if it gets damaged.


Young fronds of maidenhair ferns are light green, and the variegation can be difficult to notice.  As the frond ages it turns darker green, and the white variegation really stands out.  

I have heard that some variegated maidenhair ferns have some non-variegated fronds, but so far mine has not done this.  All of the fronds have at least some variegation.


Normally I would rotate the pot a quarter turn each week so the growth is more even.  As my little fern had such little energy I decided not to do this yet.  I decided to let it orientate its fronds to collect as much light as they could and allow the plant to become stronger.  

Once my fern is a little stronger I will probably start to rotate it each week and slowly even out the growth.  

Variegated maidenhair fern growing stronger 

There appear to be a few plants in the pot.  In spring if things are still going well I may attempt to divide this so I have a few of them.  If it doesn't look strong enough, I will give it another year or so before trying to divide it.  

For now though I plan to allow the plant to do whatever it needs to do so it can gain back its strength.

Variegated maiden hair fern - new fronds

You probably have also noticed that I left the old dead fronds on the plant.  Normally I would try to remove them so the plant looks nicer.  

My variegated maidenhair fern was very weak, and it is growing outside where it gets hot wind in summer and cold winds over winter.  I figured the dead fronds would help to insulate it a little, slightly reduce water loss, and help to block the wind ever so slightly.  For these reasons I have left them on for now. 

I will probably leave it like this with the dead fronds until spring.  If everything is still going well in spring I will remove the dead fronds.  

Fronds divide a little at the tips
Variegated fronds

I like maidenhair ferns, and I think the variegated form is beautiful.  I am glad my maidenhair fern has survived.

Saturday, 18 February 2023

Semi Aquatic Vegetables

A few years ago we bought a 'self watering' pot.  I put a nice fern in it.  After a short while I needed to transplant the fern into something else as it started to die.

Unlike other self watering pots that we have which work perfectly, this one was poorly designed and does not work.  The soil gets all swampy and wet, which rots and kills most plants.  There is no little gap for air/drainage, and is essentially a pot with no drainage.

Instead of throwing away this pot, I decided to try and grow some water loving herbs and vegetables.  Perhaps they would like to grow in this pot.

I have some things such as Vietnamese coriander, water celery, fish mint, and various types of mint that I know would do well in here.  I also suspect that water chestnuts would do well in there.  I didn't want to grow any of these as they are doing so well under other conditions.

I also have a few other edible plants that do ok where I currently grow them, but I think may thrive in this pot.  Hopefully I will stumble across a better way to grow these plants.  

I decided to try willowherb (Epilobium parviflorum), Watercress (Nasturtium officinale), Gotu Kola (Centella asiatica), Brahmi (Bacopa monnieri), and Kangkong (Ipomoea aquatica).  All of these plants are known for loving water and growing on the edge of ponds or even growing submerged with their leaves out of the water.  I hope one or more of these will be well suited to this bog garden life.

Other than kangkong which were transplanted seedlings, all the others were cutting grown.  The first photos were taken 23 December.  Everything is looking limp after being transplanted the previous day.

Willowherb, Watercress, Gotu kola, Brahmi, and Kangkong

Everything was pretty small

The next photos were taken 04 January.  In under two weeks the plants have grown very fast!  

The willowherb is slowly growing, and the Gotu Kola hasn't done a great deal yet.  You can't really tell from the photo but the Brahmi has done a lot of growing over the two weeks.  Both Watercress and Kang Kong appear to be loving this new pot and their growth is rocketing along.

Less then two weeks of growth

Willowherb, Watercress, Gotu kola, Brahmi, and Kangkong

For soil I just used what I cleaned out of a drain that is in front of the garage.  It is mostly made up of soil and leaf litter that has been broken into small pieces.  This soil has weed seeds in it so I remove grass etc as it germinates.  Other than that it seems ideal for this purpose.  It holds water well, seems pretty fertile, and has plenty of organic matter that will break down to release further nutrients over time.

I am growing this little pot of herbs and vegetables in my greenhouse.  It is pretty warm in there over summer but also has some shade from the sun.  

The photos below were taken 13 January after three weeks of growth.  

The water cress is the standout and is growing like mad, it is flowering, and spilling over the sides of the pot.  Before I took these photos I had already been removing some of the watercress.  

The kangkong seems to be growing well and has large fat leaves but not much stem length.  Hopefully I get to eat some kangkong this year as well as grow the plants large enough to over winter in the greenhouse.

Brahmi seems to be growing well and has almost covered the surface of the soil.  I'm surprised that it is not flowering yet.  I quite like brahmi but it doesn't grow fast enough for my liking.

Willowherb is getting longer leaves and is larger overall.  This plant seems to be dividing, which is what I was hoping for.  

Gotu kola seems to have disappeared.  I think the runner I used was too tiny and may not have had enough roots, so I may put in another plant to see how it goes.    

Three weeks of growth

Kangkong growing larger, water cress spilling over the sides

Watercress flowering

After seven weeks I took the pictures below.  

Kangkong is looking healthy and getting bigger, but growing far slower than I would like.  I had hoped that my kangkong would be large enough to harvest by now, but it isn't.  I can pick a few leaves here and there, but not enough.  If it is going to have any chance of survival the kangkong will need to get larger before winter.

The watercress is spilling over the sides, flowering, and dropping seed.  I have allowed some of the seed to drop into the pot.  I have also harvested some of the watercress.  Water cress seems to be well suited to life in this pot.

Gotu Kola is in there, and appears to be alive, but isn't doing a great deal of anything.  I really should have tried this using a larger plant with more established root system.

The brahmi is in there, and flowering, but it is not all that huge and its growth is not at all rampant.  I have a feeling that brahmi needs a little more shade than this pot is getting.

The willow herb is getting big.  It has grown a bit of a stem and is reaching over the side of the pot, it now has long leaves, and appears to be dividing.  I think willowherb is well suited to life in this pot.

After seven weeks


Willow herb on left, kangkong on right 

This pot constantly has wet soil and there is water in the reservoir.  Unlike good self-watering pots this one has no space for air/drainage, so it functions more like a pot with no drainage hole.  If plants work well in here I can replicate the setup by getting a pot of soil and putting it in an ice cream container or something with a little water in it.

From this early progress it appears that some of these plants should flourish in this pot.  Hopefully this proves true over the longer term and is not just things doing well in the short term.  

From here I plan to keep it growing, harvest what I want, and see what survives winter.  


Saturday, 11 February 2023

Variegated wasabi herb Diplotaxis erucoides

I have been growing Diplotaxis erucoides for six or seven years.  It is commonly called wasabi herb, or wall rocket, white rocket, white wallrocket, and it probably has a few other common names.  This is not related to true wasabi, but the leaves do have a similar (yet far milder) taste.  

This is an edible herb/vegetable with spicy leaves and sweet/spicy edible flowers.  Honey bees and other beneficial insects love this plant.  It holds up well to frost, it prefers mild temperatures, and it survives heat.  For me, this plant generously self seeds through my garden and lawn. 

I think this plant is underutilised and should be grown by more people if for no other reason than to feed beneficial insects.  

Variegated wasabi herb

Wasabi herb grows and matures fast.  They can be annuals and die after flowering, some are short lived perennials that survive (and flower) for a few years before they die.  I'm not sure if this difference is genetic but I assume it is at least somewhat influenced by the environment.

They pop up in my vegetable garden, in my lawn, in the chicken run, and I sprinkle seed on bare soil between crops to dig in as a green manure.  It matures quite fast.  I think that having something that feeds hover flies, parasitoid wasps, and bees on what would have otherwise been fallow soil is a good thing.  

This year, out of the many hundreds of self seeded plants that appeared, one had variegated leaves. 

I have seen hundreds, if not thousands, of wasabi herb plants and this is the first one that has shown any observable difference to all the rest.

This plant is growing amongst my sweet corn plants.  I had planned on weeding it out once the corn was established.  After noticing it had variegation I decided to leave it.

Variegated wasabi herb - young plant

I don't know if this variegation is a genetic mutation, or if is caused by the environment in some way.  I suspect it is not caused by spray drift as I don't spray things, and this plant had many other self seeded wasabi herb plants surrounding it that do not show any variegation.  Perhaps this is a spontaneous mutation, perhaps it is not, I don't know yet.

I plan to try and save seed from this plant to see if they produce variegated offspring.  

If you look closely you can see only one side displays variegation.  As only one side is variegated I plan to try and save seeds from this side separately if I can. 

There is a chance I will leave it too late and the seeds will scatter.  If this happens I will try to allow some of the seedlings to grow out and see if any are variegated.  Even if none of the seedlings are variegated there is still a chance that future generations may be variegated.

Hopefully this variegation is hereditary and not caused by the environment.  If it is, I may eventually be able to stabilise a variegated line of wasabi herb.  


Variegated Diplotaxis erucoides flowering

I currently sell seed of wasabi herb through my for sale page.  They are a good little plant to grow even if you don't eat them.  

If I ever stabilise a variegated line (this will take some time) I will also list them on my for sale page.  If I do stabilise a variegated line I will probably post a few updates along the way.  


Saturday, 4 February 2023

Bird nest fern rejuvenation update

I have a birdsnest fern that I have been growing for over 20 years.  It was tiny, then it grew huge, then over the last few years it declined from lack of care.  Late in 2021 I decided to try and rejuvenate this fern.  

The pot it was growing in had lost most of its soil, so I topped this up with new soil and leaf litter.  I also sprinkled some used tea leaves over the new soil.  Tea leaves act as a fertiliser, it is mild enough for the fern, and it breaks down and feeds your plant over a very long time.

Birds nest fern - over 20 years old and still growing

My fern grew a new set of fronds pretty soon after being repotted.  Even though it is so old, and had quite a number of years of neglect, it has started to grow well again.

It still looks a little shabby at times, and it is nowhere as big as it once was, but it is getting healthier and stringer.  I really should cut off the old fronds so this plant can look good again.  

Bird nest fern getting big

I often see birdsnest ferns being sold by florists and garden centers for cheap when they are small.  People put them on their desk or book shelf.  The ferns are cheap, so people generally they don't look after them, and a year or two later the thing is dead and gets replaced by some other ornamental trinket either living or inanimate.   

Birds nest ferns are simple to care for, they can be a long term investment and can get massive if you can be bothered to look after them.  My bird nest fern reached a point where it had fronds that were over 6 feet long.  It is far smaller now. 

If you see a cute little birds nest fern and decide to grow it, please remember that these are living things.  Just because they are cheap does not mean they are disposable.  They are only cheap because they are simple to grow.

Sunday, 29 January 2023

Hedou Tiny Bok Choy days to maturity

Bok choy (Brassica rapa) is known for being a fast growing and nutritious vegetable.  Most bok choy varieties are relatively small and good for balcony farming.  This year I am growing a tiny extra dwarf bok choy variety called 'Hedou'.  

From all accounts, bok choy is a highly nutritious vegetable, very fast growing, and being extra compact in size makes Hedou bok choy super cutie.  All of this makes Hedou Bok Choi perfect for urban farmers and gardeners with limited space.  Being so cute and fast to grow also make it easy to get kids involved in gardening.  

Hedou tiny bok choy Australia
Hedou Bok Choy

Extra dwarf Hedou Bok Choy Australia
I grew some Bok Choy in pots for seed saving

The Hedou variety of micro Bok Choy seems to have some internet hype, yet very little actual information can be found anywhere on the internet.  There are a few pictures here and there, and a few places selling seed, but that is about all.

I grew some of these in the veggie garden between other vegetables where they took up next to no space.  Brassicas tend to cross pollinate like mad, so I grew some in small pots in my greenhouse for saving seed.  

As there is so little information around I decided it would be good if I recorded my progress to give an idea of what to expect when growing Hedou tiny bok choy.  The first time I soaked seed overnight, the second planting I didn't, I have recorded both below. 

Being in Australia, dates are written Day/Month/Year.

Hedou Bok Choy Australia
Hedou Dwarf Bok Choy 
Hedou Bok Choy gets some petiole/stem colour with high light

Days to maturity Hedou Bok Choy (Brassica rapa)

Seeds soaked       18/11/2022      Day -1
Seeds planted       19/11/2022     Day 0
Germinating         22/11/2022     Day 3
Heads forming     10/12/2022     Day 21   
Flowering            24/12/2022     Day 34    
Seeds ripe            25/01/2023     Day 67

I also planted some Hedou Bok Choy without soaking them first:  

Seeds planted     17/12/2022      Day 0
Germinated        20/12/2022      Day 3
Harvest from      13/01/2023      Day 27  (Note: most bolted to flower)
Flowering           16/01/2023      Day 30


On the face of it, three or four weeks seems like an absurdly short amount of time from planting the seed to harvest, especially when you consider that many other vegetables take 10 or so days to simply germinate. When I look at how small these plants are, and how quickly they germinated, it makes sense.  

To be clear, they won't always take three weeks, they may take four or five under harsher conditions, but this is still very fast.  

If conditions are bad (too hot, inconsistent watering, too cold etc) they may bolt to seed early.  The heat hit so my second lot bolted to flower.  If this happens you can harvest and eat them before they send up a flower stalk.  They still taste the same.  If you let the flower stalk get too tall they get a bit tough and stringy.  Once they have reached this point you can just allow them to flower and set seed.  Hedou is a stable heirloom variety that will breed true to type.  If your neighbour has any form of Brassica rapa flowering they will probably cross, any F1 seedlings will still be edible.  

Hedou Bok Choy grow fast, and are small at full size.  Most people eat several of these in a meal, meaning you harvest what you eat and you eat what you harvest - there is never any waste, and never anything to store.  You can also grow an awful lot of plants in a tiny space, so their small size can be an advantage.  

Hedou Bok Choy Flowering 

Hedou Bok Choy happily grows in a small pot of soil meaning it can be easily grown with no land and easily tended by children or the elderly.  This would be a great vegetable to grow in a school kitchen garden as the time from seed to harvest is so short.  

I think succession planting is key, each time you harvest some you plant some more seeds, and it does not take long to get into a rhythm that ensures a constant supply of this tiny yet nutritious vegetable.  Or if you had the space you could grow a patch of them and allow a few to self seed.  

One thing that surprised me was the short time it took Hedou Bok Choy to produce seed.  From planting a seed, until harvesting its seeds, was around ten weeks.  I am sure this could be less under different conditions.  This timing sounds pretty perfect for a school science project.  

Having such short generational time also makes me wonder if I should start a breeding project with it myself.  But that will have to wait.  For now I am happy growing it, eating it, and saving its seed.  There appear to be very few places in Australia selling Hedou Bok Choy seed.  At the moment I am saving seed to grow myself, once I have saved enough seed I will list it on my for sale page.

I have a blog post with days to maturity that includes a long list of vegetables and berries etc where I have recorded the number of days from planting a seed until harvesting the first crop. 

Tuesday, 17 January 2023

Goldfish Barrelponics Update 2

I wrote a previous post about my goldfish barrelponics.  It started getting too long so I am writing a second update with plants that work well in the longer term. 

After my barrelponics had been going well for almost two years I decided to clean out the gravel pot as it was full of roots.  I removed most of the plants, tore off most of their roots, and roughly cleaned most of the gravel and added it back to a milk bottle.  I had to cut the old milk bottle apart to get the gravel out as it was completely full of roots, so I have put everything back into a new milk bottle.  I then replanted a small amount of the plants.  

The few plants that were replanted were trimmed heavily to encourage new growth.  As you can see in the photo below, I did not have many plants after the cleanout.

Milk jug after being cleaned and plants trimmed 

I keep hearing how tomatoes are well suited to aquaponics.  So last summer I tried to grow some tomatoes in the goldfish barrelponics.  They grew, and produced some fruit, but they didn't love it.  

My soil grown plants out grew and out produced the aquaponic grow tomatoes.  I think this is because the tomatoes needed more room for their roots than the crowded 2 liter plastic milk bottle.  If they had a decent sized grow bed I think they probably would have thrived.


Starting to produce tomatoes

Tomatoes growing but not thriving

I tried growing watercress.  This did well, it grew and flowered and set seed, seedlings grew and flowered, but it was eventually killed by cabbage white butterflies.  Watercress grows best with cooler temperatures, so I will likely add some back in autumn once the butterflies have passed.

I tried growing variegated water celery and this did tremendously well.  It grew long runners into the water and over the side of the barrel.  I cut it back hard and pulled out arm fulls of the stuff.  I cut it back hard a few times.  Unfortunately I think I pulled out too much the last time as it hasn't really grown back after that.  It may do ok now there is room in the jug for its roots to spread so I have added a tiny plant to see how it does.

Mint and silverbeet failed to thrive in my gold fish barrelponics.  They both did ok for a time, but didn't thrive and they are no longer growing in there.  I find this odd as mint is known to be overly aggressive in aquaponics, and silverbeet growing in my garden gets truly massive.  Perhaps it is too sunny or not sunny enough or something where my barrel is.  I think mint could work well and I may try to grow mint in there again one day.  

I tried kangkong in the barrelponics, it failed miserably.  I honestly believe kangkong would love aquaponics, but it is not suited to my climate.  That's too bad, I really like kangkong.  I will have to grow kangkong some other way.  Perhaps kangkong would do better in aquaponics if protected in my greenhouse rather than exposed to the elements like it is in the barrelponic.  I should write a blog post on this later.  

In my climate, for longer term growth with less work from me, Vietnamese coriander seems to be the winner.  Vietnamese coriander grows very fast, and seems to survive a lot of conditions that are meant to kill it.  It seems to clean the water really well.

As well as growing Vietnamese coriander in my barrelponics, I also grow some in the garden and some in my greenhouse.  The greenhouse plants have their roots in soil that is an inch or so under the water.  It seems to do quite well growing as an emergent pond plant and gets pretty big.

Vietnamese coriander in greenhouse a few weeks after planting

Vietnamese coriander grows large.  Watercress spilling onto the floor 

I cut off the Vietnamese coriander from my grow bed from time to time.  This makes the plants grow faster and quickly suck nutrients out of the water.  

After cutting it off I feed some to the chickens or put it in the compost, and last time I put some in a container with some water with the plan of doing something with it later.  Then I forgot about it.  Sometimes I would see it go limp so I would top up the container and think I should do something with it later, and each time I would forget about it.

This edible herb loves water, it smells great, and grows fast.  Below are the roots that the trimmings grew using nothing but water.  As you can see, they pretty much filled the entire container with roots.  There was only water and a few cuttings, no soil, it turned into an almost solid block of roots.


This Vietnamese coriander with that block of roots gives me options.  I could throw it into the compost, I could remove most of the roots and plant it in the garden where it would thrive, or I could use it for something else.  

In my greenhouse I had a tub of water filled with algae.  This tub is adding weight so the wind didn't blow my greenhouse away.   

After two days the water was still green but noticeably less turbid, and the roots had grown noticeably.  It didn't take long before the Vietnamese mint had cleared the water!  Now I am considering putting some fish in that tub.  From memory the tub is only 42 liters so is a bit small for goldfish, perhaps a smaller cold water fish would do well in there.  

Having a small aquaponics set up in my greenhouse sounds like fun.  It could be similar to my barrelponics, but with a different species of fish and probably a flood and grow bed on the shelf above so I can grow some edible plants in there.  Being in the greenhouse, perhaps kangkong and other tropical vegetables may perform well in that grow bed.  

Vietnamese coriander about to go into its new home

I am really impressed with my goldfish barrelponics.  For almost two years it has worked well, and I have learned a lot from it.  The original ten fish are all still all alive, they have all grown, and they have laid eggs a few times.  I am enjoying my fish and putting in very little effort to keep them healthy.