Monday, 28 December 2020

Spiny Leaf Insect

We got my son some Spiny Leaf Insects (Extatosoma tiaratum) as a Christmas present.  I have never kept these before, so it is an adventure for all of us.

We had planned on getting three, but they are so fascinating that I ended up buying four.  There is one that is slightly larger than this little guy, and two that are smaller.


They are far too little for me to know if they are males or females, hopefully there is at least one of each so they can set up a little breeding colony. They don't live terribly long, so if we want them next year we need them to grow and lay some eggs.

One cool thing about this species of leaf insect is that they are parthenogenic, meaning the females can lay eggs even if there are no males present.  These eggs hatch into clones of the mother, which is pretty cool.  There are some species of parthenogenic lizard which males have never been found!  

I am told in this species of leaf insect that eggs produced with fertilisaiton by males tend to have higher hatch rates and produce larger and stronger offspring, and that after enough generations of parthenogenic reproduction that they start to become pretty feeble.  So I hope that there are both males and females in this lot.

Saturday, 26 December 2020

Beeswax candles

My wife likes candles.  I have beehives and I have collected and rendered some beeswax from them.  I bet you can guess where this is headed...

That's right, I made some organic beeswax candles from scratch.  

Making beeswax candles was heaps of fun, and a little scary, and I learned a lot from it.  The best part of all this is that I am completely self taught.  No one helped me, no one showed me what to do, and other than a little bee keeping info on the internet I didn't even read anything on how to do any of part this.  

In hind sight I probably should have looked up a few youtube tutorials or something on candle making, it can be a little dangerous if done wrong, and if you are going to make candles you should do some reading.  I just gave it a shot and it worked out ok, with a little research I think these would have turned out amazing.

I bought a nuc of bees, drove them home in the back of my car, transferred them into a proper hive, collected honey, got the bees to build straight foundationless comb, fed them when needed, stopped feeding them when not needed, split the hive, collected the beeswax, rendered the wax, bought silicone moulds, put in candle wicks, melted beeswax, hand poured beeswax into the candle moulds, and removed the completed candles from the moulds.  

I did all of this with no help, being self taught, just giving it a go.

Beeswax candle

Second attempt, even neater

If beeswax gets too hot it discolours.  Far more importantly, beeswax has a low flashpoint, and I am told that once it reaches flashpoint it burns with a ferocity that is far scarier than any oil fire.  For these reasons it is best to melt beeswax over boiling water. 

Cleaning beeswax off things is difficult, so I used some old pots and things that the kids had in their play kitchen.  Certainly not the simplest or most elegant method, but it worked.

Melting beeswax above boiling water
 
Beeswax melts fast - this bowl floats nicely on the boiling water

I ordered some silicone candle moulds, they come entire with no hole or slit in them.  I poked a hole in them using a needle so the wick could go through, and I cut a slit down the side using a Stanley knife to make candle release simple.  

A rubber band holds the mould together and mysteriously it does not leak.  It doesn't even leak out of the hole with the wick.  The rubber band is enough for the silicon to hold together.

I poked some candle wick through the hole and tied it to a needle to keep it in place while I pour the molten beeswax.  You could tie the wick to anything really, but I had needles handy so that is what I used.  Candle wick comes in different thicknesses, so you need to do a little research to ensure you get the right size for the candle that you are making.  

I used cotton wick, which is meant to be best for beeswax.  I also made sure the wick did not have lead in it, apparently a lot of cheap wicks are impregnated with lead.

Candle moulds with wick

I thought I might spill some beeswax while pouring, so I put down some baking paper.  I am glad I did because when pouring I did spill some beeswax.  This solidified on the baking paper and was put in a container with the rest of my wax to be used for something else later.

I guessed the amount of wax I would need, for the first candle I used the perfect amount.  The second candle I spilled some wax and probably didn't have enough to begin with, so the candle is a little shorter than it otherwise would have been.  It was remarkably close, not too bad for a blind guess.  

After the candles set I weighed the amount of wax I used, so next time I was more precise.

Beeswax has been poured - baking paper means no waste

After this I left the candles somewhere safe to cool.  Once cool it was simple to remove the rubber band and carefully pop the beeswax candle out of the mould.  The candles come out of the moulds surprisingly easily.

Beeswax candles almost finished, I still need to trim the wicks

The detail on candles made using silicon moulds is just amazing!  I can't believe a complete novice like me can create something as amazing as this so easily and quickly.  I made a few more candles with my kids, each came out neater than the first.


Making beeswax candles was simple and heaps of fun.  They turned out ok and with a little tinkering I think I could make some that are really neat.  

I didn't use a candle making kit, I bought everything separately.  This was more difficult and expensive than I would have liked.

After looking on the internet at the candle making beginner kits I think I could do better.  Most kits are hideously expensive for what they are, and most have soy or paraffin wax.  I don't know why but beginner candle making kits are aimed at people who only want to pour wax into a cup, or roll up some wax foundation, none ever have nice silicone moulds.  Surely beginners would prefer to make cutie little candles that look like bee skeps and owls and things like that?

If buying things separately you need to work out the right type of wick and buy a minimum of 5 meters of it.  Beginners probably want enough wax to make 3 cute little candles, they certainly don't want to spend $50 or more to get one kilogram of beeswax! 

I have written some simple instructions, got a few silicone candle moulds, the right sized candle wick, a small amount of organic beeswax, and sell it together as a beginner candle making kit on my for sale page along with the perennial vegetables and things that I also sell.

Saturday, 19 December 2020

Amiah Potatoes - diploid potatoes Australia

I have been growing potatoes from true potato seed for a while now.  I grow a few diploid potatoes, some tetraploids, and I have a wild relative of the modern potato.  When grown from true seed, each and every plant is genetically unique.

Most diploid potatoes have really low yields, and produce small potatoes, but the taste of diploids is vastly superior to any variety of potato that you will have ever eaten.  Modern domestic potatoes are big and bland, even the tastiest modern potato is nothing compared to a diploid.

I have been messing around with breeding diploid potatoes.  I mostly grow as many as I have space to grow, cull everything substandard, each winter everything with low/no dormancy die, and I allow them to open pollinate before collecting true potato seed to plant.  

Some years one variety will do better, other years another variety will do better.  I am starting to get some really nice seed grown potatoes.

Amiah diploid potato Australia
Amiah diploid potato compared to a modern tetraploid potato
 

One of my seed grown potatoes is yielding quite well for a diploid, and produces two crops per year in my garden.  It looks pretty similar to another high yielding diploid called 'toffee apple' which was bred by Garden Larder.  As I originally got some true potato seed from Garden Larder my variety (named Amiah) may be closely related.  

Interestingly someone recently sent me a few tubers of Toffee Apple Potato, it is yet to produce a crop for me because I planted it a bit late.  It carries good genes and is flowering well so I assume some of the true potato seeds I am currently harvesting will carry some of its genetics.

Amiah potato compared to pumpkin

Amiah diploid potato produces gorgeous looking potatoes, with rich yellow flesh, it yields surprisingly well and produces multiple crops per year, it flowers well and can produce berries and true potato seed if pollinated by a different clone.  

The only real down sides to this diploid are its low dormancy and its relatively long stolons.  Most of its tubers are produced under the plant but a few will spread out and be found further from the plant.  To get the most out of it this plant likes a little space to run!  

Compared to a modern potato, Amiah potatoes taste incredible when baked.  I am bad at describing taste, all I can say is this is how a potato should taste.  If I had my way I would never eat a modern domestic potato again.

Amiah diploid potato Australia
I love rich yellow flesh potatoes

We roasted this diploid potato along with some modern potatoes for comparison.  The diploid looked like it was already buttered, much the same colour as pumpkin, indicating it is very high in beta carotene vitamin.

I really like the look of yellow flesh potatoes.  That being said I also grow some blue flesh potatoes and some whites that are worth keeping.  Hopefully a nice red flesh potato pops up soon.  

When grown from rather diverse and heterozygous seed it is difficult to know what they will produce!

Amiah yellow flesh potatoes

Diploid potatoes
Amiah potatoes and the white modern tetraploid ready for roasting

Diploid potatoes can sometimes produce small tubers.  Small potatoes are frustrating to clean and difficult to use.  Normally the diploids aren't too tiny, but at the start I had a couple of lines that produced pea sized tubers, needless to say I culled them from my breeding efforts pretty quickly. 

Any potato grown from true seed can produce tubers with deep eyes.  These are difficult to clean.  Some can produce really long stolons.  I have heard that some produce tubers on stolons that can be 6 foot long, making them unrealistic to grow.  Luckily I have never come across anything like that.

This diploid potato produces reasonable sized tubers, nothing huge but certainly a size that is usable in the kitchen.  The eyes are not very deep.  The stolons are a bit longer than most varieties, but not too bad.

Amiah potato size
Amiah potatoes are a reasonable size for a diploid potato

Amiah potatoes with violet skin
Amiah potatoes look nice
There were some potatoes that got a little sun and turned a little green, rather than risk eating them these were replanted.  

I have a few extra tubers, if you are interested I should list them for sale on my for sale page along with the other perennial vegetables and things I have for sale.

Tuesday, 1 December 2020

Shahtoot mulberry and White mulberry

I love mulberries.  I have a few mulberry trees and really should get some more.  They are such an underrated tree and they have so many uses, both on acreage as well as in backyards.

I have a white mulberry that I grew from a tiny cutting.  This is a lovely and hard working tree.  It gets larger and stronger each year even though I planted it in a really bad position, it tries hard to fruit no matter how difficult the situation and pumps out a lot of berries, it grows many large tasty leaves, the berries taste good, and it doesn't stain things.  The berries are very sweet, some ripen white, some lavender, some pinky, and some can ripen a bit darker.

  
White mulberry - all picked from the same tree

I also have a white shahtoot mulberry tree.  The berries from this little tree are long, they don't stain, it produces numerous berries per bud, and they taste like honey ripened apricots.  

Unfortunately this tree is determined to die in my garden.  Every summer it grows larger, it survives winter well, in spring it starts to bud all over, and then large parts die back for no apparent reason.  I can't work out why, but there is something about spring that the tree does not cope with in my garden.  It is fine in summer, autumn, and winter, but for some reason does not like spring.

I love the taste of these berries, but am pretty sure that I will lose it one day because I don't think it is well suited to my climate.  That is too bad as it really does taste great.

Shahtoot mulberry

I originally didn't want to get a dark fruited mulberry because I am now in town and they tend to stain things, but to be honest they probably taste better than the lighter coloured mulberries.  

I have never eaten a black mulberry (Morus nigra), but am told they taste far superiour to white mulberries (Morus alba) or mulberry hybrids.  I am yet to even see a black mulberry tree, I see plenty white mulberry trees with dark fruit that are incorrectly labelled as black mulberry, but have never seen an actual black mulberry tree.  Hopefully these currently exist in Australia.

I really should look around and see if I can find a nice tasting mulberry, who cares if it stains, and grow this as well.  I am sure my kids will pick most of the berries so they won't have a chance to stain anything. 

Mulberries - shahtoot and white mulberry


Saturday, 21 November 2020

Cape sundew (Drosera capensis) flowers

Drosera capensis was the first carnivorous plant that I ever grew successfully.  I got my first plant when I was a school student, I tended it and fussed over it and despite all my well meaning yet poor gardening it survived for years.  They are really quite forgiving and surprisingly simple to grow, yet can also reach a rather impressive size.  From that original plant I learned a lot. 

I stopped growing carnivorous plants for some years, and have started to grow them again.  I am loving growing these again and am slowly building up a nice little collection.  

Among the carnivorous plants I grow I have some D capensis.  I grow most outside where they thrive, and I have a few on my kitchen window sill.

Drosera capensis sending up a flower stalk

I am always amazed at the large number of insects that the sundews catch.  Each leaf is often covered in its prey, often dozens of insects are trapped on each leaf.  I am really surprised at how many mosquitoes they catch, especially inside my house!  I don't know why they catch so many mosquitoes, they really shouldn't be all that attractive to mosquitoes at all, but I am glad that they do catch them.

My capensis are flowering nicely at the moment so I thought I would write a post to show what these look like.

Drosera capensis flowers

Above you can see three flower scapes.  The one on the far left is from the typical form, this is the form I originally grew and it is rather pretty.  In the middle is 'alba' which is anthocyanin free and a strong grower.  On the far right is also alba, but it has leaves and plantlets on the end of the flower stalk.

Drosera capensis 'typical' flower
Above are the purple(?) flowers from capensis 'typical'.  I really like this variety.  They produce many flowers on the stalk and each flower can produce hundreds of tiny, dust like seeds.  The seeds tend to have exceptionally high germination rates.  This particular flower stalk is interesting because it is forked into two branches.  I don't see this very often, but I have a few plants that always do this.  I am not sure if it has genetic or environmental causes.  I should take cuttings from the forking plants and see if their clones display the same forking tendencies.

Drosera capensis 'alba' flower

Above is the flower stalk from capensis alba.  These plants are anthocyanin free.  The flowers are white and the tentacles on the leaves are green/white.  These tend to be very vigorous growing plants that get large pretty fast.  Again they produce huge numbers of tiny seeds with high germination rates.

Drosera capensis with plantlets growing on the flower stalk

I have never seen Drosera capensis grow leaves or plantlets growing on capensis flower stalks before.  I am told it is not overly uncommon, and I believe it may be caused by environmental factors rather than anything genetic.  I kind of like it, and being able to break off the little plantlets and grow them is fun, so it is too bad that this is not a genetic trait.

When I have extra sundews for sale I list them through my for sale page.  I prefer people to pick up these plants but I can post them much the same as I post perennial vegetables.  Sundews sulk a little after postage, and they often lose all of their 'dew', but they tend to survive and grow really well after they have had some time to get established.

Sunday, 15 November 2020

VFT seedlings breaking dormancy

I grow a few different varieties of venus flytrap.  I like them.  When grown from seed they tend to display a lot of genetic diversity and each plant is different, but it takes a few years before they reach a decent size.  Unfortunately very few places sell seed of venus flytraps.  

Never buy venus flytrap seed from eBay or Gumtree, most of the time it is fake, they will send you seeds of grass or flowers and by the time you know something is wrong it is too late to do anything.

I have always been told that venus flytraps need dormancy over winter.  I knew people in places without winter who dug them up and put them in the fridge over winter.  I have always grown them in climates with cool winters, so mine have a natural dormancy and I have never had to think about it too much.

I grew a few venus flytraps from seeds, so over winter they went dormant and looked like they were dead.  Then once spring hit, they all started to grow actively.  Some seem to have come out of dormancy easier than others.  Some came out of dormancy well, but now appear to be declining.

I don't have many seedlings, but each is genetically unique.  I look forward to seeing what they grown into and if any are noticably different from any of the named varieties that I grow.

This Venus flytrap seedling was all red over summer
Short petioles, comparatively large traps, lots of traps, good colour - this seedling is a keeper

Sunday, 8 November 2020

Growing Sphagnum Moss

Sphagnum moss (one of 380 or so species of Sphagnum) is often used to grow carnivorous plants, or to pack around fragile plants in postage, and a bunch of other uses.  It is expensive to buy dead sphagnum moss, and difficult to find for sale live.  

Years ago I got a strand of it while on a field trip with university.  I grew it in a little glass cup on my window sill along with pygmy Drosera that I also collected on the same trip.  It grew well for a few years, and looked amazing, I eventually lost in moving house.  

Strangely enough I haven't seen live sphagnum moss since then.

A while ago a very generous person posted me some plants, and wrapped the carnivorous plants in live sphagnum moss.  I figured it would be a waste to let the sphagnum moss die, so I wanted to grow it.  

I don't know the best way to grow this, so figured I would try a few different methods. 

Sphagnum moss - growing well and ready to divide
I had some dry sphagnum moss in a packet, so I soaked that in rain water.  I put that in the bottom of a few empty punnets as the substrate, and placed the live sphagnum moss on top.  

I also put a damp little peat moss in an empty punnet, and 'planted' some live sphagnum moss on top.  All of these punnets I put in a tray with a little rain water, much like how I water carnivorous plants.

So far both methods appear to be working and the sphagnum moss is growing. 

I have given them part sun.  From memory full sun makes it grow slowly, but I may be wrong.  Some species are ok with frost and can be frozen solid, I think others may die off if hit by frost.  I am not sure what species this is, so I will protect most in winter and probably leave a little unprotected to see how it copes.

I also put a little live sphagnum moss on top of pots of peat moss that I am growing various carnivorous plant in, hopefully it grows well in there as it looks nice.

I don't know how well this will go longer term, but for now it is growing well for me.  I hope to find where is best in my yard to grow sphagnum moss, and how to grow sphagnum moss, and then once I have enough I plan to use it for carnivorous plants. 

Sphagnum moss - one live strand

Sphagnum moss - one live strand did some growing!
If you know how to grow sphagnum moss, and if you have ever grown sphagnum moss successfully over a longer time period, I would love to hear how you do it.  Trial and error is all well and good, but if I can learn from someone else that is even better.

Sunday, 1 November 2020

Black raspberry seedlings and wild strawberries

In September 2019 someone kindly posted me some seeds.  They were seeds of some strawberries (most likely Fragaria virginiana) that had been collected from the wild, some black raspberries (Rubus occidentalis), and saskatoon.

I have eaten wild strawberries in the Arctic many years ago.  These are a different species to the woodland strawberry.  The berries were about the size of my little finger nail, some were pointy, some were round, and they tasted better than anything I have ever eaten.  I grow a few different strawberries that taste incredible, but none of them can compare the the ones I ate in the arctic.  So I hoped that these wild collected strawberries would come close in terms of taste. 

Raspberry are notoriously difficult to germinate.  They do far better after scarification and cold wet stratification.  Both strawberry and saskatoon germinate better after stratification.  I put the raspberry seeds through several different types of acid scarification, put all the seeds on damp paper towel in zip lock bags, labelled everything, and put them in the fridge for a few weeks of cold wet stratification.

Then, life knocked me down pretty badly, and I forgot about my seeds.  In September 2020 I remembered about my seeds in the fridge.  The saskatoon seeds had all germinated and died, as had a small number of strawberry seeds.  The rest of the seeds did nothing, presumably after spending a year in the fridge on damp paper they were all dead.  None of the raspberry seed had germinated.  I figured they were all dead, I figured it was a lost cause.

There was a small chance one or two may have survived, so I planted them.  I had low hopes of anything happening after so long, so I planted them all together, strawberry and raspberry in the same pot.  Nothing labelled.  There was no real point, the chances of even a single strawberry seed germinating was very low.

Strawberry seedlings and Black raspberry seedlings

Then the most incredible thing happened, some seeds germinated.  Then a lot more germinated.  Nothing was labelled or separate, but a good number germinated.  Most were probably strawberry seedlings, which I was very excited about.

As they grew their first leaves some plants looked different, I wondered if they were the black raspberry.

As the seedlings got larger more seeds germinated, then more, then a few weeks later even more germinated.  Other than the saskatoon (which all germinated and died in the fridge) it looks like almost all of the seeds have germinated.  This was completely unexpected, I am really glad I had not thrown the seeds away!  

I now have a small number of black raspberry seedlings, and a good number of wild collected strawberries.  Some of the strawberries are growing runners at less than two months old!

My plants are larger than the photo above.  It is still just a pot of mixed seedlings.  I am waiting for the last of the seedlings that are still tiny to grow a bit larger before I try to separate anything.  I would hate to lose them at this stage.

If all goes well from here I should get to taste the wild strawberries this summer, and it will likely be another year or so before the black raspberries are old enough to fruit.  This is very exciting!

Saturday, 24 October 2020

Obscure salad vegetables: Mache and Miner's lettuce

There are a heap of common salad vegetables, many are bland or bitter.  As well as the common vegetables there are a large number of less common ones.  Two obscure salad vegetables that I particularly like are Mache corn salad, and Miner's lettuce.

Mache (Valerianella locusta) also goes by the names corn salad, lamb's lettuce, field salad, nut lettuce, and a long list of other common names.  This is a cool season crop that grows well over winter and will often self seed once the heat hits and return in your garden when the weather cools.

Mache is a small plant that is dreadfully low yielding and does not like to grow in the heat.  What is lacks in yield it makes up for in ease of growing (did I mention that it self seeds and returns each year), being highly nutritious, and a surprisingly delicious taste for a salad green.  Mache is never bitter, even when it is flowering.  While I have never seen it for sale I am told that mache commands high prices at markets and is an expensive specialty crop that is adored by chefs.

I think mache is too small, but the taste and texture of this plant are excellent so I keep growing it.  Mache is far superior to any lettuce I have eaten.  There are a few varieties around, and it crosses and sets seed readily, someone should mass cross them and select for larger, faster growing plants.

Mache corn salad - surprisingly delicious for a salad plant

Miner's lettuce (Claytonia perfoliata) is also known as Indian lettuce and according to the internet even sometimes it is called 'spring beauty'.  It is not closely related to lettuce, it is used in similar ways to lettuce which is why it shares part of the common name. 

I used to read descriptions of this vegetable on the internet that made it sound like the poor cousin to lettuce, so I didn't bother growing it for many years.  One day I got some seeds and gave it a try, and I am glad I did.  Miner's lettuce is superior to lettuce in many ways.

Much like mache, miner's lettuce is cold hardy, tastes great, and is exponentially more nutritious than lettuce.  It is never bitter, even when flowering.  It does well in full sun and does ok in part shade, meaning it grows well under taller vegetables.

This is another salad plant that will happily self seed if given the chance.  This is great as it means no seed saving, just don't allow undesirable plants to flower and the superior plants will return the following year.

Miner's lettuce looks interesting, and is simple to grow, but its appeal lies in its taste.  Much like mache, Miner's lettuce is superior to any lettuce I have eaten.  Unlike mache this can grow a little larger and provides a better yield. 

I don't think there are any named varieties, but given how readily this self seeds and the apparent genetic diversity I don't think it would be overly difficult to breed a superior variety of Miner's lettuce.

Miner's lettuce starting to flower

Miner's lettuce - young plants

If they don't have good conditions they still flower and set seed!

Miner's lettuce is never bitter

Saturday, 17 October 2020

Raspberry x Strawberry Hybrid - F2 seed attempt

I wrote a few posts about attempting to create a hybrid of raspberry and strawberry through cross pollination. 

The berries themselves taste amazing and the plants are very vigorous.  Without genetic testing I can not be certain that they are hybrids or if they are just weird strawberry plants that differ from the parent species. 

Most produce lumpy red berries, some produce yellow/white berries, and one is producing pink berries which I have never seen before.  There are a lot of odd morphological differences from the strawberry parent, plus they take a lot longer to reach maturity, they are larger, more vigorous, and more productive than the strawberry parent.  While I am not yet certain if they are hybrids, I know is that they differ from the parent strawberry species in quite a lot of ways.

To be clear, this is not 'funberry' (also called "strawberry raspberry") which is not a hybrid but is a species Rubus illecebrosus that looks superficially similar to a strawberry and a raspberry.  This is not a 'strassberry', which is just a variety of strawberry.  This is not a Genetically Modified plant.  This is a true hybrid between strawberry and raspberry that I created using simple cross pollination in my yard.

If I have created a fruiting hybrid of a strawberry and a raspberry the next logical step is to attempt to grow seed and produce some F2 seedlings.  These seedlings could have any of a myriad of genetic combinations and would range from plants that contain mostly raspberry genes, to some that were half raspberry half strawberry like the parent, to some that contained mostly strawberry genes.  This is an oversimplification of what could happen, but I can't go into that here.

When the hybrid started fruiting I began collecting seeds from it.  I am unsure if they were the result of self-pollination, or raspberry pollen, or strawberry pollen, as there were many things flowering at the time and many insect pollinators around.  I did not exclude the flowers in any way as I wanted to give them the best chance of being successfully pollinated and setting viable seed. 

As no one has successfully created this hybrid and had it set fruit before there is much to be learned. More importantly, this plant if it is a true intergeneric hybrid holds a lot of breeding potential for disease resistant berries as well as amazing new tastes, but only if it either sets viable seed or if it produces viable pollen.  Given that both parents were diploid and have the same chromosome count I figured that this shouldn’t be too much of an issue.

I decided if I collected 2 or 3 seeds from each berry we would still be able to eat all the berries and I would slowly get a large number of seeds.  It was a rather productive little plant so it did not take me too long before I had a reasonable amount of seed to play with.  The seeds were not hollow, they were plump and full, they ranged in size from tiny strawberry seed size to extra-large strawberry seed size, so I collected a mixture of all the seeds.

I usually have some success germinating raspberry seeds and often 100% success with strawberry seeds.  I usually put strawberry or raspberry seeds in cold wet stratification to get them to germinate, if I leave them for too long they tend to germinate in the fridge.  I also sent some of these F2 seeds to a grower friend, hopefully they get some decent results from growing them.

I put the seeds through cold wet stratification because this method works well for both parent species.  Sunlight can trigger some seeds to germinate, and makes no noticeable difference to the germination of others, so I did both.  Some of the seeds were left in the fridge for a longer cold wet stratification while others were planted on damp soil on the window sill where I usually germinate strawberry and raspberry seeds.

I started with many hundreds of seeds.  The results were as follows:

03/03/2019 strawberry x raspberry F2 seeds put in cold wet stratification
10/06/2019 three (3) seeds germinated


No other seeds have germinated at all, only these three, which is odd.  I expected a lot more seeds to germinate considering the numbers that I stratified. 

None of the seedlings displayed any albinism.  All three looked like small strawberry plants.

None of them have produced any runners.  The strawberry line this is from produces a lot of runners in two to three months when grown from seed.  These three plants are now over a year old and none have flowered while the strawberry line produces flowers in five months when grown from seed.  At this stage the F2 plants are small, smaller than the F1 and smaller than the strawberry parent.  I am unsure if they will stay small or if they will get larger once they mature.  Given that they are well over a year old I would have expected them to reach full size by now.

From here I plan to do my best with the three that have already germinated, hopefully one of them turns into something interesting.  I also plan to save some more seed and try to germinate it, I would also like to use raspberry pollen and see if that produces viable seed.

It will be interesting if any of these F2 seedlings survive to maturity to see what their fruit is like.  At this stage they have survived winter and look much like strawberry plants only smaller.  The strawberry parent flowers around five months when grown from seed, this plant is sixteen months old and is still not flowering.  The F1 plants flower earlier in the season and more profusely than the strawberry parent, the F2 has still not flowered. 

Leaf comparison: F2 hybrid on the left, F1 hybrid on the right

While none of this actually proves anything and there is a chance that they are not hyrbids, it all lends weight to the possibility that the parent may be a true intergeneric hybrid.  If it is not a hybrid, then it is a mutant with rather frustrating timing.  I sent samples of these plants for testing, so should hopefully have some answers very soon.

Edit to add: early/05/2021 flowering - over two years from seed to maturity!!!  Given the parent strawberry flowers in about 5 months this is remarkable and indicative that it is a hybrid.

Edit to add: this was tested by the CSIRO.  The results are on this blog post

Monday, 12 October 2020

Strawberry Raspberry hybrid leaves being tested soon

I have written a few posts about my attempt at creating a strawberry raspberry hybrid using cross pollination.  While the resultant plants display several morphological differences to the parent species, and are far more vigorous than the strawberry parent, the plants do look remarkably like a strawberry. 

I made every effort to ensure a hybrid was produced (emasculating flowers, bagging flowers, etc), and while this would exclude flying insects such as flies or bees this attempt was produced in the field.  As such there is a chance that some tiny ant was able to crawl under my bag and pollinate the flowers with pollen from who knows where. 

For this reason I have been trying for quite some time to have these plants tested by a lab to determine if they are hybrids or something else (perhaps they are polyploid, perhaps a mutation).  For various reasons I have not yet been able to have these plants tested, which has been rather frustrating.

Recently someone contacted me who knows someone in the CSIRO who may be able to test my plants.  I contacted the CSIRO, we had a discussion, and they are willing to test my plants.  I have sent the CSIRO sample leaves of several F1 hybrids, one F2 hybrid, and samples of both parent plants for analysis. 

If all goes well I will know before Christmas if they are hybrids.  Regardless of the outcome I will post the results on this blog.  Exciting times!

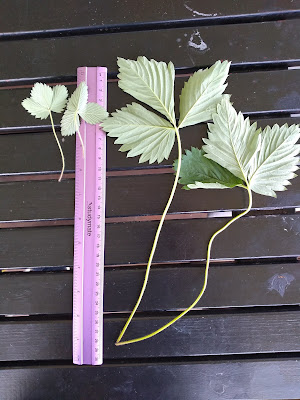
Strawberry raspberry hybrid leaf comparison
Hybrid leaves top, strawberry parent leaf lower left, raspberry parent leaves lower right

Strawberry raspberry hybrids F1 and F2
F1 hybrid leaves on right, F2 hybrid leaves on left

Hybrid leaf - long petiolules not quite opposite

strawberry X raspberry hybrid and strawberry parent
Hybrid leaf at top, parent strawberry lower

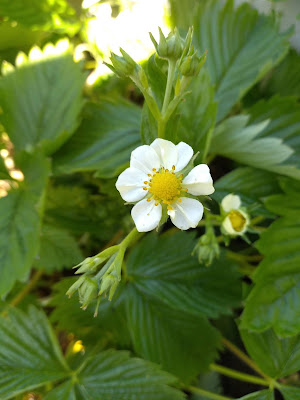
raspberry x strawberry hybrid
Hybrid - inconsistent flowers and a lot more flowers per set