Tuesday 19 December 2023

Grow water chestnuts in milk bottles

I have written a few blog posts on growing Chinese water chestnuts in buckets and flexitubs, it's easy and they are very productive when grown like that.  As well as this I also grow a few aquatic vegetables in milk bottles.  

Growing water chestnuts in a milk bottle is not ideal.  When grown like this the yield is low or even non-existent, but it keeps the plants alive.  They can survive by growing in a milk bottle like this for years.  

I cut the base off a plastic milk bottle, fill it three quarters with soil, plant a corm, and add water to the top.  From here, I just top up the water.  Simple.    

Chinese water chestnuts 

I first did this as a short term thing so I could sell duck potatoes or water chestnuts at a garage sale.  I told people to plant them into something larger if they wanted an edible size crop.  Someone asked me how long the plants can survive like this because their pond was not yet ready.  I didn't know, I told them to give it a try and if they died I would replace them.  I never heard back so assumed it went well.  

Out of curiosity I kept growing some Chinese Water chestnuts in milk bottles to see how long they can last like this.  I assumed they would last a few months with no problem.  It turns out they will live like this for several years!  

Below are duck potatoes and watercress growing in a milk bottle.  This is their third year.  The water cress drops seed and grows by itself.  The duck potatoes go dormant each winter.  They multiply, but only slowly due to the lack of space.  

Duck potatoes growing in a milk bottle

Below is another milk bottle, this has water chestnuts, duck potatoes, and watercress.  This one has azolla and duck weed growing on the surface of the water.  The azolla and duckweed die back over winter, and come in strong once the weather warms.  

This photo was taken at the start of spring when everything was just breaking dormancy.  Once the weather warms the duckweed and azolla will cover the water surface, and becomes a self mulching living fertiliser.   They also seem to prevent mosquitoes from breeding in the milk bottle.

Duck potato, water chestnuts, and water cress

What you can't see from my photos is the amount of life in the water.  It is incredible just how many tiny organisms are in there.  There are heaps of tiny things swimming around that can be seen even without a microscope.  

Putting a drop of this water on a slide and viewing under a microscope is something else.  My kids are fascinated by the sheer number of things teeming in the water.  It isn't the number of things that surprises me, it is their diversity.  There are a lot of things living in there, and there are plenty of different types of things.  It is a remarkably diverse little ecosystem.  

I can't tell you how these tiny critters got in there, but I can tell you that they are thriving.

Azolla and duck weed starting to come back

I also tried putting a small pot of soil in the cut off bottom of a milk bottle.  Below you can see a water chestnut emerging from dormancy.  Once it gets taller I will fill up the milk bottle with water.  If I want I can either plant it into a larger pot, or just leave it for another year.  

Again, if grown like this the yield will be very small.  They need more soil to grow properly.  They can and do survive like this for several years, so this can be a good way to keep them short term while you get something larger ready for them.  If life gets in the way, short term can push out to a few years.  

Water chestnut in small pot of soil

It can be difficult to buy Chinese water chestnuts or duck potatoes at certain times of year.  Many people want to buy them to put in a pond or a water feature, but need more time to plan and build the water feature.  Buying the plants when they are available, and growing them in the base of a milk bottle like this, solves the problem.  They easily survive like this as long as needed, and can be planted into the water feature when it is ready.  If it isn't ready until next year, that's fine.

I have a for sale page on this blog where I sell water chestnuts and duck potatoes and other perennial vegetables in Australia.  I update the page regularly, and it has my email address that you can use to contact me.  


Friday 15 December 2023

Fragaria virginiana breeding larger berries

I grow a few different strawberries, some different species and some garden strawberries.  One of the species of wild strawberries I grow is Fragaria virginiana

Fragaria virginiana strawberries

F virginiana comes from North America.  This species was used as one of the two main parents to develop the garden strawberries that you can buy from the shops.  This was used as a parent due to its great taste, the other parent was used for its larger sized berries.

The taste of these berries is similar to a garden strawberry, but nicer, and more concentrated.  The original berries were too small for my liking, so I decided to do some breeding for larger berry size.  

Larger F virginiana strawberries

When I first got seeds of this plant they took a while to grow to maturity, the resultant berries were about the size of your finger nail.  The berries tasted great, but were too small.  Even the smallest berries in the photos are larger than the original berries.  I don't know what size berry is normal for this species, I know there are several cultivars overseas with larger berries.  I think the wild ones tend to be a lot smaller. 

I originally obtained seed that had been collected from the wild.  These tiny berries certainly had great taste.  They also had a lot of genetic diversity, which made this selective breeding project a lot simpler.  

I collected seed, grew out a lot of plants, culled the ones with the smaller berries, and grew seeds from the ones with the largest berries.  I did this for a few years.  

It takes time for these to go from seed to fruit, and these only flower once or twice per year in my garden, so this project took quite a while before I could see any progress.   

Saving seed from strawberries, and growing it out to maturity, is fiddly.  Luckily you get a lot of seed per berry, and a lot of genetic diversity combined with a lot of seed means there is a good chance of stumbling across the right plant.  Growing out large numbers helps your chances of getting the right genetic combination.  

Some are too small and will be culled

After a few generations it was clear that the berries are significantly larger than the original ones.  As you can see in my photos, some plants produce larger berries than others.  It takes the same space and effort to grow tiny berries as it does larger berries, so the smaller ones are culled.  

This is still the same species, it has not crossed with any other species, or messed around with ploidy levels.  I have selected for larger berries through growing many seedlings and culling hard.  Some of the smaller ones also don't look typical of this species, given they open pollinated they may have crossed, so I have also culled anything that appears to be an off type.  

I was worried that the taste might be diluted in the larger berries.  I am happy to say that this has not been the case.  The larger berries taste the same as the smaller berries.  When under ripe they are not great, but when ripe they taste incredible.  

These plants all produce runners in my garden.  This means I am able to cull the smaller ones and propagate the larger ones quickly and easily.  If they did not produce runners it would likely mean another 15 or so years of growing out seeds to produce a stable variety, so runners are great.  Runners also mean the plants spread to different parts of my garden, if we have another dry summer that kills off lots of things there is a chance one runner will be sitting somewhere protected and I will be able to us it to restart the patch.  

Realistically this is probably the largest berries that these plants can produce through selective breeding.  I think they have reached their genetic potential.  I will still try to grow seed from the largest ones and see if there are any further gains to be made, but I am not expecting much from here.  

If I were to induce polyploidy, or hybridise with another species I know the berries could become far larger, but I have no plans for attempting things like that.  

Further breeding work could be done with these to introduce day length neutrality, or more flower production.  I am not sure if my stock has the genes needed for this, and I probably can't source any Fragaria virginiana with the needed genetics, so it is unlikely I will breed towards this any time soon.  


I sell bare rooted plants of the largest ones through my for sale page.  The plants flower in spring and fruit spring/summer.  Sometimes they provide a second crop in autumn.  They produce many runners and can fill a garden bed relatively quickly.  Their productivity is low, but they make up for that in great taste and ease of growing.

Fragaria virginiana breeding


Tuesday 12 December 2023

Leaf Cuttings African Violet

A few years ago I bought an African violet.  For some reason I don't see many African violets around these days.  They are lovely little ornamental flowers with no particular use that I can gather beyond being nice to look at.  

I have always heard that African violets are difficult to grow.  My one has been easy to grow.  It lives in a little self watering pot on my kitchen windowsill.  Every few weeks I fill up the water reservoir, from time to time I remove dead flowers or dead leaves, and I rotate the pot occasionally to keep the growth reasonably even.  Other than that it takes care of itself.

Up until recently it bloomed for most of the year, only stopping over winter when it gets too cold.  My original one grows large ruffled blue flowers, it is rather pretty.  It needs repotting and/or fertilising if it is going to keep flowering well.  Using leachate from my worm farm seems to be good fertiliser for African violets. 

At that start of winter I saw an African violet that had dark red flowers.  I had heard how simple African violets are to propagate form leaf cuttings, so thought I would give it a try.  I removed a leaf, put it in my pocket, and brought it home.  When I got home I mixed potting soil with perlite, put this in a pot, watered it until damp, and planted my leaf cutting.  

African Violet leaf babies 

I have heard that the plantlets are produced from the cut part of the petiole, and to produce extra plantlets you cut the petiole on an angle with the cut section facing up.  I did this, I also nicked the petiole a little further up to see if it produced any extra plants for me.

Several months passed, the leaf looked fine, but nothing really happened.  It can be very cold in my house over winter, so it is not unexpected that it did not grow during this time.

One day in early spring the potting mix looked like it had been pushed up near the base of the leaf.  I looked closer and saw several tiny leaves.  It looks like my leaf cutting worked, and the leaf cutting is producing several baby African violets.  


Now the weather has warmed, the tiny plantlets have started to grow relatively quickly.  The leaf itself still looks healthy.

I am still not sure how many plants it produced as the leaves of the baby plants are all close together.  It looks like this leaf has produced three or four little plants.  I am happy with that number.  

I am told if you slit the end of the petiole about a centimeter or two that you should get a much larger number of plantlets, but they will be a bit smaller.  I have taken a leaf cutting from my blue flowered plant and am trying this.  

African Violet leaf babies

Look how cute leaf babies are!

I plan to let these grow a bit larger before I repot them into individual pots.  If I divide them too early I risk killing them, if I wait too long to divide I risk stunting them, so it is a bit of a guesswork balancing act.  

I think they are ready to be transplanted now, but am planning leaving them to grow just a little larger.  I really don't want to lose them.

Leaf babies ready for transplant 

The mother leaf itself still looks remarkably healthy.  If I cut it off just above where the plantlets are attached, I wonder if I could reuse the leaf as a cutting to produce even more plants.  I would hate to lose my little leaf babies, so perhaps I will attempt this with another leaf at another time.  

It is early summer here now.  After repotting I have no idea how long until they will be large enough to flower, I am guessing it won't be before late spring or early summer next year at the earliest.  From everything I have read it takes about 6 to 9 months to flower after being separated.  

Edit to add: this post was written December 2023, the leaf babies were flowering March 2024, they had not yet been divided or repotted.  The leaf cutting from my blue African violet has just started to grow baby plantlets.  Perhaps the 6 to 9 months includes 3 months for baby plants, and then 3 to 6 months before they flower.  

I would like to get a few more types of African violet.  I don't have a lot of places in my house where I think African violets will thrive, so I will never grow a large number of them and will need to be picky about what varieties I grow.  

Once my leaf babies are larger I will probably keep one and offer the others for sale or trade, or I may offer to sell leaf cuttings.  If I do this I will try to list them on my for sale page along with the perennial vegetables, herbs, and vegetable seeds and things that I sell.  I don't plan of selling them before they start to flower and I work out the best way to post them, so this won't be until some time from now.

Friday 8 December 2023

Variegated maidenhair fern update

I wrote a post a while ago on my variegated maidenhair fern.  I mentioned how I didn't look after it properly and it died back to a single frond, and how at that stage it was starting to regain strength.  

I was worried because variegated maidenhair ferns are rare and incredibly difficult to find, so if I lost mine I probably would never be able to get another one.  Variegated maiden hair ferns are really lovely, so I would hate to lose mine.

It has been almost a year since my previous post, so I thought it may be time for an update.  As you can see, my variegated maidenhair fern (top right of the following two photos below) is doing well.

Variegated maidenhair top right

Variegated maidenhair fern almost a year ago top right

On a side note, you may notice in the photos above that my tiger fern (top left) is smaller in the more recent photo.  This is because I divided it.  I am planning on keeping this little division, and growing out the other larger ones for sale.  Tiger ferns are hardy and fast growing, it should not take too long for this little one to grow back to its original size.  Enough about tiger ferns, let's talk about maidenhair ferns.

I grow my variegated maidenhair fern outside where it is under cover and slightly sheltered.  I had it inside my house for some time but there was not enough light for it, which meant it declined badly.  Outside on my verandah this plant gets hit by strong winds, over winter it gets some light frost, and it gets too hot over summer, but my maidenhair ferns perform surprisingly well out there.  

Too many people complain that they have killed a maidenhair fern, they usually blame the fern and assume they are difficult to grow.  Maidenhair ferns are not what I would consider to be very hardy, but they are simple to grow.  I wrote a blog post on how I grow maidenhair ferns.  While I am not an expert, they grow well for me, and that post explains how I grow them.  

I have grown this variegated maidenhair fern for almost six years, and I also have a green maidenhair fern (bottom right of the photos above) that I have been growing for close to eight years.  While I am not an expert in ferns, the longevity of these plants show the way I grow them works well.  

Variegation is different on each of the pinnules

Maidenhair ferns don't like to dry out, but they are not swamp plants.  I use self watering pots that have a little reservoir of water.  This ensures they have constant access to water but are not overly wet.  

I am told that maidenhair ferns do well in hanging baskets.  The ones I have seen in hanging baskets look incredible.  I don't grow these ferns, or any plants, in hanging baskets because I can't work out how to do it.  I can't work out how to water them easily, I worry that the wind will knock them down, and I don't have anywhere sensible to hang them.  If you have success growing things in hanging baskets I think a variegated maidenhair fern would look incredible growing in one.  

Any variegated plant will be weaker than an all green one, variegated maidenhair ferns are no exception to this.  Direct sunlight scorches their fronds.  They also don't cope with total darkness, less chlorophyll means they are less efficient at photosynthesis.  

Chlorophyll allows plants to photosynthesize and also acts like sunscreen.  Being variegated means they will burn easily, and be less able to cope with lack of light.  I grow them in 'bright shade' where they get an hour or so of direct light at sunrise.  Too much direct sunlight tends to burn them, but a little direct sunlight in the morning seems to be fine.  

Variegated Maidenhair Fern

I mentioned in my previous post how I would normally rotate my fern each week to ensure it grew out evenly, at that stage my fern was still weak so I was not rotating it.  This was a good idea and it worked out well.

My fern had little energy and only one frond.  It grew new fronds and orientated them to catch the light in the most efficient way possible, and it regained strength.  The fern grew a bit lop sided, but that was ok.  

Once it was a little stronger and a bit more healthy I started to rotate the pot a little bit each week.  This helped the growth to even out a bit, and my fern continued to get stronger.  It was still lo[p sided, but was less uneven and getting healthier.  

When my variegated maiden hair fern got even larger I would rotate the pot 90 degrees each week.  As you can see from the photo below, my fern now has reasonably even growth on all sides.  This is what I wanted it to do.  

Not only does it have even growth on all sides, but my fern is now reasonably large and healthy.  

Variegated maidenhair fern with even growth

If you have followed my blog you will probably have noticed that I am not a photographer.  Regular maidenhair ferns are graceful, variegated maiden hair ferns are incredibly graceful and even more elegant, my photos do not do it justice.  

I also realise that the photos I take of the entire plant don't really show the variegation.  While I don't encourage people to touch the fronds of maidenhair ferns, you can see the variegation a little more easily when I do hold my hand underneath.   

New fronds start out green, with lighter green where the variegation will develop.  As the frond ages the variegated parts turn white.  On each frond some pinnules will be entirely green, some might be entirely white, and most will have some amount of green and white.  My fern hasn't produces any entirely green fronds.

Variegated fern
Variegation
Maidenhair variegation

One thing I notice is that this fern grows a little differently than my other maidenhair ferns.  I was told it was Adiantum raddianum 'Variegata' but to be honest I am not certain about the species.  I grow a few different species of maidenhair ferns.  Perhaps my variegated fern is a different species to my other maidenhair ferns, or perhaps it is the same species with different growth characteristics.  

It is not quite as large as my other ferns, and I don't think it ever will be.  The fronds of my variegated maidenhair fern often reach 40cm, occasionally some of them reach 50cm.  I have a feeling that this is as large as they will ever grow.  My other maidenhair ferns have fronds that regularly exceed 50cm.  I think some of my other maidenhair ferns have potential to row quite a bit larger but are restricted due to the size of their pots.

The fronds of my variegated maiden hair fern are often divided at the tip.  You can see this in the photo below.  Not every frond does this, but it appears that most of the larger mature fronds do.   

Variegated maidenhair fronds tend to be divided at the tip

It appears that my variegated maiden hair fern is doing well.  I am tempted to try and divide it.  

Dividing my fern will set it back considerably, and will mean that its growth is no longer even.  I am not overly keen on this because my variegated maidenhair looks so large and impressive at the moment.  

Variegated maidenhair fern

Dividing it would also mean that I will have two of them, which will help to ensure that I don't lose it if the pot gets knocked over by a possum or something.  Very few places sell variegated maidenhair ferns, and the few that do seem to be sold out for most of the year.  

Variegated fronds

Variegation is different on each pinnule

My photos really don't do them justice

I like maidenhair ferns, and I really like this variegated form.  I should try to grow some from spores and see how much genetic diversity they have.  

I sell some maidenhair ferns through my for sale page, and if I ever have any variegated ones spare I will probably offer them for sale through there too.  

Unless I grow a lot from spores, or have success with growing them using tissue culture, it is unlikely that I will ever be able to offer many for sale, but it is worth keeping an eye on my for sale page if you are interested in them.  

Saturday 2 December 2023

Raspberries: yellow red and black

I do a bit of vegetable breeding, I also breed other plants with various different aims.  

A number of years ago I bred a new variety of red raspberry.  I acknowledge that I am biased - I like this raspberry (Rubus idaeus).  It is genetically thornless, very vigorous, incredibly productive, produces dozens of flowers per cluster, fruits multiple times per year, and tastes nicely sweet.  This red raspberry performs better in my garden than any other raspberry variety I have grown.  I am told it does not grow as well in subtropical gardens.  

I eventually tracked down a yellow raspberry (Rubus idaeus) and did a little breeding with this too.  This one has thorns (prickles).  It only crops once or twice per year and has flowers in clusters of about half a dozen.  The berries are pretty, they smell divine, and it tastes very sweet.  What it lacks of the typical raspberry flavour it makes up for in delicate floral notes.  I need to do more breeding with this to create a thornless primocane version.  

After some years I got a black raspberry (Rubus occidentalis).  This is a different species of raspberry to the red (or yellow) raspberry.  It is not a blackberry.  It is not a loganberry.  It is not a youngberry.  It is not a mulberry.  It is not any other kind of berry, this is a black raspberry.  

It drives me crazy how difficult people seem to find the concept of a black raspberry in Australia, but I digress.  

Black raspberry comparison
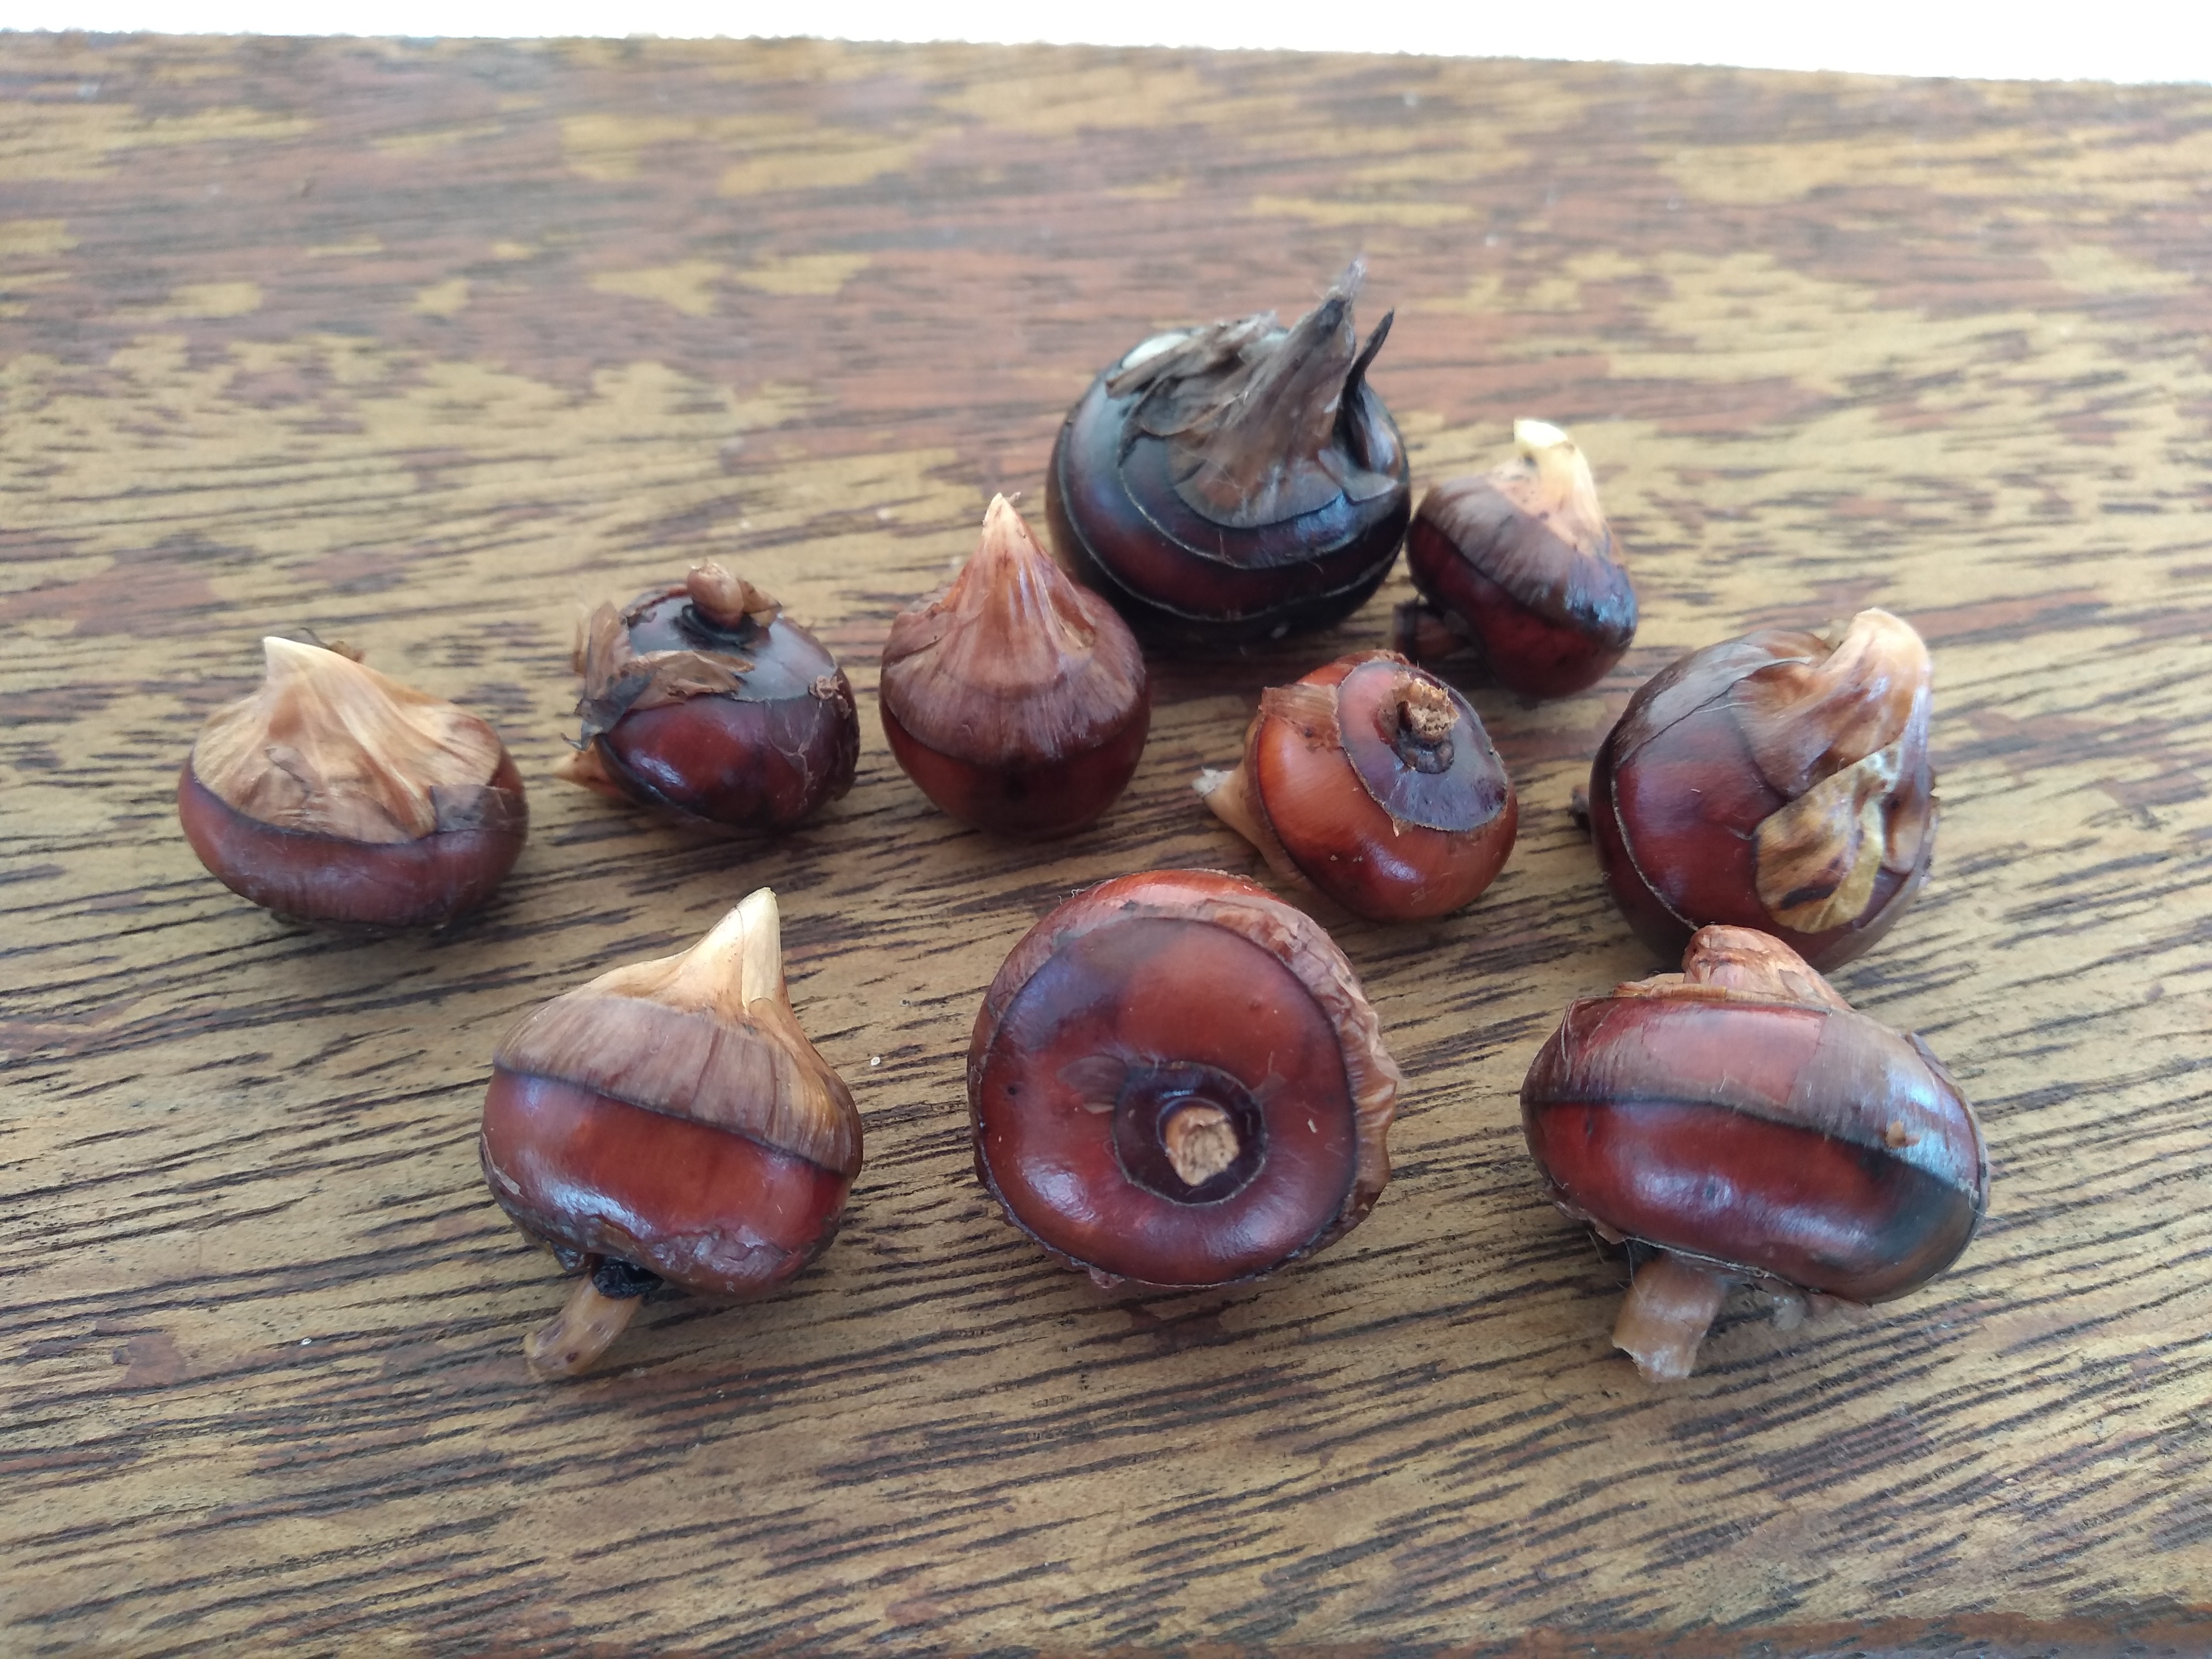
Yellow, red, and black raspberries

My black raspberries have a rich complex taste and aroma.  It is not as sweet as my other raspberries (neither are store bought raspberries), but it is not what I would consider to be sour.  They have a nice taste, it does not taste the same as a red or yellow raspberry, and it is not meant to be the same as them.  It does taste a bit like a raspberry, but also very different.  Black raspberry tastes nothing like a blackberry, and tastes nothing like a mulberry.  There really isn't anything I have eaten that they taste similar to.

I am bad at describing taste, my description above really doesn't describe it well.  The internet says black raspberries are "tangy, richly flavored, mildly sweet, cooling, and high in antioxidants".  I am not sure that description is all that much better than mine.  

Yellow raspberry, red raspberry, and black raspberry comparison
Yellow raspberry, red raspberry, and black raspberry 

You will probably notice that the berries are a bit smaller than red or yellow raspberries.  My comparison photos are all typical sized berries.  Some berries from each plant are larger or smaller, but the ones in the photo give you a decent idea of what is normal.  While black raspberries are smaller, they are still a decent size.  While I would prefer them to be larger, I don't find them to be too small. 

These plants are not what I would consider to have low productivity, and they do not blow me away with the size of the crops.  They usually produce clusters of about half a dozen flowers.  This is comparable to most raspberry varieties including my yellow raspberries, but it feels like nothing compared to my red raspberry which produces dozens per cluster.  

In my garden my red raspberries have the longest picking season.  They start ripening first, finish last, and produce the most berries over the season.  My yellow raspberries start to ripen after the red raspberries have been cropping for a while.  My black raspberries start to crop once I have been picking both the red and yellow for a few weeks.  


Black raspberries grow well in my garden, but they need different management to red raspberries.  They have curved thorns, similar to a blackberry or a rose, and the thorns seems to grab at you when you walk past the plants.  This is worth noting if you want to grow one.

I grow mine in pots, they appear to do well in pots.  I have never had red or yellow raspberries perform well in pots for me.  

Black raspberries grow differently to red raspberries.  Red raspberries grow roots underground and send up canes from the tips of these roots, black raspberries do not do this.  Black raspberries will set down roots from the tips of the canes if they touch the soil.  


My black raspberries are a floricane variety, meaning that they flower and fruit on the previous season's growth.  This is good to know as it dictates the way you prune them.  

I don't prune mine at all and at this stage, but if I was pruning them I would need to ensure large canes from the previous year were intact so they could flower.  I imagine that tip pruning would encourage them to branch and be more fruitful.  I know that tip pruning my red or yellow raspberries increases the crop significantly as they produce 5 to 10 times as many flowers.

Much like my other raspberries, the black raspberries do not ripen all at once.  Each cluster will have some ripe berries and some unripe berries at the same time.  I pick them once ripe, and go back each day or so to pick more over the season.  A long picking season is great for home gardeners, but dreadful for commercial growers who have to employ pickers.  

It is simple to tell when the berries are ripe because they are black.  The berries start out green, turn red, and get darker until they ripen a black colour.  Ripe berries will pull away from the stem easily, if they resist pulling from the stem they usually aren't ripe enough.  Raspberries have a hollow core once picked, blackberries and youngberries etc do not have this hollow core.  


So far birds seem uninterested in my raspberries of any colour.  They also don't seem overly interested in my strawberries.  Perhaps I am just lucky, or perhaps the birds are too busy stealing all of my plums and apples to worry about berries.

My black raspberries seem to have more seeds than red raspberries.  Perhaps it isn't more seeds, perhaps they are larger seeds.  I am not sure, all I know is they are more noticeable.  I don't find the seeds very annoying, but they do get stuck between my teeth more often than the seeds from my red raspberries.

Black raspberries are simple to grow from seed, but it takes a long time before you get the first crop.  I am growing out some seed at the moment, and once berry season is over I plan to root some of the can tips.  

If I have a few extra plants I plan to offer them on my for sale page.  I don't have any spare plants at the moment but I am expecting to have a few to offer when they are dormant in winter or early spring.  

Raspberry comparison