Monday, 12 October 2020

Strawberry Raspberry hybrid leaves being tested soon

I have written a few posts about my attempt at creating a strawberry raspberry hybrid using cross pollination.  While the resultant plants display several morphological differences to the parent species, and are far more vigorous than the strawberry parent, the plants do look remarkably like a strawberry. 

I made every effort to ensure a hybrid was produced (emasculating flowers, bagging flowers, etc), and while this would exclude flying insects such as flies or bees this attempt was produced in the field.  As such there is a chance that some tiny ant was able to crawl under my bag and pollinate the flowers with pollen from who knows where. 

For this reason I have been trying for quite some time to have these plants tested by a lab to determine if they are hybrids or something else (perhaps they are polyploid, perhaps a mutation).  For various reasons I have not yet been able to have these plants tested, which has been rather frustrating.

Recently someone contacted me who knows someone in the CSIRO who may be able to test my plants.  I contacted the CSIRO, we had a discussion, and they are willing to test my plants.  I have sent the CSIRO sample leaves of several F1 hybrids, one F2 hybrid, and samples of both parent plants for analysis. 

If all goes well I will know before Christmas if they are hybrids.  Regardless of the outcome I will post the results on this blog.  Exciting times!

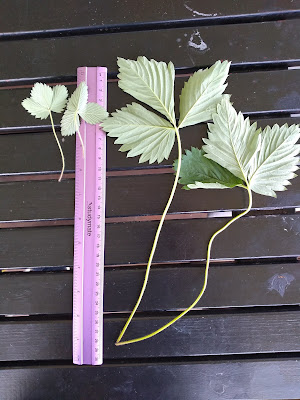
Strawberry raspberry hybrid leaf comparison
Hybrid leaves top, strawberry parent leaf lower left, raspberry parent leaves lower right

Strawberry raspberry hybrids F1 and F2
F1 hybrid leaves on right, F2 hybrid leaves on left

Hybrid leaf - long petiolules not quite opposite

strawberry X raspberry hybrid and strawberry parent
Hybrid leaf at top, parent strawberry lower

raspberry x strawberry hybrid
Hybrid - inconsistent flowers and a lot more flowers per set

Sunday, 4 October 2020

Chufa varieties

Chufa (Cyperus esculentus) is an underrated crop.  Chufa tastes nice and can yield very well.  I have only ever eaten them raw but to me the little tubers taste sweet and a lot like almonds when raw. 
I have only ever eaten the 'regular' chufa, but I really like them.  The taste and the texture are very appealing to me.  If I could buy these in the shops I would eat them every day.

It is difficult to find any chufa to grow.  Some places sell unnamed varieties, others sell seeds, but over all chufa is difficult to find for some reason.

A very generous person sent me five different varieties of chufa to grow.  I soaked them prior to planting them and hope to be able to compare them after a season.

Chufa grows much like water chestnuts, but without needing to be under water.  There is even a weedy version that produces tiny tubers and numerous seeds which is a bit of a nuisance in crops and lawns.  Most of the improved named varieties do not produce seed.  Hopefully they grow well for me and produce a lot of fat little tubers at the end of the season.

This blog post is mostly for me to be able to compare things more easily later.  The postcode boxes can be used for scale, but in hind sight I should have taken pictures of each variety next to a ruler or something.  I will have to try and remember that at the end of the season.

Chufa - Ale

Chufa - Jumbo

Chufa - Black Tiger

Chufa - Spanish

Chufa - regular

Thursday, 24 September 2020

Rendering bees wax the easy way

Bees wax is rather useful for a variety of purposes.  If you have a bee hive you eventually end up with extra wax.  This doesn't tend to store very well unless it has been rendered.  I also can't imagine using it for anything other than eating before it was rendered.  So rendering beeswax is an important skill to have.

I have read some descriptions of how people render bees wax.  Quite often they are difficult, time consuming, and sometimes even sound rather dangerous. 

Below is how I render bee wax the easy way.

To be clear:  I am not an expert.  I am self taught.  This is almost certainly not the best way to render wax.  This method is fast, it is simple, it is safe, it is cheap, and it uses things I have in the home. 

I don't know for sure, but I think once something has wax on it there will always be wax on it and I would hate to ruin pans that we use for cooking.  My kids have a play kitchen in the back yard with old pots and pans and things, so instead of ruining pots and pans that we use I 'borrowed' these from the kids (just don't tell them).

I got a pan and another pan with holes in it that fit on top.  The bottom pan needs to hold a few cm of water so there needs to be a gap between the two pans.  If the pans are the right size they maintain a gap nicely, but I was using things that were never meant to fit together and were old and bent out of shape so I think I used an old metal cup or something to maintain this gap between the two pans.

Two pans, the bottom one is half filled with water

I put a sheet of paper towel on top.  Once the wax melts it drips through this paper towel onto the water.  Dust, dirt, debris, propolis, parts of dead bees, and other impurities get caught in the paper towel.

One sheet of paper towel on top

I then put my old dirty wax on top.  Feel free to stack it high, it will melt down considerably.  We don't tend to have a lot of spare wax.  I collect it and keep it in an old ice cream container until I have enough to bother rendering wax.  My kids eat little bits of this wax throughout the day for some reason. 

I think I ended up with around 150 grams of wax at the end of this, which isn't too bad.

Pile the old wax on top of the paper towel

I then put all of this in the oven.  I set the oven to 200C and left it to melt.  In hind sight I should have set the temperature lower.  The flashpoint of beeswax is 204.4C, so I cam close to disaster!  I think as the wax heated it melted and dripped through to the water, which could have kept it slightly cooler.  The beeswax only needs to reach 62 to 64 to melt, and anything over 85C causes discolouration.

The more wax you have the longer it takes to melt.  This lot was small so only took half an hour while I took the kids for a walk, but it can take a few hours if you have more wax.

Wax melts quickly, it looks and smells kind of appetising at the start

The wax melts and drips through the paper towel

Once it is finished the wax will have dripped through the paper towel and is floating on top of the water.  The paper towel will have strained out most of the impurities.  My kitchen smells a little like honey and baking at this stage.

The paper towel strained out most of the impurities

This part is very important: when everything is still warm remove the paper towel from the tray.  If it cools too much it will be stuck to your pan and can't be removed.  If this happens, don't worry, just pop it back in the oven for a minute to warm slightly and then try again.

I am told that the paper towel can be cut up and used to light camp fires etc as the wax etc burns long.  I haven't tried this myself.  I would not use it to light the fire at home because it would likely not burn completely and the smoke may clog up the chimney.

Melted wax floating on the water, let it cool!
Rendered wax ready to be used or cut and stored

If you want the wax really clean you can render it again, or even render it several times to get it even cleaner.  Each time it should come out a little cleaner.  I only render once and it comes out a lovely yellow colour, but it really depends on what you want use you have in mind for the wax.

Once the wax has cooled it will solidify.  It has been floating on water so put it somewhere to dry, then cut it up, put in a container or zip lock bag, and then it is ready to do whatever you want to do with beeswax.  Rendered wax should last a very long time and possibly never go bad.

As I said at the start of this post, I am not an expert and this is likely not the best way to render wax.  This method is incredibly simple, very safe, low cost, and yields decent results.  If you know of a better way to render bee wax, or have any hints and tips that may be useful, please leave a comment as I would love to hear it!

Monday, 21 September 2020

Daffodils

This year we grew a few different daffodils.  I really like them.  As last summer was extremely harsh not all of our daffodils flowered this year, but the ones that did flower were lovely, so I decided to take pictures of a few of them.  
 
Below are pictures of some of the named daffodil varieties.
 
Daffodil: Ice King 

Ice King Daffodils
Ice King Daffodils

Daffodil: Replete
Replete Daffodil - white and orange
Replete Daffodil next to Marieke
Replete Daffodil and Marieke - side on
Replete Daffodil - turns a pinky/orange as it ages

Daffodil: White Ideal
White Ideal Daffodil
White Ideal and Marieke
White Ideal Daffodil next to Marieke
White Ideal and Marieke

Daffodil: Marieke (the larger of the two, the smaller and less impressive 'King Alfred' is included as a comparison)
Marieke Daffodil
Marieke Daffodil

  Daffodil: Bell Song

Bell Song Daffodil
Bell Song Daffodil
Bell Song Daffodils - they get slightly pink as they age

Mixed daffodils and tulips


There are a few places that sell these daffodil varieties so if you want some you should be able to find them if you look around a bit.  I have never sold flower bulbs, if I ever do sell any they will be listed on my for sale page

Saturday, 19 September 2020

Honey Bees foraging close to the hive

There have been many studies conducted on the maximum distance from their hive that honey bees will forage.  Honey bees are fascinating and have a lot of financial implications, so they have been studied rather extensively.  To the best of my knowledge there have been no peer reviewed studies on how close to their hive honey bees will forage.

I am often told by beekeepers that honey bees don't forage closer than 30 feet [or some other precise distance] from their hive.  The theory goes that they don't have a waggle dance for such short distances, therefore they can't find flowers very close.  I have never believed this.

Some beekeepers tell stories of seeing bees on flowers next to their hives and cite that as evidence of bees foraging over short distances.  They are often scoffed at because these bees are probably from some other hive.  Let's be honest, most honey bees look alike.  Seeing bees foraging near a hive proves nothing.

I have a bee hive in the chicken run under some fruit trees, the other day I stood for some time and watched the bees.  The honey bees foraged in the flowers, then they went into my hive.  I watched for a while and saw dozens of bees forage in the fruit trees and then fly into that hive.  This shows that bees can and do forage very close to their hive.

I have never seen bees fly from the hive to these close flowers so I can't know if they unsuccessfully attempted to forage further afield and visited these flowers on their return trip, or if they flew directly to them, but it doesn't matter.  What matters is that the bees were foraging on flowers this close to their hive.

Even though I watched quite a lot of bees go from that tree into my hive I don't know if after they return to their hive and have some way to communicate about the location of these close resources.  Perhaps they have a different waggle dance for short distances, perhaps they have some pheromone or other way to communicate this, or perhaps communication is not needed as scouting bees will forage close to the hive rather than go further looking for forage.  I don't really know, what I do know is that honey bees do forage within a few feet of their hive, so any close flowers are not wasted.

Bee hive under fruit trees in chicken run

You can't see them in this picture, but this tree is full of honey bees

Honey bees forage within a few feet of their hive, this tree had almost finished flowering

Sunday, 6 September 2020

Spring flowering bulbs

Spring came early this year, some of my spring flowers began to bloom the first week of August.  Some have already finished flowering, others are not going to flower this year after barely surviving last summer, while others are not even starting to emerge from dormancy yet.  I haven't seen a spring like this before, it is all over the place.

I got a bunch of different daffodils and had planned on mass crossing them and planting out the seeds in the hopes of producing something nice.  One daffodil variety I grow is called 'Marieke'.  It is said to be the best yellow daffodil.  Large flowers are almost double the size of my other yellows, good colour, lovely shape, strong stems, flowers last a surprisingly long time, to be honest I don't think I can breed anything better.
Daffodil 'Marieke' - said to be the best of yellow daffodils

Crocus 'pickwick' produces lovely stripey flowers that last well in the garden.  I like crocus, but don't grow many types.  For some reason I don't see many in people's gardens around here even though they are simple to grow in this area.  I quite like pickwick, they are one of my favourite crocus.
Crocus 'Pickwick'
Crocus 'Pickwick'
Grape hyacinths smell lovely, attract and feed honey bees early in the season, are small so take up next to no room, reliably flower even in the harshest years, divide well, can be grown from seed, and generally look after them selves.  I only grow the common blue ones, and some seed grown blue ones.  I keep saying that I should try to get a few more varieties, but never get around to it.  I think they are very under rated spring flowering bulbs.
Muscari grape hyacinth
Dwarf iris 'harmony' is said to be the best of the blue dwarf iris.  I like these little ones, hopefully I can divide them somewhat and have more next year.  I would like to grow some from seed but have had little luck in getting them to set much seed.
Dwarf iris 'Harmony'
Hyacinth - smell lovely and look nice but only some flowered well this year.  Notice the pink one on the left has a lot of flowers, the one on the right has disappointingly few flowers.  They have a bad habit of only lasting a few years and then not returning, so I will need to look after them and lift them at the end of this season.
Pink Hyacinth
Blue hyacinth


Snowflake - these were here before we moved in.  They are mostly in places I would prefer to grow other things.  I don't love them, so each year I dig some up and give them away, every year there are more to replace them.
A honey bee investigating the flower