Sunday, 3 April 2022

Zea diploperennis - perennial corn ancestor

There are a few wild ancestors of modern corn (Zea mays) that are still around.  Most don't look hugely like the corn that we are used to, but you can see how they were bred into what we use today.  Most are annuals, just like domesticated corn.  Most can be crossed with domestic corn if they can be induced to flower at the same time.  

There are a smaller number of species of perennial ancestors of corn.  Most of the perennial ones are on the brink of extinction in the wild, or already extinct on the wild.  I think there may be a few wild species that are growing in such small areas that they have yet to be described.  

Recently someone sent me some seeds of a hybrid between modern corn and the perennial Zea diploperennis.  From memory this contains ~15% mays genes.  I was very excited to grow this as I am not sure how much perennial corn is in Australia.

I planted the seed and ended up with a small number of plants.  I put each plant in a pot of soil and moved this into the garden over the growing season.  Growing in pots means I can move them around and hopefully protect them over winter.

I am told that diploperennis can be used similar to popcorn, but with smaller ears and few kernels in each ear.  If this was crossed with regular popcorn it should be possible to create a perennial popcorn.  As many wild plants contain genes for disease resistance or pest resistance that are not present in their domestic counterparts, a perennial popcorn that uses diploperennis as one of the parents could be very useful to grow in low input permaculture farming or backyard gardens like mine who don't like to spray anything.

Zea diploperennis in pots next to popcorn, pumpkin, and beans

Zea diploperennis tillering a little

Zea diploperennis flowering in my garden

As it has some modern corn genes, it should flower under my climate without having to manipulate daylength, and it should flower roughly at the same time as domestic corn.  It should be able to cross with regular corn.  There is a lot of "should" and very little that I know for certain about this plant.

I had hoped to cross this with pop corn, with the hopes of eventually producing a perennial popcorn.  To give it the greatest chance of working I grew it next to some genetically diverse multi-coloured popcorn.

Unfortunately the weather was odd this summer, and many of my vegetables flowered really late or not at all.  My diploperennis didn't start to flower until the popcorn was already harvested.  Some diploperennis appear to be producing cobs, but I am not sure if any of them contain seed or if they will all be empty.  As the diploperennis are flowering so late I am not sure if they even could produce any seed prior to winter.  


Some of the diploperennis plants tillered a little, others did not tiller at all.  None of them got more than a foot and a half tall and they all had stems almost as thick as a pencil.  This was likely due to the soil I grew them in combined with the cooler than usual summer.  Then again, perhaps they are always scrawny plants.

I can't imagine that these would be perennial in my climate as they are not adapted to frosts.  I planted my diploperennis in pots of soil so I can move them into an unheated greenhouse over winter to protect them from frosts.  Hopefully they can survive over winter, but I won't really know until spring.

I don't have enough seeds or plants to share any at the moment.  I grow and sell a lot of interesting plants through my for sale page, but it is unlikely that I will have diploperennis available any time soon.  I don't even know if this can survive winter in my climate in an unheated greenhouse.  Fingers crossed I can over winter these plants and eventually have enough to share around a little.  

Tuesday, 29 March 2022

Giant dandelions - the supervegetable

A few years ago I started trying to breed a larger variety of dandelion (Taraxacum officionale).  I can't quite remember why.  It was a lot more difficult that I had imagined, but the results were pretty spectacular.  I wrote an earlier blog post on my giant edible dandelions.  I do a lot of vegetable breeding, and have produced some spectacular new varieties of plants.     

Dandelions are tremendously useful plants.  They are edible and far more nutritious than almost every vegetable I can think of.  All parts are edible and incredibly nutritious.  Livestock and poultry love to eat them, bees and many other beneficial insects adore the flowers.  The roots are deep and bring minerals up from the subsoil.  A nice coffee substitute can be made from the roots, or the roots can be roasted and eaten as an interesting vegetable.  People make coloured dye, syrup, or even wine from the flowers.  The flowers are pretty, and kids (and adults like me) like to blow their seed heads.  

Here are some leaves of my giant dandelions.  While it does change throughout the seasons, leaves over 50cm long are not uncommon.  Even the smaller leaves are very large and easily big enough to be useful in a salad.

Giant edible dandelion

Giant edible dandelion leaf

I find the leaves of regular lawn dandelions to be too small and too bitter to be useful in salads.  Leaves of these giant dandelions are far larger than regular dandelions, the pictures above show them on my hand for scale.  Being massive they seem to be less bitter.  Some people like bitter leaves, but I don't.

I find that bitterness changes in all dandelions.  They become more bitter when they flower.  They are less bitter when given a lot of water when growing fast.  I find new leaves from fast growing plants prior to flowering to be the most tender and least bitter.

Giant dandelion leaves, 30cm ruler

Leaves around 50cm long are not uncommon

I have grown a number of seedlings from my giant edible dandelion plants and they are spectacularly large.   

My giant dandelions seem to need more water than the regular lawn kind, so I figured they would never survive in the lawn as volunteer seedlings.  This summer was wet and cool, and a small number of my giant plants have started to grow in my lawn.  I am happy with this.  I also think next summer they will likely die off.  Time will tell on this one.

Giant edible dandelion leaves

Even the small leaves are large enough for salads

As you can see, leaves of dandelions vary a bit in shape and size on each plant.  I really should grow one giant dandelion in a pot and grow a regular dandelion in a pot as a comparison to show just how impressively massive these larger plants are.

I sell seeds and plants of my giant edible dandelions.  I also grow pink flowered dandelions, which grow to a normal dandelion size but the flowers are fairytale pink, and sometimes sell seeds of those.  If you are interested they are listed on my for sale page with some other perennial vegetables and other seeds and plants.


Friday, 25 March 2022

Drosera capensis Hercules

I was given a small plant of Drosera capensis 'Hercules' by an extremely generous person.  As far as I know there are very few of these in Australia.

At first this plant grew well for me, then it died back somewhat.  It grew larger, then died back again.  It kept doing this and each time it died back to a larger plant and grew larger than the previous time.  
Drosera capensis 'Hercules' foreground, 'typical' and 'alba' in background

Drosera capensis Hercules

I originally had it growing in a pot with Drosera capensis 'True Giant'.  The capensis true giant is an interesting clone, but that is a story for another time.  I should have had them both in their own pots from the start, but I had issues buying peat moss.

I had it growing inside my house next to some typical and alba capensis, so figured the position was not too bad.  It turns out that my capensis Hercules did not like this position, its leaves got stretched out and is started to lose colour.  I don't think it had enough sunlight there.

Capensis Hercules Petioles are about 4mm to 5mm wide

I moved it outside, where it grew a little but was really not happy.  I moved it back inside again and expected a better result.  I tried a few different positions and eventually moved it to my greenhouse, and put it in its own pot, where it has really started to grow.  

I am not sure if it is the location, or having its own pot, or the incredible number of insects it catches, but it is now growing well.  To be honest, I can't imagine having a greenhouse without a few carnivorous plants to control the insects.

Drosera capensis 'Hercules' catching a lot of insects

This year my Hercules sent up a flower scape.  It grew many, many flowers and the scape grew incredibly long.  

The flowers on capensis Hercules are absolutely huge, far larger than any capensis flower I have seen.  

The seeds have just started to ripen.  I plan to plant a few and see what the seedlings are like.

Drosera capensis Hercules flower

This plant was originally registered as an interspecific hybrid between Drosera capensis 'alba' and Drosera aliciae.   The current belief is that this is a wide leaf variant of Drosera capensis.  

From what I have been told, capensis Hercules grows reasonably true from seed, which indicates that it may be pure capensis rather than a hybrid.  My first seedlings are still tiny, so it is too early for me to know how true to type they will grow for me.


The leaves on capensis Hercules are rather wide.  Which is similar to, but distinct from other wide forms of capensis.  The leaves grow reasonably long.  

The leaves and flowers have the same colouration as typical capensis.  The young leaves seem a little hairy before they have unfurled.

Capensis Hercules is a really nice looking plant.  Strangely enough I don't have any nice photos of my capensis Hercules plant.  The leaves never look picturesque and dewy because each leaf catches so many tiny insects.  This is a good thing, it means my plant is well fed and (more importantly) it means that there are far fewer tiny insects flying around in my greenhouse.

Drosera capensis Hercules on left, capensis True Giant on the right

The capensis Hercules flowers are truly massive.  They are the same colour as typical capensis flowers.  The scape grew very long, and had a lot of flowers.  Much like typical capensis, the first flowers to open drop seed while the last flowers are still buds.

From what I have seen they set seed and appear to be highly self fertile.  Again this tends to indicate that they may not be an interspecific hybrid.

capensis Hercules flowers are HUGE

Young plants of capensis Hercules and True Giant 


The capensis Hercules plant I am growing was taken as a cutting from a clone, meaning it is the true Hercules.  Seed grown plants may be slightly different and should never be labelled as Hercules.

I sell some carnivorous plants through my for sale page.  If I sell or trade any seed grown plants I will make sure that they are labelled Hercules x self or something to indicate that they are not the true Hercules clone.  If I ever trade the true Hercules clones I will also make sure to label this to distinguish between them and its seedlings.

Friday, 18 March 2022

Micro woolly dwarf tomato progress

I wrote an earlier blog post about crossing a micro dwarf tomato with a high anthocyanin tomato with angora leaf.  I am not great at cross pollinating tomatoes, but my cross worked.  

I dabble in vegetable breeding and have created some interesting new varieties.  I want to develop some lines of micro dwarf wooly tomatoes.  Eventually I would like a micro dwarf tomato that has high anthocyanin blue fruit as well as woolly foliage.

Micro Woolly Dwarf tomato progress

Micro Tom was the seed parent.  This is a micro dwarf tomato with red round fruit that tends to be slightly pointy at the end.  The pollen parent was a dwarf tomato with woolly foliage, this had round fruit that was black where hit by the sun and yellow underneath.  Using a dwarf crossed with a micro dwarf makes progress a little faster as there is one less gene to segregate in future generations.

The F1 cross was a dwarf plant slightly taller than the pollen parent.  It had slightly fuzzy leaves and fruit.  The fruit was red and round that was usually slightly pointy at the end.  Strangely enough not all of the fruit was pointy, I only had one plant but nothing was overly uniform.  This plant had high anthocyanin fruit that was black where hit by the sun.  It had traits of both parents, which was fun.

Most of the early fruit was red as it grew on the shaded side of the plant.  Strangely enough the fruit that got more sun didn't ripen until later.

Micro Woolly tomato progress


Some of the fruit is very black where the sun hit it.  This is a trait I would like to keep in some of the lines that I will develop.  Others will probably not have this trait.  I am planning on focusing on getting a few micro woolly tomato lines going.

One truss of tomatoes has confused me.  Somehow one tomato in that truss is black, and the rest are red.  I don't understand how this could have happened.  I can't imagine one tomato in the truss getting sun while the others were in shad.  Perhaps there is an early stage of development where they need sun to turn black and all except one were shaded?  

How is this even possible?

I like the look of black tomatoes

Micro Tom tomatoes are a tiny plant, the tallest I have ever grown is 10cm tall.  Next generation I should be able to produce some micro woolly tomatoes that won't be much taller than that.

As I will be largely dealing with recessive (or partially recessive) genes it should be easy to plant a huge number of seeds and cull anything that is not woolly or micro dwarf.  Micro dwarf should start to appear in the next generation, they should not be a great deal taller than Micro Tom.  I don't plan on keeping anything that is over 15cm tall.

I am tempted to plant some seeds now and try to sneak in an extra generation on my window sill over winter.  Then again it may be best to wait until spring and plant several hundred seeds and cull them hard.  There won't be room on my window sill for doing something like that.

Full grown Micro Tom tomato

The next generation should see some real progress, then it will be a few generations after that to stabilise any lines.  Luckily I can normally grow two or so generations per year of micro tomatoes so this should not take as long as other things that I am breeding.

At some stage I will sell seed through my for sale page, but that won't be until the lines are stable.  I do have seed of other things that I have bred.  If you are interested go and have a look.

Friday, 11 March 2022

Venus Flytrap - DCXL

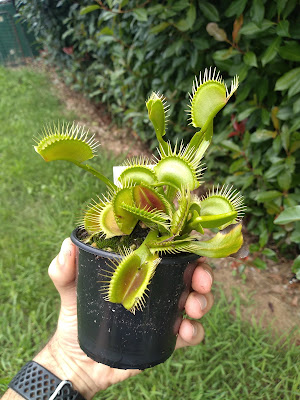
Late last year I bought a DCXL Venus Flytrap.  I have not been growing it for very long, and my plant has not yet demonstrated its true potential, but already it is one of my favourite Venus flytraps. 

DCXL has upright summer growth, and is meant to die down to have low growth over winter.  The traps are rather large, even on my young plant, and it puts out a lot of traps.  The traps don't have a huge amount of colour, but they make up for it with their large size.  So far mine is upright but has not grown overly tall, but I can see its potential for growing very tall once established.

My plant arrived in the mail rather small, and has exploded in growth, faster than any venus flytrap I have seen.  It is pretty impressive how quickly it grew from a tiny thing into a large impressive plant.

DCXL Venus Flytrap in Australia
Venus Flytrap DCXL big and beefy

My plant attempted to flower not too long after I got it.  I cut off the stalk as I wanted my plant to focus on getting strong and healthy rather than flowering and producing seed.  I planted the stalk, and it has produced a few baby DCXL plants from that cut off flower stalk.  

My DCXL plant also appears to be dividing.  So far there are two large divisions in that pot and maybe the start of a third smaller one.  I will be interested to see how many divisions it will produce between now and winter as I hope to grow a few more of these in my collection. 

Venus Fly trap DCXL

I am not great at describing these plants, so have cut and paste some descriptions that I found which were written by people far more knowledgeable than I am.

Flytrapstore.com description:

This is it! THE LARGEST TRAPS WE'VE EVER SEEN! Out of the thousands of flytraps we have growing here at FlytrapStore, DC XL grows the largest traps of any flytrap we've ever grown. The first traps in spring are usually the largest and can approach 2 inches in size on a fully grown DC XL flytrap. In addition to being ginormous for a Venus flytrap, DC XL is also an extraordinarily hardy grower, more than any other type we know of. DC XL is a handsome hardy monster flytrap, and we learn to love it more and more as we watch it grow over the seasons.

DC XL produces the largest traps we've ever seen! A giant monster of a plant. Grow one and judge for yourself! The "XL," in case it wasn't obvious, stands for X-tra Large. 

The challenger to B52 for the "world's largest traps" title. The "DC" in DC XL is for David Conner, the original source for the single plant of DC XL we obtained and subsequently grew and propagated in tissue culture in the FlytrapStore Lab. David Conner is also the original tissue-culture source of the famous B52 Venus Flytrap.

I also could paraphrase the history of the DCXL VFT, but thought I could just cut and paste directly from the source.  Flytrapcare.com gave a bit of a description of its history:

A few years ago before I knew Matt and was raising and selling Venus Flytraps as the Flytrap Ranch, I bought quite a few young B52 Venus Flytraps from David Conner. He was the original tissue-culture propagator of that great clone, and I'm still grateful to him just from a personal perspective for helping to generate enough for B52 to become widely distributed and cultivated, now in many countries, not just its home country of the United States.

When I received one of my orders from David, he included several gift plants, single young plants of specific Venus Flytrap clones he was thinking of tissue culturing. One of them was "All Red" (which Matt is propagating and we are growing for sale, a magnificent deep red clone whose name we added the prefix "DC" to in order to identify its source), another was "Giant Red," which turned out to be disappointing after growing it for several seasons, and another was the XL (which we've added the "DC" to to indicate the source).

The XL (now DC XL) grew very vigorously that first year and divided into several plants. I was impressed with its growth. The second growing season, it produced the sturdiest wide leaves, with the largest midrib (the vein that runs the length of the leaf), most vigorous growth after dormancy and the largest traps I had ever seen on a plant that was still immature. Matt used a flowerstalk of DC XL (right, Matt?) to get the plant into viable (noncontaminated) sterile culture and has been propagating it since. 

Venus Flytrap DCXL - a large robust carnivorous plant

I myself don't currently have any carnivorous plants in tissue culture.  I grow all my named venus flytrap plants from divisions, leaf pullings, or flower stalk cuttings.  This means increasing numbers can be slow, but I am growing them as a hobby so I don't need to produce thousands of them.

I can't help but notice the price of these has gone up since I bought my plant, the average price in Australia being $50 plus postage for one small juvenile plant!  In my opinion that is far too much for a flytrap.  I hope to divide my DCXL vft and have a few plants to grow for myself, but I may be able to produce a few extras on top of that.  

When I have any extras I might list them on my for sale page but the price won't be as high.  I have a few other named varieties of venus flytrap and other carnivorous plants for sale, or I would be willing to consider a trade for other interesting plants.  

Saturday, 5 March 2022

How I grow maidenhair ferns

Back in early 2016 I got a little fern to keep in my office.  Maidenhair ferns don't cope with direct sunlight, they don't love extremes of temperature, and they appear to dislike change, so they are really well suited to office life.  

Over the past 5 or 6 years my little maidenhair fern has grown rather large.  To give you an idea of size of my maidenhair fern, the pot is about 20cm across.  There is a bit of variation but most of the fronds measure about 50cm long.

Maidenhair fern

One year later, same fern, lush growth

My little fern grew well.  I used to bring it home over Christmas as there was no one around to water it.  Other than that it was always in the office.  People often used to comment at how much they liked my office fern.

I had to bring my maidenhair fern home a while ago because I have not been in the office very much.  It wasn't really happy where I had it at home, it was a little too dark and I didn't rotate the pot so it only grew on one side.  I eventually worked out the problems.

Now I rotate the pot each week and my fern is picking up again and starting to fill out on all sides like it once did.  Hopefully it doesn't take too long to long good again.

Office fern front of pot

Office fern back of pot

Office fern side of pot
The same fern a year later - growing strong

Maidenhair ferns have a reputation for being finicky and difficult to grow, but they look so nice that I think the effort needed to grow them is worth while.  

By far the easiest way to grow them is to accidentally stumble on their preferred growing conditions.  Failing that I have noticed a few of their needs and listed them below.

Maidenhair ferns need constant moisture, but really don't like to sit in water.  I grow this one in a self watering pot and always keep water in the reservoir.  Other than the few times when I tipped out the water to take the fern home or take it back to the office the reservoir has never been empty, not even for a little while.  They don't like sitting in water as it will rot, so a self watering pot is perfect.  I have others growing in regular pots that I feel like I am watering all the time, but it is less work having them in self watering pots.  

Maidenhair ferns need bright indirect light.  From what I have seen, direct sunlight burns them and kills them pretty quick.  While I never let direct sun hit mine, if it is too dark he plant suffers and slowly declines.  Office lighting was good for this as it had many hours of low level light every single day.  At home I have it on a book shelf not too far from a glass door, it is a little dark for it there but not too bad.

Maidenhair ferns don't like being touched by people.  I am told the acid on your hands burns their fronds.  If you have to touch them please wash your hands first.  Kids shooting nerf darts or throwing paper planes also seem to do some damage to their fronds (don't ask how I know).  I don't have cats but assume that a cat rubbing against them is not great either.  If you can put them somewhere that they are not being touched they will reward you with nicer looking growth.

Maiden hair ferns don't love draughts or being blasted with an air conditioner.  That being said I have seen them in some extremely windy positions in nature and have a few growing outside under cover where they get lots of wind.  Perhaps they can survive strong wind if they have some sort of protection, being in a pot on your shelf they have no protection so it is best to protect them from wind if you can.

Ferns don't love regular fertiliser, it is usually too strong for them and burns their new growth.  I was told many years ago to tear open used tea bags and sprinkle the leaves on their soil to fertilise ferns.  I can't remember the last time I did that with my fern, but it always grew well afterwards.  It also seemed to encourage some kind of fungus, so I haven't done that in a while.  I am also told that banana peels are good for ferns.  Spreading banana peel on the soil causes insects to be an issue.  Cutting up the banana peels and drying them before mixing in the top of the soil seems to prevent insects from being a problem.

Maidenhair ferns don't love change.  When you bring your fern home, or repot them into a larger pot, or move them from one shelf to another some of the new growth will likely burn off and you should expect them to look bad for a little while.  I am not sure what the deal is with this, maybe it is because I have touched their fronds with my hands or maybe it is some other reason.  It isn't too big an issue as they seem to recover pretty fast.  Do rotate the pot each week to ensure they grow evenly on all sides, other than that try not to change too much too often.

I do sell maidenhair ferns, as well as a few other plants, through my for sale blog page.  If you are interested you should have a look.  From time to time I may have variegated ferns for sale.  

Monday, 28 February 2022

Venus flytrap leaf pulling

Venus Flytraps are reportedly very simple to propagate using leaf pullings.  A leaf pulling is similar to a cutting, but a small part of the rhizome must be attached to the leaf in order for it to be successful.  

I gently pull a leaf downwards which removes part of the white rhizome, and I plant it in sphagnum peat moss mixed with sand.   I treat this leaf pulling the same as an adult plant and often just plant it in the same pot as the plant that I took the cutting from.  

Once the plantlets have grown I divide them into their own pot.  I don’t use rooting hormones or grow lights or heat mats or anything special.

VFT leaf pulling sprouting many baby plants, each bump makes one new plant
 

I find leaf pullings to be a bit hit and miss, incorrect temperature or sunlight seem to be the difference between 100% success and complete failure.  I also find that some cultivars grow well from leaf pulling while I have difficulty getting others to take from a leaf pulling no matter what I do.  Genetics has a part to play here.

Whenever I repot or divide my plants I sometimes take a leaf pulling and sometimes I will pull off a damaged leaf and try to use that.  For me, the leaf pullings that are successful usually provide me with one new plant. Sometimes I get two or three new plants from one leaf pulling.  I normally get a few plants from each flower stalk cutting.  

This past spring I divided some of my plants and took a few leaf pullings.  I was planning on selling the plants, and because I didn't have many spare pots I left the leaf pullings in the pots with them until the divided plants were large enough for sale.  The day before the plant sale I removed any surviving leaf pullings to put in another pot and was surprised at what I saw.

Most of the venus fly trap leaf pullings had either died off or produced a single plant, some had two new plants.  These new plants mostly arose from the rhizome or very low on the leaf near the rhizome. 

Leaf pulling was growing in this pot with a larger plant

One Venus Flytrap variety produced numerous new plants, they were produced most of the way along the stem of the leaf and not just from the rhizome.  One leaf started to produce well over a dozen new plants.  These are the first leaf pullings I have successfully taken from this variety, so I am not sure if this excessive production of plants per leaf pulling is common in this variety or if I just got lucky.  This is a particularly vigorous clone, so it may be possible that they commonly throw this many plants per leaf pulling.

I have never seen so many new plants arise from one venus flytrap leaf pulling.  These were the first two leaf pullings I have taken from this variety, so perhaps it is common to this clone.  I guess next Spring when I take more leaf pullings I will find out.

As I dug up these leaf pullings and moved them before they were established I half expected to either die or for only a few of the plantlets to continue developing.   Often cuttings and the like do not take kindly to being disturbed until they are more established.  So far this does not seem to be the case, and both of these successful leaf pullings appear to have survived and the plantlets are continuing to develop.

The other leaf pulling came from this pot

Two leaf pullings replanted in this pot

I sometimes get a pot of tiny plants that I can care for while they are growing larger.  Keeping tiny plants in one pot makes it simple to care for them.  I put the successful leaf pullings in one of these pots.  You can see in the picture above that it already had some tiny plants as well as a flower stalk cutting.

The picture below shows that both of those leaf pullings survived and are producing many new baby venus fly trap plants.  You can also see the flower stalk cutting (bottom right) successfully made new plants.

This pot has tiny plants growing out from various cuttings and things

From here I will leave them to grow over the warmer months.  I will probably let them go dormant over winter, and I will try to divide anything that is relatively large in spring.  Even though my venus flytraps are growing in very low nutrient media, I find that dividing them seems to help them grow faster.  

I regularly have venus flytraps for sale and other carnivorous plants for sale, if you are interested I list them here.

Thursday, 24 February 2022

Cambridge Rival strawberries Australia

For over a dozen years I have been trying to find somewhere to by a "Cambridge Rival" strawberry plant.  I have heard so much about them.  Cambridge Rival are meant to be the best tasting strawberries in Australia.

Diggers used to have them, but I have had such bad experiences with Diggers on many many occasions, plus their prices are unreasonable for low quality plants, and postage price is incredibly high, that I really didn't want to buy anything from them if I could help it.  I looked around, and asked around, but had no success. 

As it has been so many years of searching and I have had no success I decided to bite the bullet, spend a fortune to buy a plant from Diggers, and hope they did not send me the wrong plant that had been mis-labelled, or a dead plant, or a plant covered in mildew, or any of the other nonsense that they have repeatedly done in the past when I have bought from them.  Strangely enough, I looked one day and they had them listed but the following day when I was planning to complete my order they had been removed from their list.  I guess it wasn't meant to be.

I kept looking, and asking around, and eventually found a home gardener who grew Cambridge Rival strawberries and sent me some plants.

Cambridge Rival strawberry
 

Cambridge Rival strawberries have white flowers and can either self pollinate or be pollinated by another variety.  Cross pollination does not change the taste.  They are said to throw a lot of runners but my plants have not done much of that yet.  They are only meant to crop once or twice per year in my climate, which is a down side of this variety. 

My plants survived winter and flowered in spring.  The first berries ripened early December.  A second flush of fruit ripened in February.  The berries were mid-sized, and red.  The colour of these was nice, even the inside of the berries was rather red.  The berries themselves were nice and soft, making them unsuitable for commercial harvest but perfect for the home grower.  They smelled rather nice for a garden strawberry, which was novel.

The taste of Cambridge Rival strawberries was incredible and unrivaled by anything else I grow.  They were intensely sweet, and pretty sour, at the same time.  They had a depth of flavour that I really enjoy.  The texture of these was very soft.  It sounds cliched but they did sort of melt in my mouth.  I have only eaten them perfectly ripe, I have no idea what they taste like a day or two before being ripe.

The richness of flavour, combined with the nice strawberry smell and the texture makes Cambridge Rival my favourite strawberries.

I have saved some of their seeds and should plant them at some stage.  Seeds that were self-pollinated will not produce Cambridge Rival strawberries.  These are octoploid and largely heterozygous, meaning every seedling will be genetically unique.  While most seeds will not be as good as the parent, some may be much the same, and there is a chance that some may be even better.

At some stage I need to track down a good day-length neutral strawberry and cross it with Cambridge Rival in the hopes of producing a day-length neutral strawberry that is of similar quality to these.


Cambridge Rival strawberries with insect damage

As you can see from the berries in the background of the above picture, other things also like to eat these strawberries.  I grow everything organically, so the earwigs and slaters tend to get into my strawberries.  This frustrates me greatly.  There isn't much I can do unless I spray, and I am not keen on spraying, so I have to put up with it.

Given how difficult Cambridge Rival strawberries were to track down, and how great they taste, I plan to let my plants throw as many runners as they want.  If I ever have a few spare plants I will offer them through my for sale page.  I can't imagine I will ever have too many extras of these though as I really want to grow a lot more of them myself!

Friday, 18 February 2022

Tiger fern

I recently got a lovely variegated tiger fern.  Tiger fern is a variegated variety of the Boston fern.  There aren't a huge number of different types of variegated ferns, which is too bad because I think that variegated ferns usually look really nice.

For some reason that I am unable to find out, I am told that Nephrolepis exaltata and all of its varieties does not form viable spores and can only be reproduced asexually.  I would love to know more about why this is the case, but I have been unable to find out anything.

Something I find remarkable is even though this species does not produce viable spores there are dozens of cultivars of it.  It seems to throw natural mutations from time to time, and many new varieties have formed naturally and spontaneously.

Tiger fern have variegated fronds

I find the history of the tiger fern to be interesting.  As they can not be sexually reproduced they were developed by a long drawn out domino effect of naturally occurring mutations that just happened to be noticed by someone with enough wherewithal to keep them alive, propagate them, and spread them around.

Brief history of the tiger fern:

The wild type 'Sword fern' (Nephrolepis exaltata) has upright fronds and looks like the type of fern you would find in a woodland.  The wild type existed for millennia, it was noticed by collectors and has been propagated and grown by gardeners across the world.

The 'Boston fern' (Nephrolepis exaltata ‘Bostoniensis’) came about as a natural mutation that occurred in sword ferns.  Sword ferns have upright fronds, while the Boston fern has gracefully arching fronds.  The arching fronds mutation was noticed in one plant among an importation of about 200 sword ferns by a florist near Boston in 1895.  This mutant plant was grown and cared for as it was a beautiful oddity.  Since then the Boston fern has been propagated asexually and spread across the world by gardeners and collectors.

‘Tiger Fern' is a natural mutation of the Boston fern.  The Tiger fern came about as a natural mutation that occurred in Bogor, Indonesia, in the spring of the year 2000.  Since then Tiger ferns have been propagated asexually and spread across the world by gardeners and collectors.

To be clear, the tiger fern is not the only mutation to have occurred in Boston ferns, nor was it the first mutation to have be found in Boston ferns.  There are literally dozens of varieties of Boston fern, all have arisen spontaneously and have been noticed by someone who grew them and spread them around to other interested people.  

Tiger fern

The tiger fern is noticeably different from its Boston fern parent.  The following description of a tiger fern has been copied from google patents:

The following traits have been repeatedly observed and are determined to be the unique characteristics of ‘Tiger Fern’. These characteristics in combination distinguish ‘Tiger Fern’ as a new and distinct cultivar of Nephrolepis Fern:
 
1. Upright and outwardly arching plant habit.
2. Vigorous growth habit.
3. Durable rachis; plants resist breakage during shipping.
4. Green and yellow green variegated pinnae.
5. Closely-spaced pinnae; densely foliated.
 
Tiger fern stolons
 
As mentioned, Tiger ferns reputedly do not produce viable spores.  I am not sure if they are completely infertile, or is a small percentage of spores can be viable under the correct conditions.  This means that tiger ferns can only be reproduced using asexual methods.

One method of propagating these is through the use of stolons.  Stolons, or runners, function the same way as strawberry runners.  The plant sends out long thin stolons that can produce a baby plant where they touch the soil, and stolons may even produce baby plants while they are hanging in the air.  I have heard of people removing the stolons and using the them like cuttings, while most people leave them attached to the plant and allow them to do their thing.

My little tiger fern came with a few stolons.  Some were damaged and won't produce plants, whereas others look healthy and may produce new plants in time.  As the plant grows I am sure it will throw more stolons when the time is right.  

After only growing this tiger fern for two months it produced three baby ferns.  Meaning this fern should be quite productive and quickly fill out it's pot.

Tiger fern runners

Another way to propagate tiger ferns is to split a larger plant into several small plants.  My plant is still pretty small, so this is not yet an option.  I have little doubt that my variegated tiger fern will be large enough to split in spring.

From what I have seen, splitting a larger tiger fern into several plants is pretty simple.  Most people just remove the fern from the pot, then use a knife and hack the thing into a bunch of pieces.  I am told that Spring is the best time for this as the plant is actively growing and the plants each have a full growing season to establish before winter comes.

Variegated tiger fern frond


Tiger ferns, like many ferns, do not love frost and do not love too much direct sunlight.  They do best in bright indirect light.  They like water but not being waterlogged, and they seem to do better with drier soil than many ferns.

I have a few places to grow them that may suit these ferns.  I have the greenhouse that I feel may be too bright, I have a place on the deck that only receives an hour or so of morning sun that I think may be ideal, and I have limited spaces inside the house which I think may be too dark.  I regret not getting two tiger ferns, that way I could have grown them under different conditions and hopefully found the best way to grow them.

Monday, 10 January 2022

Lucky Iron Fish

I always seem to have low iron, I'm not sure why but every blood test says that I am low in iron.  I eat well but think I have a higher need for iron than most people.  My wife always had low iron, and my youngest son had low iron.

I can tell when I am low in iron.  I feel off.  I know the feeling well but can't describe it.  When I am low I tend to eventually buy iron supplements.  I have to take them every day.  After a few weeks my iron levels increase and I feel ok.  When the supplements run out I don't buy any more and it normally takes a while for my iron to run low again.  Supplements aren't cheap, so I tend to buy them infrequently.

My son was so low in iron that his gums were very pale when they should be darker pink.  Pale gums are a sign of low iron levels.  Being a young child he needs enough iron to grow and develop properly.  Iron supplements are expensive, they take a few weeks to work, and are very difficult to get a young child to take regularly enough for long enough to make a difference.

For some time I have considered buying a Lucky Iron Fish.  They are a little fish shaped piece of iron.  You boil it in water, or cook with it, and it releases iron into to water/food.  When you drink that water, or eat that food, it increases your iron intake.  Sounds pretty cool.  Getting a child to drink water is easier than getting them to take supplements.

I did some research (not blogs like this, medical papers from peer reviewed journals) and read a lot about the Lucky Iron Fish before committing to trying one.  It seems like it is safe, and that using it increases blood iron levels in people whose iron levels were low due to inadequate iron in their food.  This is much like taking iron supplements, but it doesn't hurt your stomach and works out a lot cheaper in the long run.


Lucky Iron Fish - I have been using it every night for about five months

The Lucky Iron Fish was first developed to combat anemia in Cambodia, which is a huge issue over there.  To me this sounded odd because much of the food eaten by poor people in Cambodia is actually rich in iron.  Strangely enough most of the studies showed that the Lucky Iron Fish worked well in many countries, but had limited impact in Cambodia.  I found this intriguing.

After a lot more reading I discovered that most of Cambodia's anemia problem has nothing to do with low iron intake, and is mostly due to some genetic disorders that are common over there.  Research demonstrates that increasing the amount of iron in food has no effect on non iron-deficiency anemia that is prevalent in Cambodia.  This explains why the Lucky Iron Fish is of limited value in Cambodia but appears to successfully decrease anemia in other countries.  Similar to any supplement, it only helps if you are not eating enough of that nutrient.  I don't consume enough iron, which means that the Lucky Iron Fish should work for me.

Last year, after much research, I bought a Lucky Iron Fish.  

Each night as I wash the dishes I boil 2 liters of water with a few drops of lemon juice and the Lucky Iron Fish.  After 20 minutes (which is about the time it takes me to wash up the dishes) I take the pan off the stove and leave it to cool, I dry the fish and put it on the shelf.  Before going to bed I pour the cooled water in bottles.  The next day we drink that water.  You could use it for cooking, but we drink enough water that we easily go through that each day.

The photo above is of my Lucky Iron Fish.  I have been using it every night for about five months now.  I just dry it with a dish cloth when I have used it.  I didn't buy the protective oil or anything like that.  After five months of daily use it seems to be holding up pretty well.  I am told that after using it every day like this that after five years its smile will wear off, and that is when it is time to get another one.

The amount of iron that the Lucky Iron Fish releases is pretty impressive.  When combined with a varied diet it easily makes up for any shortfall in iron.

The water tastes like water.  I couldn't taste or smell anything.  If you put in too much lemon I guess it would taste lemony?  The instructions that come with the Lucky Iron Fish are really simple to understand and follow.

I felt low in iron when I started to drink the fish water.  At the start I could not drink enough of the water, I felt like I needed to drink it.  It was really weird, but makes sense that my body was low in iron and wanted more of it.  It took a few weeks, but after a while I didn't feel low in iron.  At that stage I no longer wanted to drink iron water, the craving to drink it had faded.  I now drink the Lucky Iron Fish water a few times per week (but I still make it every night for my wife and son) and feel like my iron level is always up.

I have been checking my son's gums ever few days over the past few years.  After using the Lucky Iron Fish water for a few weeks his gums went from almost white to a very healthy looking dark pink, indicating that his iron levels were much higher.  The difference is rather remarkable.  His behaviour changed over this time, but he is getting older so it may have nothing to do with the iron fish.  He is a growing boy, so I keep giving him the iron water.  The water is providing about half the iron he needs each day, he would be getting the rest from his food.

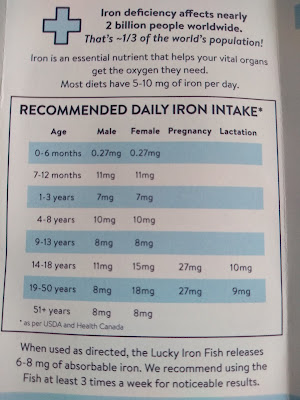
The below is a comparison table from the Lucky Iron Fish website. 

Iron from using a Lucky Iron Fish

If you are low in iron I completely recommend trying a Lucky Iron Fish.  For me it worked really well.  Other people may or may not have similar results.  One thing to remember is it isn't a magic bullet, you need to drink it every day (or every few days) for a few weeks before you will notice any difference.

The Lucky Iron Fish company used to donate money from each purchase to aid work in Cambodia.  I think they still do this, but it may change over time.  

The metal used to make Lucky Iron Fish is safe.  It has been tested by many labs over time and they all say that it is safe.  There are a few other companies who make iron fish, I could not find any research on them so was not certain that the metal used was safe.  I would hate for low levels of lead or cadmium or even if it was radioactive or something like that to be leaching into my drinking water!  There have been several instances that I am aware of where China sold scrap metal from deactivated nuclear reactors that is highly radioactive to an unsuspecting market, I would hate to buy a cheaper iron fish and have it made from that iron.

You can buy a Lucky Iron Fish from their website, I used to have a link to get people a discount, but they no longer do that as I am in Australia.