Sunday, 24 January 2021

Huacatay - Targetes minuta

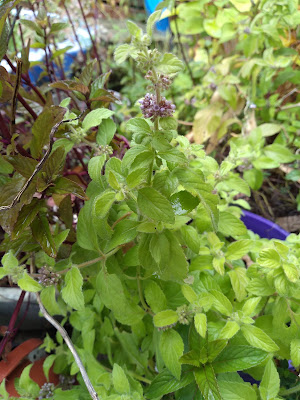
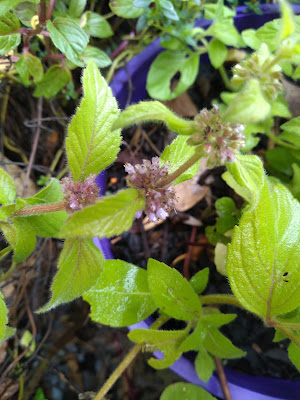
Huacatay (Tagetes minuta), is also called Peruvian Black Mint, is an annual herb commonly grown across the Peruvian Andes and less commonly in other areas.  I am not sure why, but very few people seem to grow huacatay in Australia.

Huacatay is not a type of mint (Mentha sp) or even related to mint.  It is not invasive like mint, nor is it perennial in my garden.  

Huacatay is a type of marigold, and is sometimes called 'southern cone marigold'. Huacatay is sometimes referred to as 'Peruvian Black Mint' because it smells a bit like mint.

Huacatay leaves

The internet says huacatay "leaves have a flavour reminiscent of mint and sweet pineapple but with an additional hint of bitterness and a strong scent of marigold flowers" or that huacatay has "minty, aniseed and citrusy aroma".   Sounds incredible!  


To me, huacatay tastes much like spear mint, but a little different and more complex, I can't really explain how.  Some people prefer huacatay to true mint, some prefer true mint, I like both in different ways.

Huacatay grows to about 6 feet tall, maybe a bit less depending on the soil and the climate.  It has dissected leaves that get a lot of comments as it looks like another plant...

I am told that huacatay can seed so prolifically that it may become a weed in some gardens.  I haven't grown it for long enough for this to be an issue.  I would grow more of it if I had more space, so would welcome it popping up as a weed from time to time.


Most often huacatay is either used as a way to flavour meat dishes, in things such as tortillas, and in the sauce called ocopa.

When brewed into herbal tea, huacatay is known to reduce cold symptoms and improve the health of the respiratory tract.  I have made herbal tea from huacatay a few times, to me it tastes a lot like speamint tea, I rather like it.

I found a recipe for ocopa huacatay sauce:

Huacatay Sauce 

Take a massive handful of this plant (pick the young tips), a clove of garlic, a couple of chillies (traditionally aji amarillo), a pinch of salt, juice of a lime and enough oil to make a sauce.
Blend them all together and adjust for taste.

That sounds simple enough.  Perhaps I should give that a try and see how it goes.

At this stage I don't sell huacatay plants or seeds.  Depending on how well it seeds for me I may try to sell seeds through my for sale page.

Saturday, 9 January 2021

Banana Mint Plant

A few years ago I heard of a plant called banana mint.  It was said to be a mint plant (either a Mentha species, or hybrid of several Mentha species) and it is meant to smell strongly of banana.  This herb sounded intriguing.  

Banana mint plant

Strangely enough I only ever see banana mint mentioned by nurseries that sell it and no mention from home gardeners.  Other than a passing remark that it exists, I don’t see any home gardeners ever mention this plant, which I find rather odd.  Good or bad I would have thought that someone would have spoken about their experience growing and eating it.

I searched for a few years and only found this plant for sale overseas, then one day I found it listed in Australia.  It was sold out, so I emailed the nursery and asked when they would likely have it in stock again.  They replied and said it should be back in spring, so every few weeks I checked their site and once it was available I bought one.  The place I bought it from is run by some dedicated, knowledgeable, and really lovely people, I highly recommend buying from them.

The plant arrived healthy, bare rooted, and small.  Quite often smaller plants cope better with postage and grow faster than larger plants, so I was happy with this.  I planted it in a pot, but it didn’t do much growing.  From spring to autumn it really didn’t get any larger than it was when I bought it.  We were in the midst of one of the biggest droughts ever recorded in this region, and had week after week of thick smoke, so I didn’t give it as much water as it deserved.  I tried to pick part of a leaf every now and again to smell, but feared damaging the plant so never took more than quarter of a leaf and was never able to really smell much.

Then winter came and the plant died down to below soil level.  I wasn’t sure if it was dead or not and wasn’t going to check until spring.  I top dressed the soil to boost fertility and hoped for the best.  Some mints die back over my winters, others power through, I didn’t know what to expect.

Once spring hit my little plant got to work, it had divided into 4 or 5 larger plants and was even growing out of the draining hole in the bottom of the pot.  As summer hit it started to flower.  I often try to prevent mint from flowering because they drop seed everywhere and are difficult to control, but I am tempted to allow banana mint to seed and see what the seedlings are like.  Chances are they will be nothing like the parent, but there may be something nice in there.  

Banana Mint Flowers

The growth rate of banana mint is slower and far less aggressive than other mints.  I usually find mint difficult to control even when planted in a pot, so a less aggressive mint should be easier to grow long term.  The leaves are green and a little fuzzy, the flowers are a lavender colour and like any other mint seem to attract bees.  But it is the smell that matters with herbs like this.

I am told that banana mint smells “freshly minty with strong unmistakable undertones of banana”.  I don’t smell any mint in my plant.  To me this plant does smell strongly of bananas but not exactly like banana.  I really like banana mint.

Back when I was at university I remember working with an organic ester called isoamyl acetate (3-Methylbutyl ethanoate), this has a distinctive smell of bananas but not exactly like bananas.  Most people who smelled this liked it, it does smell like banana, but just a little different.  I think banana mint must be high in isoamyl acetate because that is what it smells like to me. 

I am told that banana mint can be used to flavour sweet meals such as cakes and things, I am told it goes well with chicken or salads, and I am told it goes well in fruit punch.  I am told that it holds its flavour well after cooking.  I haven’t tried any of that but it all sounds reasonable.  So far I have only eaten a leaf raw here and there with my kids, and I have made herbal tea with banana mint.  The herbal tea is nice, it does smell like bananas.  

Banana Mint Leaves

To make banana mint tea I put a few leaves in a mug, add some honey, pour on some hot water, and stir.  Really simple. 

I quite like banana mint and plan to keep growing it.  Even though it is less aggressive in its growth I won’t risk growing it directly in the garden and will always keep it restrained in a pot or some other container.  If I have a spare plant I may offer it on my for sale page, but it is unlikely I will ever have many of these because my kids can’t help but strip the leaves off and smell/eat them whenever they think I am not looking. 

Sunday, 3 January 2021

Drosera binata

When I was younger I grew a lot of carnivorous plants.  I loved them.  I started with Drosera capensis, gained some skills, and slowly built a rather impressive collection.  

I mostly had easier to grow species, many of which look incredible.  I had a low of sundews and pygmy sundews, many of which I don't see for sale any more.  It baffles me why they are not more common in collections because they grew so easily and looked incredible.

Drosera binata and other carnivorous plant - in a cage because birds keep pulling them out of the pots

One carnivorous plant I always wanted was a rather common Australian native sundew called Drosera binata.  I tried to buy a plant a few times but my timing was off and they were always sold out, I tried to trade for it once or twice but they forgot to put it in the package.  

Drosera binata - potted up after being posted

Now that I am older and am growing carnivorous plants again I wanted to get the elusive (yet incredibly common and apparently easy to grow) binata.  

I paid a lot of money for some seeds, which arrived quickly yet never germinated.  I ordered a binata ‘t form’ plant from a very reputable nursery and paid far too much for it, this plant quickly lost all of its dew, then all of the leaves died, then all signs of life above the soil line disappeared completely.  

Months passed and it never showed any sign of life.  I kept the pot in a tray with water just in case it was alive, but I figured that plant was dead and I was somehow jinxed with this species.  

I found this very odd because people often comment on how binata is one of the simplest carnivorous plants to grow, it is native to my area, and I have success growing more difficult plants.

Drosera binata slowly losing all of its leaves

Then a very generous person offered to send me some binata plants.  They sent multiple large healthy plants which I put in multiple pots.  This is different to the t form, most leaves have four tips and the leaf petioles are quite thick.  

This one self-seeds readily, I am told that many binata in cultivation cannot set seed so I was happy to have one that will seed.  These plants did not die back after postage, and did not lose their dew. 

Drosera binata

I thought that the binata t form was dead so I planted one of the smaller divisions in its pot.  Then, after a week or so, the t form sprouted and grew into two plants.  It wasn’t dead after all!

After they grew larger they started to flower.  The unnamed binata also started to flower at the same time in the same pot.  The ones growing in other pots are also flowering and developing seed.  They are lovely looking plants.

The binata 't form'  seems to grow branched flower stalks with many flowers, while the larger form of binata appears to produce less flowers and stalks that either don't branch or don't branch very much.  This may be due to the plants being weak after postage, they may all branch a lot once they have settled in a bit more.


Drosera binata flowers

Drosera binata flowering

Now I have two very different forms of binata, both of which I think are lovely, and both of which are flowering.  I am not sure if they are self-fertile or if they require cross pollination, but both of them are setting seed.  

Given that I have two very different forms of the same species flowering next to each other I dare say there will be some crosses and the seedlings should show some genetic diversity.  I can hardly wait to grow out the seedlings and see what they are like.

I do sell some carnivorous plants through my for sale page.  I often have some Drosera capensis plants, capensis seeds, and I usually have some typical venus flytraps for sale.  


I probably won't sell any binata unless some of the seedlings turn into something special, I would trade them though.  If you are interested in a trade I would been keen to hear from you as there are some species that I am trying to track down and grow again. 

Monday, 28 December 2020

Spiny Leaf Insect

We got my son some Spiny Leaf Insects (Extatosoma tiaratum) as a Christmas present.  I have never kept these before, so it is an adventure for all of us.

We had planned on getting three, but they are so fascinating that I ended up buying four.  There is one that is slightly larger than this little guy, and two that are smaller.


They are far too little for me to know if they are males or females, hopefully there is at least one of each so they can set up a little breeding colony. They don't live terribly long, so if we want them next year we need them to grow and lay some eggs.

One cool thing about this species of leaf insect is that they are parthenogenic, meaning the females can lay eggs even if there are no males present.  These eggs hatch into clones of the mother, which is pretty cool.  There are some species of parthenogenic lizard which males have never been found!  

I am told in this species of leaf insect that eggs produced with fertilisaiton by males tend to have higher hatch rates and produce larger and stronger offspring, and that after enough generations of parthenogenic reproduction that they start to become pretty feeble.  So I hope that there are both males and females in this lot.

Saturday, 26 December 2020

Beeswax candles

My wife likes candles.  I have beehives and I have collected and rendered some beeswax from them.  I bet you can guess where this is headed...

That's right, I made some organic beeswax candles from scratch.  

Making beeswax candles was heaps of fun, and a little scary, and I learned a lot from it.  The best part of all this is that I am completely self taught.  No one helped me, no one showed me what to do, and other than a little bee keeping info on the internet I didn't even read anything on how to do any of part this.  

In hind sight I probably should have looked up a few youtube tutorials or something on candle making, it can be a little dangerous if done wrong, and if you are going to make candles you should do some reading.  I just gave it a shot and it worked out ok, with a little research I think these would have turned out amazing.

I bought a nuc of bees, drove them home in the back of my car, transferred them into a proper hive, collected honey, got the bees to build straight foundationless comb, fed them when needed, stopped feeding them when not needed, split the hive, collected the beeswax, rendered the wax, bought silicone moulds, put in candle wicks, melted beeswax, hand poured beeswax into the candle moulds, and removed the completed candles from the moulds.  

I did all of this with no help, being self taught, just giving it a go.

Beeswax candle

Second attempt, even neater

If beeswax gets too hot it discolours.  Far more importantly, beeswax has a low flashpoint, and I am told that once it reaches flashpoint it burns with a ferocity that is far scarier than any oil fire.  For these reasons it is best to melt beeswax over boiling water. 

Cleaning beeswax off things is difficult, so I used some old pots and things that the kids had in their play kitchen.  Certainly not the simplest or most elegant method, but it worked.

Melting beeswax above boiling water
 
Beeswax melts fast - this bowl floats nicely on the boiling water

I ordered some silicone candle moulds, they come entire with no hole or slit in them.  I poked a hole in them using a needle so the wick could go through, and I cut a slit down the side using a Stanley knife to make candle release simple.  

A rubber band holds the mould together and mysteriously it does not leak.  It doesn't even leak out of the hole with the wick.  The rubber band is enough for the silicon to hold together.

I poked some candle wick through the hole and tied it to a needle to keep it in place while I pour the molten beeswax.  You could tie the wick to anything really, but I had needles handy so that is what I used.  Candle wick comes in different thicknesses, so you need to do a little research to ensure you get the right size for the candle that you are making.  

I used cotton wick, which is meant to be best for beeswax.  I also made sure the wick did not have lead in it, apparently a lot of cheap wicks are impregnated with lead.

Candle moulds with wick

I thought I might spill some beeswax while pouring, so I put down some baking paper.  I am glad I did because when pouring I did spill some beeswax.  This solidified on the baking paper and was put in a container with the rest of my wax to be used for something else later.

I guessed the amount of wax I would need, for the first candle I used the perfect amount.  The second candle I spilled some wax and probably didn't have enough to begin with, so the candle is a little shorter than it otherwise would have been.  It was remarkably close, not too bad for a blind guess.  

After the candles set I weighed the amount of wax I used, so next time I was more precise.

Beeswax has been poured - baking paper means no waste

After this I left the candles somewhere safe to cool.  Once cool it was simple to remove the rubber band and carefully pop the beeswax candle out of the mould.  The candles come out of the moulds surprisingly easily.

Beeswax candles almost finished, I still need to trim the wicks

The detail on candles made using silicon moulds is just amazing!  I can't believe a complete novice like me can create something as amazing as this so easily and quickly.  I made a few more candles with my kids, each came out neater than the first.


Making beeswax candles was simple and heaps of fun.  They turned out ok and with a little tinkering I think I could make some that are really neat.  

I didn't use a candle making kit, I bought everything separately.  This was more difficult and expensive than I would have liked.

After looking on the internet at the candle making beginner kits I think I could do better.  Most kits are hideously expensive for what they are, and most have soy or paraffin wax.  I don't know why but beginner candle making kits are aimed at people who only want to pour wax into a cup, or roll up some wax foundation, none ever have nice silicone moulds.  Surely beginners would prefer to make cutie little candles that look like bee skeps and owls and things like that?

If buying things separately you need to work out the right type of wick and buy a minimum of 5 meters of it.  Beginners probably want enough wax to make 3 cute little candles, they certainly don't want to spend $50 or more to get one kilogram of beeswax! 

I have written some simple instructions, got a few silicone candle moulds, the right sized candle wick, a small amount of organic beeswax, and sell it together as a beginner candle making kit on my for sale page along with the perennial vegetables and things that I also sell.

Saturday, 19 December 2020

Amiah Potatoes - diploid potatoes Australia

I have been growing potatoes from true potato seed for a while now.  I grow a few diploid potatoes, some tetraploids, and I have a wild relative of the modern potato.  When grown from true seed, each and every plant is genetically unique.

Most diploid potatoes have really low yields, and produce small potatoes, but the taste of diploids is vastly superior to any variety of potato that you will have ever eaten.  Modern domestic potatoes are big and bland, even the tastiest modern potato is nothing compared to a diploid.

I have been messing around with breeding diploid potatoes.  I mostly grow as many as I have space to grow, cull everything substandard, each winter everything with low/no dormancy die, and I allow them to open pollinate before collecting true potato seed to plant.  

Some years one variety will do better, other years another variety will do better.  I am starting to get some really nice seed grown potatoes.

Amiah diploid potato Australia
Amiah diploid potato compared to a modern tetraploid potato
 

One of my seed grown potatoes is yielding quite well for a diploid, and produces two crops per year in my garden.  It looks pretty similar to another high yielding diploid called 'toffee apple' which was bred by Garden Larder.  As I originally got some true potato seed from Garden Larder my variety (named Amiah) may be closely related.  

Interestingly someone recently sent me a few tubers of Toffee Apple Potato, it is yet to produce a crop for me because I planted it a bit late.  It carries good genes and is flowering well so I assume some of the true potato seeds I am currently harvesting will carry some of its genetics.

Amiah potato compared to pumpkin

Amiah diploid potato produces gorgeous looking potatoes, with rich yellow flesh, it yields surprisingly well and produces multiple crops per year, it flowers well and can produce berries and true potato seed if pollinated by a different clone.  

The only real down sides to this diploid are its low dormancy and its relatively long stolons.  Most of its tubers are produced under the plant but a few will spread out and be found further from the plant.  To get the most out of it this plant likes a little space to run!  

Compared to a modern potato, Amiah potatoes taste incredible when baked.  I am bad at describing taste, all I can say is this is how a potato should taste.  If I had my way I would never eat a modern domestic potato again.

Amiah diploid potato Australia
I love rich yellow flesh potatoes

We roasted this diploid potato along with some modern potatoes for comparison.  The diploid looked like it was already buttered, much the same colour as pumpkin, indicating it is very high in beta carotene vitamin.

I really like the look of yellow flesh potatoes.  That being said I also grow some blue flesh potatoes and some whites that are worth keeping.  Hopefully a nice red flesh potato pops up soon.  

When grown from rather diverse and heterozygous seed it is difficult to know what they will produce!

Amiah yellow flesh potatoes

Diploid potatoes
Amiah potatoes and the white modern tetraploid ready for roasting

Diploid potatoes can sometimes produce small tubers.  Small potatoes are frustrating to clean and difficult to use.  Normally the diploids aren't too tiny, but at the start I had a couple of lines that produced pea sized tubers, needless to say I culled them from my breeding efforts pretty quickly. 

Any potato grown from true seed can produce tubers with deep eyes.  These are difficult to clean.  Some can produce really long stolons.  I have heard that some produce tubers on stolons that can be 6 foot long, making them unrealistic to grow.  Luckily I have never come across anything like that.

This diploid potato produces reasonable sized tubers, nothing huge but certainly a size that is usable in the kitchen.  The eyes are not very deep.  The stolons are a bit longer than most varieties, but not too bad.

Amiah potato size
Amiah potatoes are a reasonable size for a diploid potato

Amiah potatoes with violet skin
Amiah potatoes look nice
There were some potatoes that got a little sun and turned a little green, rather than risk eating them these were replanted.  

I have a few extra tubers, if you are interested I should list them for sale on my for sale page along with the other perennial vegetables and things I have for sale.

Tuesday, 1 December 2020

Shahtoot mulberry and White mulberry

I love mulberries.  I have a few mulberry trees and really should get some more.  They are such an underrated tree and they have so many uses, both on acreage as well as in backyards.

I have a white mulberry that I grew from a tiny cutting.  This is a lovely and hard working tree.  It gets larger and stronger each year even though I planted it in a really bad position, it tries hard to fruit no matter how difficult the situation and pumps out a lot of berries, it grows many large tasty leaves, the berries taste good, and it doesn't stain things.  The berries are very sweet, some ripen white, some lavender, some pinky, and some can ripen a bit darker.

  
White mulberry - all picked from the same tree

I also have a white shahtoot mulberry tree.  The berries from this little tree are long, they don't stain, it produces numerous berries per bud, and they taste like honey ripened apricots.  

Unfortunately this tree is determined to die in my garden.  Every summer it grows larger, it survives winter well, in spring it starts to bud all over, and then large parts die back for no apparent reason.  I can't work out why, but there is something about spring that the tree does not cope with in my garden.  It is fine in summer, autumn, and winter, but for some reason does not like spring.

I love the taste of these berries, but am pretty sure that I will lose it one day because I don't think it is well suited to my climate.  That is too bad as it really does taste great.

Shahtoot mulberry

I originally didn't want to get a dark fruited mulberry because I am now in town and they tend to stain things, but to be honest they probably taste better than the lighter coloured mulberries.  

I have never eaten a black mulberry (Morus nigra), but am told they taste far superiour to white mulberries (Morus alba) or mulberry hybrids.  I am yet to even see a black mulberry tree, I see plenty white mulberry trees with dark fruit that are incorrectly labelled as black mulberry, but have never seen an actual black mulberry tree.  Hopefully these currently exist in Australia.

I really should look around and see if I can find a nice tasting mulberry, who cares if it stains, and grow this as well.  I am sure my kids will pick most of the berries so they won't have a chance to stain anything. 

Mulberries - shahtoot and white mulberry


Saturday, 21 November 2020

Cape sundew (Drosera capensis) flowers

Drosera capensis was the first carnivorous plant that I ever grew successfully.  I got my first plant when I was a school student, I tended it and fussed over it and despite all my well meaning yet poor gardening it survived for years.  They are really quite forgiving and surprisingly simple to grow, yet can also reach a rather impressive size.  From that original plant I learned a lot. 

I stopped growing carnivorous plants for some years, and have started to grow them again.  I am loving growing these again and am slowly building up a nice little collection.  

Among the carnivorous plants I grow I have some D capensis.  I grow most outside where they thrive, and I have a few on my kitchen window sill.

Drosera capensis sending up a flower stalk

I am always amazed at the large number of insects that the sundews catch.  Each leaf is often covered in its prey, often dozens of insects are trapped on each leaf.  I am really surprised at how many mosquitoes they catch, especially inside my house!  I don't know why they catch so many mosquitoes, they really shouldn't be all that attractive to mosquitoes at all, but I am glad that they do catch them.

My capensis are flowering nicely at the moment so I thought I would write a post to show what these look like.

Drosera capensis flowers

Above you can see three flower scapes.  The one on the far left is from the typical form, this is the form I originally grew and it is rather pretty.  In the middle is 'alba' which is anthocyanin free and a strong grower.  On the far right is also alba, but it has leaves and plantlets on the end of the flower stalk.

Drosera capensis 'typical' flower
Above are the purple(?) flowers from capensis 'typical'.  I really like this variety.  They produce many flowers on the stalk and each flower can produce hundreds of tiny, dust like seeds.  The seeds tend to have exceptionally high germination rates.  This particular flower stalk is interesting because it is forked into two branches.  I don't see this very often, but I have a few plants that always do this.  I am not sure if it has genetic or environmental causes.  I should take cuttings from the forking plants and see if their clones display the same forking tendencies.

Drosera capensis 'alba' flower

Above is the flower stalk from capensis alba.  These plants are anthocyanin free.  The flowers are white and the tentacles on the leaves are green/white.  These tend to be very vigorous growing plants that get large pretty fast.  Again they produce huge numbers of tiny seeds with high germination rates.

Drosera capensis with plantlets growing on the flower stalk

I have never seen Drosera capensis grow leaves or plantlets growing on capensis flower stalks before.  I am told it is not overly uncommon, and I believe it may be caused by environmental factors rather than anything genetic.  I kind of like it, and being able to break off the little plantlets and grow them is fun, so it is too bad that this is not a genetic trait.

When I have extra sundews for sale I list them through my for sale page.  I prefer people to pick up these plants but I can post them much the same as I post perennial vegetables.  Sundews sulk a little after postage, and they often lose all of their 'dew', but they tend to survive and grow really well after they have had some time to get established.

Sunday, 15 November 2020

VFT seedlings breaking dormancy

I grow a few different varieties of venus flytrap.  I like them.  When grown from seed they tend to display a lot of genetic diversity and each plant is different, but it takes a few years before they reach a decent size.  Unfortunately very few places sell seed of venus flytraps.  

Never buy venus flytrap seed from eBay or Gumtree, most of the time it is fake, they will send you seeds of grass or flowers and by the time you know something is wrong it is too late to do anything.

I have always been told that venus flytraps need dormancy over winter.  I knew people in places without winter who dug them up and put them in the fridge over winter.  I have always grown them in climates with cool winters, so mine have a natural dormancy and I have never had to think about it too much.

I grew a few venus flytraps from seeds, so over winter they went dormant and looked like they were dead.  Then once spring hit, they all started to grow actively.  Some seem to have come out of dormancy easier than others.  Some came out of dormancy well, but now appear to be declining.

I don't have many seedlings, but each is genetically unique.  I look forward to seeing what they grown into and if any are noticably different from any of the named varieties that I grow.

This Venus flytrap seedling was all red over summer
Short petioles, comparatively large traps, lots of traps, good colour - this seedling is a keeper

Sunday, 8 November 2020

Growing Sphagnum Moss

Sphagnum moss (one of 380 or so species of Sphagnum) is often used to grow carnivorous plants, or to pack around fragile plants in postage, and a bunch of other uses.  It is expensive to buy dead sphagnum moss, and difficult to find for sale live.  

Years ago I got a strand of it while on a field trip with university.  I grew it in a little glass cup on my window sill along with pygmy Drosera that I also collected on the same trip.  It grew well for a few years, and looked amazing, I eventually lost in moving house.  

Strangely enough I haven't seen live sphagnum moss since then.

A while ago a very generous person posted me some plants, and wrapped the carnivorous plants in live sphagnum moss.  I figured it would be a waste to let the sphagnum moss die, so I wanted to grow it.  

I don't know the best way to grow this, so figured I would try a few different methods. 

Sphagnum moss - growing well and ready to divide
I had some dry sphagnum moss in a packet, so I soaked that in rain water.  I put that in the bottom of a few empty punnets as the substrate, and placed the live sphagnum moss on top.  

I also put a damp little peat moss in an empty punnet, and 'planted' some live sphagnum moss on top.  All of these punnets I put in a tray with a little rain water, much like how I water carnivorous plants.

So far both methods appear to be working and the sphagnum moss is growing. 

I have given them part sun.  From memory full sun makes it grow slowly, but I may be wrong.  Some species are ok with frost and can be frozen solid, I think others may die off if hit by frost.  I am not sure what species this is, so I will protect most in winter and probably leave a little unprotected to see how it copes.

I also put a little live sphagnum moss on top of pots of peat moss that I am growing various carnivorous plant in, hopefully it grows well in there as it looks nice.

I don't know how well this will go longer term, but for now it is growing well for me.  I hope to find where is best in my yard to grow sphagnum moss, and how to grow sphagnum moss, and then once I have enough I plan to use it for carnivorous plants. 

Sphagnum moss - one live strand

Sphagnum moss - one live strand did some growing!
If you know how to grow sphagnum moss, and if you have ever grown sphagnum moss successfully over a longer time period, I would love to hear how you do it.  Trial and error is all well and good, but if I can learn from someone else that is even better.

Sunday, 1 November 2020

Black raspberry seedlings and wild strawberries

In September 2019 someone kindly posted me some seeds.  They were seeds of some strawberries (most likely Fragaria virginiana) that had been collected from the wild, some black raspberries (Rubus occidentalis), and saskatoon.

I have eaten wild strawberries in the Arctic many years ago.  These are a different species to the woodland strawberry.  The berries were about the size of my little finger nail, some were pointy, some were round, and they tasted better than anything I have ever eaten.  I grow a few different strawberries that taste incredible, but none of them can compare the the ones I ate in the arctic.  So I hoped that these wild collected strawberries would come close in terms of taste. 

Raspberry are notoriously difficult to germinate.  They do far better after scarification and cold wet stratification.  Both strawberry and saskatoon germinate better after stratification.  I put the raspberry seeds through several different types of acid scarification, put all the seeds on damp paper towel in zip lock bags, labelled everything, and put them in the fridge for a few weeks of cold wet stratification.

Then, life knocked me down pretty badly, and I forgot about my seeds.  In September 2020 I remembered about my seeds in the fridge.  The saskatoon seeds had all germinated and died, as had a small number of strawberry seeds.  The rest of the seeds did nothing, presumably after spending a year in the fridge on damp paper they were all dead.  None of the raspberry seed had germinated.  I figured they were all dead, I figured it was a lost cause.

There was a small chance one or two may have survived, so I planted them.  I had low hopes of anything happening after so long, so I planted them all together, strawberry and raspberry in the same pot.  Nothing labelled.  There was no real point, the chances of even a single strawberry seed germinating was very low.

Strawberry seedlings and Black raspberry seedlings

Then the most incredible thing happened, some seeds germinated.  Then a lot more germinated.  Nothing was labelled or separate, but a good number germinated.  Most were probably strawberry seedlings, which I was very excited about.

As they grew their first leaves some plants looked different, I wondered if they were the black raspberry.

As the seedlings got larger more seeds germinated, then more, then a few weeks later even more germinated.  Other than the saskatoon (which all germinated and died in the fridge) it looks like almost all of the seeds have germinated.  This was completely unexpected, I am really glad I had not thrown the seeds away!  

I now have a small number of black raspberry seedlings, and a good number of wild collected strawberries.  Some of the strawberries are growing runners at less than two months old!

My plants are larger than the photo above.  It is still just a pot of mixed seedlings.  I am waiting for the last of the seedlings that are still tiny to grow a bit larger before I try to separate anything.  I would hate to lose them at this stage.

If all goes well from here I should get to taste the wild strawberries this summer, and it will likely be another year or so before the black raspberries are old enough to fruit.  This is very exciting!