Friday, 14 October 2022

Perennial corn survived winter

Last summer I grew some perennial corn Zea diploperennis.  I am very excited to say that some of my perennial corn plants survived winter and now that the weather is warming are happily growing!  

Zea diploperennis is a perennial undomesticated ancestor of our modern corn.  I am not sure if this particular species was used in breeding modern corn, or if it is just closely related to the species that were used in breeding domestic corn.  What I do know is that it crosses with modern corn and with various undomesticated teosinte corn species.  

My understanding is that perennial corn is pretty uncommon, and it is incredibly rare in Australia.  I had never grown, or even seen, perennial corn plants before so this was somewhat of an adventure and a learning curve.

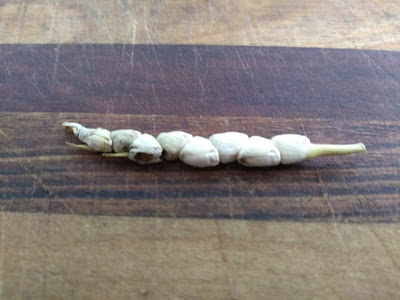
The cobs from diploperennis were small and contain far fewer seeds than domestic corn.  I don't know if first year cobs are smaller than subsequent year cobs, but have a feeling that they are never large and never contain huge amounts of seed.  

All modern corn varieties are annual which is great for large scale chemical dependent monocropping.  A perennial corn would be wonderful for home growers, permaculture farming, and low input polyculture food forests.  Perennial corn plants are simple to grow and resistant to may pests and diseases that affect modern corn, which makes them useful in breeding something that is better suited to backyard growers who don't want to spray anything.  

I am told that this corn contains roughly 85% diploperennis genetics and about 15% domestic corn genetics.  Having a small percentage of domestic corn genetics should mean that this will flower around the same time as other corn varieties, making it easier to cross breed and produce a perennial popcorn or perennial dent corn.

Australian perennial corn
Z diploperennis divided into two plants - red stems

I'm not sure how perennial corn would grow in a warmer climate, but where I am it dies back to rhizomes over winter.  Some plants have robust rhizomes that appear to have divided a lot, while others had weaker rhizomes that did not divide at all.

Perennial corn is not well suited to my climate, the frosts are just too harsh here.  It would be well suited to conditions with milder winters.  I was uncertain if it could survive winter here but I did not want to grow it from seed each year and have yet another perennial vegetable that I treat as an annual.

To give it the best chance of surviving I grew it in pots which I moved to an unheated greenhouse over winter.  This meant that it was still very cold, but the soil would not freeze.  I learned a lot from this, and by in large it was successful.  I believe that this would probably survive in the field if it was mulched.


Perennial corn second year
Zea diploperennis divided into two - green stems

Some plants did not survive the winter.  These were no great loss, they were not cold tolerant and did not contain the genes required to build a perennial corn landrace that could stand up in my climate.  

A few plants survived and started to sprout in spring, then were eaten by slaters and the plant died.  This is regrettable as the plants were good and would probably survive in the field if mulched well.  They clearly had some of the required genetics and their loss represents a loss of diversity that may have been useful in some other genetic combination.  They did not divide enough, which meant that they only had one growing point and they died once this had been eaten by pests. 

Some plants divided a little, as can be seen in the above pictures they had two growing points that had not been killed by pests.  As can be seen above there is considerable diversity among these survivors.  Some have green stems, others have more red on the stems.  This diversity carries over the the colour of the seeds and cobs and is likely present in all of their genetics.  

Perennial corn Australia
Perennial corn flowering 

Genetic diversity is great as it means we should be able to cross things and hopefully end up with the right combination of genetics.  One of my plants started to flower as it was breaking dormancy.  We will see if anything comes of that flower and if that plant is worth keeping.

You may be able to tell in the photos, but I did not remove the previous year growth.  This was partly because the leaves stayed green and alive for much of winter, and partly because I thought they would help protect the growing points slightly.  Now that they are actively growing again it is time to remove the old growth.

Zea diploperennis plant
Zea diploperennis dividing into many plants

One of my plants divided into several plants, I am not sure how many but it is a decent number.  This plant also had several stalks in its first year, and was the only of my plants to do this.  This is a trait that I want to keep when I try to breed perennial popcorn.  

I certainly don't want to reduce genetic diversity in the population at this stage so will not be only breeding from this dividing plant.  Given that it does produce multiple stems I assume it will produce a lot of pollen and will likely incorporate its genes into a lot of the seeds produced by my plants.

From careful poking around in the soil it appears that this plant produced several rhizomes which probably could have been split off from one another and transplanted.  These second year plants are certainly larger than seed grown at this stage, (especially considering that I have not yet planted corn seed for the year) so it will be interesting to see if they are more productive than first year plants.

Even if I never successfully cross this with modern corn this vigorously dividing trait would still be useful and highly desirable.  Even if I simply breed a population of dividing plants they can be used similar to other cereals such as wheat o oats, but with much larger seeds that are more nutritious and are far simpler to thresh at home.
Perennial corn Australia
Zea diploperennis cob

I have not divided anything yet as I have so few plants to play with and would hate to accidentally kill one.  Instead I am leaving all of these surviving plants as they are to see how they perform in their second year and hopefully produce far more cobs per plant.  

As you can see in the photo, the first year cobs were tiny.  I have a feeling that they could double or triple this size.  In other words I think that they will always be really small unless it is crossed with domestic corn.

Zea diploperrenis cob Australia
Zea diploperennis cob size

I wonder if a clumping plant like this would be more productive or less work than a plant with a single stem as it may produce numerous little cobs.  It would be nice to be able to plant a perennial corn rhizome and then leave it to form an expanding clump that was increasingly productive each year.  The only way for me to find out if this is possible is for me to leave it and see what happens.

This year I don't have any spare plants or seed to share.  Hopefully all goes well and in autumn I will have spare seed and hopefully even some rhizome divisions from my more vigorous plants.  

If you are in Australia and interested in growing perennial corn feel free to get in touch with me around autumn/winter to see if I have any seeds to spare.  You can either leave a comment below or my contact details can be found on my for sale page.   

Tuesday, 4 October 2022

Growing Square Lemons at Home

Question: What happens when you put a round lemon (or pumpkin, or apple, or tomato etc) in a square plastic mould?  
Answer: the fruit grows and is slowly squished to conform to the shape of the mould.  

Square lemon, I grew this!

When talking about the hollow, shaped receptacle I don't know if it is spelled 'mould' or 'mold'.  I have a strong feeling it depends on which country you are from.  I'm too lazy to google it, I think I will just use both spellings and wait until some irate person corrects me, and then fix it up, or not bother and just leave it as is because that is far simpler.  Hmmm.  

Last year I bought some plastic fruit moulds.  I got some square ones, and some heart shaped ones.  I could hardly wait to use them.

I had intended on putting these fruit shaping molds on some apples and Asian pears, but at that time of year the apples and pears were too large to fit into the moulds.  

As my apples and pears were not the right size I put one on a lemon to have a little bit of practice.  Or maybe I was just impatient?  Either way, I put a square one on a meyer lemon.

I wish I chose a larger lemon to turn square

There weren't many lemons at that time of year so I chose one of the few that was small enough and put the plastic fruit shaping mould on.  

The lemon grew, then the tree flowered a lot and started producing a lot more fruit.  I wish I had chosen of one the second set of lemons as they all grew larger, but I didn't.

The lemon grew, then when it stopped growing I removed it from the mould.  Unfortunately the lemon did not fully grow to the size of the mould.  

Square lemons

This lemon was a bit small so wasn't perfectly block shaped, still became reasonably square and had three very flat sides and one slightly rounded side, so I consider it a success.  

I am told that apples and nashi pears tend to perform a little better than lemons.

My apple trees are just breaking dormancy now and will blossom shortly.  Once the little apples are a bit bigger I plan to put a few moulds on them and see how well they take to being moulded.

This lemon has three flat sides, and one round side

I have read comments from people who have seen pictures of these plastic moulds and they usually talk about how this is a pest deterrent and mean that fruit can be grown organically.  Interestingly the people who make and sell the moulds never make this claim.

I grow everything organically.  When I saw pictures of this my first through was that pests could get in and be protected from predators.  I was also concerned that fungus and mildew might grow in the poorly ventilated plastic box.
Square lemon slices from the square lemon I grew
Lemon before being removed from the mould

Now I have grown square lemons I can confirm that pests can get in and are protected from predators.  That is not a big deal as I don't have huge numbers of pests here and my square lemon was not damaged by the slugs and earwigs living in the box.

I can also confirm, as evidenced in the photo above, that algae and things do grow in the box.  This year was particularly wet so more water than normal had gotten into the box and caused things to grow.  This did not damage the fruit as it was mostly growing on the plastic.

I like square lemons

If only I used a larger lemon, it would have fit in the box better and this would look pretty incredible!  

I can hardly wait to use the fruit molds again.  My apple and pear trees are flowering at the moment, so it won't be long before I get to try this on them.  My lemon tree normally flowers on and off throughout the year, so I will try to make some more cool shaped lemons.


I do have some extra fruit shaping moulds, a few heart shaped ones and a few square ones.  They click together.  I have included pictures of them below so you get an idea of how they work.

Given that these plastic fruit shaping molds are clear it would be simple enough to put a sticker on them and use sunlight to tattoo an apple like I did here.  That way you would end up with an apple that is blocky or heart shaped, also with the name of your child or a fun picture on it.  I can hardly wait to try to do that myself!!!

I am not sure how many times they can be used, presumably if you look after them and don't drop them on concrete they should last for many years.  The one I used certainly looks no worse for wear.

Love Heart fruit mould

Love Heart fruit mold

Square fruit mold

Square fruit mould

If you want to try a fruit shaping mould there are very places on the internet where you can buy them.  There seem to be a few places selling tiny ones for strawberries, or long ones for cucumbers, or even some larger watermelon size ones, but not many places are selling ones for apples and lemons.  

If you are interested in buying some online please be careful of their size and ensure that you are not getting a tiny one that is only useful for medium sized strawberries. 

You can buy them directly from the place I got them from.  Their price includes postage to any country.  Note: While you pay the same price for the fruit shaping molds I get a small commission if you buy directly from slingfisher using the above link. 

I considered selling some through my for sale page if I have extras for sale.  To be honest you may be better off buying them from my slingfisher link above as it would work out cheaper for you, plus I intend on using these on all the appropriate sized fruit in my yard. 

Friday, 30 September 2022

Drosera peltata complex

There is a native tuberous sundew that grows naturally in my area, I am entirely certain but think they are Drosera peltata.  Peltata are said to be one of the easier species of tuberous drosera to grow.  

They are so local that there is a population of them less than 50 metres from my house!  

I have grown this species years ago, but only ever got 3 or 4 years before they all died.  

Back then I grew some from seeds, some from tubers, and always had similar results.  They did well for a few years, and then my entire collection died out.  I figured growing them long term was beyond my ability.

As these grow locally I figure that the climate here is good for them and decided to give growing them another try.  Hopefully this time I get more than a few short years out of them.

Drosera peltata starting to flower

These used to all be lumped in to species Drosera peltata.  Now this has been broken into several very similar looking species, all within the peltata complex.  I am not entirely convinced that these are distinct species, or if they are subspecies, or if they are merely local variants of the same species, but it really doesn't matter.

These sundews are perennials, but are only above ground for a few months each year.  They have an active growing phase over winter/spring, this is where they flower and set seed, then they die back to tubers over summer.  

It is over summer that the tubers must be kept a lot more dry, otherwise they will rot.

They can pe propagated by seed and the tubers tend to divide a little.  I have not tried to grow them using cuttings so have no idea how difficult that would be. 

Foreground D peltata, other carnivorous plants in background


I am by no means an expert at growing tuberous sundews.  I have grown this species before using either peatmoss or the poor soil that they were originally growing in.  I don't think either of these are ideal mixes for growing them in pots.

This time I am growing them in peatmoss mixed with sand.  There is more sand than peatmoss in this mix.  I hope that this is a better mix for growing them.  

This year I am growing them in a plastic cup with a few holes punched in the base because I only had short pots at the time.  Next year I plan to use a taller plant pot so the tubers can bury themselves deeply.

I have them in a tray of water that is very shallow.  'Tray' is probably a misleading term, I cut off the bottom of a milk bottle and am using that as their water tray.  I plan to let this dry out completely as summer approaches.

Tuberous sundews

Tuberous Drosera peltata

Drosera peltata are not the most effective hunters of the sundew world.  They tend to catch a few ants and moths and other little things.  I still find them interesting and hope that they grow for me.  

If they perform well for me I have a few people who I plan to send a few tubers to let them have a try at growing them.  Hopefully between us we can work out how to successfully grow these fascinating native carnivorous plants. 


Thursday, 22 September 2022

Basic Beeswax Candle Making Instuctions

Simple Beeswax Candle making Instructions: 

I sell candle making kits through my for sale page.  I thought it would be remiss not to provide instructions on how I make candles using these kits.  While I am not an expert, this is a simple method that I use.  Making beeswax candles is far easier than you think.  


WARNING: While candle making is fun you will be dealing with hot molten wax, hot items, and sources of heat.  Candle making carries an inherent danger of: fire, damage to property, injury to yourself and others, and death.  Read the instructions, always be careful, never leave anything unattended, never leave children or pets unsupervised, if in doubt please stop, and ring 000 if needed.  


STEP 1 - first time set up

Your mould has come complete, if this is the first time you are using your mould you will need to do two things. 

1) poke a hole for the wick.  This can be achieved using a bamboo skewer or a large needle.  I use a needle so I can thread the wick through at the same time.  Somehow, like magic wax never drips out of this hole.

2) you may need to slit the side of your mould to make release easier.  If the mould has detail that will get stuck, I slit the side using a craft knife/stanley knife.  You will also need a rubber band to hold the mould together.  Note: If you don't think the candle will get stuck in the mould then don't cut it.


STEP 2 - collect your things

Collect everything need:

Weigh out 40 to 50 grams of organic beeswax
Your silicone mould
The correct size rubber band
Double saucepan or some other way to melt wax (NOT on direct heat)
Large needle or bamboo skewer
Baking paper


STEP 3 - melt the beeswax

WARNING: NEVER allow wax to come into direct contact with a heat source.  Beeswax has a low flash point (where it spontaneously ignites) and burns fiercely.  If over heated beeswax discolours.  Always be careful when dealing with heat/fire.

Melting beeswax at home
Beeswax chunks, in a pan over boiling water

Beeswax almost melted


Set up your double saucepan, adding the wax to the inner pot and water in the outer pot.  Heat this on your stove top to melt the beeswax.  Heating over boiling water prevents the beeswax from reaching flash point and catching on fire.  
 
I don't have a fancy double boiler, I use an old dish and I float that on a pot of boiling water.

These are instructions for simple beeswax candles, I only use pure organic beeswax.  These instructions do not cover adding essential oils, fragrances, colours, or anything else as that is more advanced.  Gain skills making pure beeswax candles, then you can learn more complex things.

Put some baking paper down where you plan to pour your moulds.  This will ensure than any wax that is dripped/spilled will be simple to collect and use later.  I use a piece of timber and sticky tape baking paper to it.


STEP 4 - add candle wick and rubber band

Silicone moulds, wicks, and skewers

During the melt process, prepare your mould.  Poke the wick through the wick hole that you made at step 1.  I use a needle to do this but you could poke it through using a kitchen skewer.  You only need a little poking out of what will become the top.  Silicone is 'self sealing' so won't drip.

The other end of the wick can be tied to something to keep it in the centre, then snipped off.  I tie a knot in it and poke a needle through the wick, but you could use a pen or anything that will hold it in place while the molten beeswax cools and hardens.  I find using a needle is simple and when the candle has set I just ship off the wick below the knot.

Place a rubber band around your mould, this will hold it together and ensure nothing leaks out of the slit you put in at step 1.


STEP 5 - pour the wax

Beeswax poured into silicone cnadle moulds

 
Put your mould on the baking paper before you pour anything.  As you can see above, I spilled a little while pouring.  This isn;t wasted, I can easily peel it off the baking paper and use it later.

Pour the wax to the desired level - most moulds fill to the top, but you could fill to a mm or two lower.  Beeswax usually shrinks a little as it cools.  Make sure you have the mould level, it will be easy to see if it is not.
 

STEP 6 - allow to set

Leave the wax in the mould somewhere safe to cool and harden.  Keep out of reach of pets and children.  You don't want hot wax to be knocked over as it will cause burn injuries.

I leave them overnight, but you can remove them from the moulds a lot earlier if they have set and cooled.  Don't put them in the fridge to speed up the cooling as this will cause your candle to crack.


 STEP 7 - remove your fancy new candle from the mould

Finished beeswax candles

Once the candle has cooled you need to remove it from the mould.  Remove whatever was holding the wick in place, I normally just snip the wick off just below the needle I used at the base of the candle. 

Remove the rubber band, and gently loosen the candle from the mould.  Once the candle is loose you should be able to carefully remove it from the mould.  Be gentle, your mould is reusable and should be able to make hundreds of candles.

Trim the wick to 5mm to 7mm before lighting.  Always light away from drafts, keep on a fireproof surface, keep well way from flammable materials/curtains/pets, never leave unattended while lit, always supervise children if they are near a lit candle, and be careful whenever dealing with fire.  If in doubt, don't light the candle. 


STEP 8 - pretend to be humble


Marvel at the incredibly detailed organic beeswax candle you have hand poured.  Give one to a friend as a gift, then stand back and pretend to be modest when they oooh and ahh over how incredibly talented you must be to have made such an amazing candle.

My daughter made this owl beeswax candle (with help)


Saturday, 17 September 2022

Red fleshed apple tree seedlings

I used to live on acreage and we had several hundred mixed fruit trees.  Now we live in town we only have a small number of fruit trees.  One is a Huonville crabapple.  This is a cross between a crab apple and a domestic apple, and it has red flesh.  Huonville crab is a great red fleshed apple.

I like red fleshed apples, but there are too few varieties in Australia.  I tried to cross pollinate my Huonville crab with a Pink Lady apple in the hopes of a larger fruited red flesh apple that is sweeter and firmer.

I saved seeds from the apple, put them in cold wet stratification until they started to germinate.  I only had five seeds, and all five sprouted.

apple seeds 01/08/2021 germinating in the fridge

Once the apple seeds germinated I carefully planted them in a pot of soil.  Then for a really long tim nothing happened, it was just a pot of soil.  

It seemed like it took forever, but eventually all five seedlings popped up.

Not too long after being planted

Even as the cotyledons were just emerging from the soil, it appeared as thought three have red leaves and two have green leaves.  

The genes for red leaves is linked reasonably closely with the red flesh genes, so there is a good chance that the three red leaf plants should also have red fleshed apples.  The green leaf ones may have red flesh, or they may not, there is no way to know until they fruit.

Three red leaf seedlings
Red flesh isn't guaranteed in the red leaf apple trees, and there is no guarantee that the green leaf ones won't have red flesh. The only way to know it to grow them out until they fruit. 

Apple tree seedlings should have been separated at this size

I should have separated the three seedlings into individual pots at their first true leaf stage.  But I didn't.  I left them to grow and now they are larger.

Growing apples from seeds takes a considerable amount of time.  With mature apple trees you can induce them to fruit by girdling, bending branches, and generally slowing the sap flow.  Seedling apple trees are almost the complete opposite because they are in the juvenile phase.  

The trick with growing apples from seed it to get as much growth as possible so they get through the juvenile phase faster.  More sunlight, lots of water, fertile soil, low competition, and they should produce fruit in the lowest amount of time.

Apple tree seedlings first year

Apple tree seedlings can take around 10 years to fruit.  This timeframe can be as little as 5 years or well over 20 years depending on a lot of factors.

At this stage I don't know what to do with any of these trees.  I should divide them before they break dormancy but don't know where to plant them.  

Perhaps I will keep them as trees, perhaps I will graft them onto a mature tree and have them as separate branches, or perhaps I will do something else.  I wish I thought of a plan for them before I grew them, but I didn't, so now I will have to think of something to do with them.

Thursday, 8 September 2022

Lichen Glowing

Lichen has always fascinated me. Ever since I was a small child there was something intriguing about lichen, I just couldn’t put my finger on what it was. It comes in a variety of colours and shapes, some look like tiny delicate flowers (they are not flowers), others look like bizarre coral (they are not coral), and others look like an unsightly mess. 

Lichen seems to grow in some of the most inhospitable, unlikely, and sometimes unbelievable places. Lichens are a pioneer species, often colonising a barren rock somewhere, paving the way for moss and eventually higher vascular plants to start growing. 
Different lichens 

When I was younger there were a few hills that were covered in old abandoned mines. Very little grew in these places as the top soil was gone and they were just rocks and sub soil that had been dug up by hand a hundred or so years ago in gold rush times. Some of these places were covered in thick beds of lichen. I used to scrape some of this off and take it home to bury in the vegetable garden. I figured it had probably liberated some of the rock minerals that may be useful for my vegetables. Now I am older I think I was onto something, on the other hand it may have contained high concentrations of heavy metals and other toxins, I will never know either way.

Lichen often slowly dissolves the rock they are growing on and releases minerals that were locked up and other organisms can use them. Some types can also absorb heavy metals and other toxins and can be used in bioremediation. Different types of lichen grow on the trunks of different trees. For years there has been debate among horticulturists whether or not lichen is harmless to apple trees or if after the lichen reaches a certain density that it can cause any issues.

Some types of lichen are extremely slow growing, while others seem to almost grow while you are watching them. Some can take extreme heat and dry, others can be frozen solid for months with no ill effects. Some lichens are simple to grow, some people might say they are almost impossible to kill. They can be hot glued onto surfaces or even mashed up and painted on to colonise a larger area quickly. Some people paint them onto gates and artworks to give a new creation an aged and distinguished look. I have seen some growing in interesting low maintenance terrariums. Yet you won’t often find lichen for sale in garden shops or online.

Another fascinating thing about lichen is that they aren’t one organism, they are two or more. Lichen is a combination of fungi and algae living in symbiosis, with each organism benefitting from the other. The way they reproduce and disperse can be rather bizarre and intricate, but I am not going to talk about any of that in this post.

As I said, lichen is fascinating, but it gets better. So much better, and that is what I want to talk about in this post.

Lichen glows in the dark but it isn't bioluminescent. 

If you turn out the lights lichen won't glow, they are dark just like everything else. Nothing to see here, move on, they are boring, go do something else. Put lichen under an ultraviolet light and it is an entirely different story.

Most lichens will fluoresce under ultra violet light, different types will be different colours and different intensities. Some are pretty uninteresting, they kind of glow a little. 

Others glow bright orange, or bright green, or any number of other incredible intense colours. Some lichens have one part that is one colour and other parts that glow another colour, others will have one part that glows and other parts that do not glow.
My photo didn't work, this was bright orange under UV light
 
Some types glow very bright under UV light and are incredible to see. These lichens tend to fluoresce under UV light alive or dead. This means you can plant out a terrarium with these more impressive lichens and even if the conditions are not to their liking and they all die they will still look unbelievable under a black light. 

The one on the right glows orange but didn't show in the photo

Another fun thing that can be done is to set up an enclosure for something else that glows under UV light, and include different lichens.

Scorpions fluoresce under UV light, they look amazing and I am unable to capture this in a photo. I would not leave a UV light on them the all the time as over time they lose some of their glow and they aren’t really fond of UV light. Putting the UV light on every now and again when you really want to show them off is fine.

If there are lichens that fluoresce bright yellow or orange or green, as well as a scorpion, the enclosure can take on a look that is impossible to describe but is a sight to behold. 

All scorpions have a sting, but none of the Australian scorpions are deadly to people. Some species are certainly grumpier than others, some are more laid back while others are very fast, and some species are far easier to raise than others, so not all are suitable for beginners.

Scorpions are a fascinating animal, they give birth to live young and the female carries the young on her back for some time. Another interesting thing is that adults and young of many species fluoresce different colours under ultra violet light. 

Scorpions shed their skin to grow. I have an exoskeleton from a baby scorpion I had that shed its skin in the year 1999 or 2000, this will still fluoresce when I shine a black light on it. I think that is absolutely remarkable after all this time. If I kept a black light on it all the time it would eventually grow dim and lose its glow, but still glowing after more than twenty years is just incredible.

Baby scorpion exoskeleton 

The same scorpion exoskeleton under UV light 


Thursday, 1 September 2022

Drosera burmannii

Drosera burmannii is a small annual sundew that is native to warmer parts of Australia.   

This species has snap tentacles, which are longer tentacles on the edge of the leaf which flick prey into the sticky tentacles further in the leaf.  These are meant to be the second fastest snap tentacles of any species, and they can move very fast.

Ever since I saw a picture of these I wanted to grow them.  I think they look really cute, plus I found the concept of snap tentacles to be alluring.  They produce a lot of seed and I am told they are so prolific at self seeding that they can become weeds in carnivorous plant collections.  

Tropical sundew flowering
Drosera burmannii sending up a flower stalk

One day I bought some seeds of Drosera burmannii.  Like all sundew seeds, they were tiny.  

I grew the seeds, the seedlings looked great.  Then winter came and the seedlings all died.  Apparently this species does not handle cold weather.  Not just frost, but low temperatures above freezing made them die.

The following spring some more seeds in the same pot germinated.  By this time I had planted some tiny venus flytrap offsets in that pot.

This time my plants flowered and produced seed.

Drosera burmannii and venus flytraps

The snap tentacles really can move fast.  They do not have dew, instead when triggered they flick up pretty fast and throw prey into the sticky tentacles.

I have a little trouble growing these.  If they get too hot they die, if they get too cold they die.  They are only annuals so if you wait long enough they die.  I have no idea if I could grown them from cuttings, but assume the cuttings would die from cold before maturing.

D burmanii mature plants

That being said, I really like Drosera burmanii.  They are small and cute, but not too small.  The leaves are nice and round, but not too round.    

Drosera burmannii size
D burmannii full size plant

Hopefully one day I work out how to grow these properly and I can have a lot more of them.  Until then I will do my best and hope that they set seed for the following year.

In summer I should have a few extra plants available for swap or sale.  I am not keen on posting these just yet, so would be limited to people who can pick up from the Canberra region.  If I do have any extra plants they will be listed on my for sale page.

Drosera burmanii and venus flytraps